

Personalize Management API
Run in SwaggerIntroduction
Overview
The Personalize Management API lets you manage all the resources (Attributes, Audiences, Events, and Experiences) in your Personalize project using REST API. This documentation provides information on endpoints, operations, parameters, and responses for the Contentstack Personalize Management API.
Base URL
For Personalize Management API
- AWS US (North America, or NA): https://personalize-api.contentstack.com
- AWS Europe (EU): https://eu-personalize-api.contentstack.com
- Azure North America (Azure NA): https://azure-na-personalize-api.contentstack.com
- Azure Europe (Azure EU): https://azure-eu-personalize-api.contentstack.com
- GCP North America (GCP NA): https://gcp-na-personalize-api.contentstack.com
- GCP Europe (GCP EU): https://gcp-eu-personalize-api.contentstack.com
- AWS Australia (AU): https://au-personalize-api.contentstack.com
Authentication
Contentstack provides you two ways to authenticate the API requests:
- Contentstack OAuth: Contentstack OAuth server generates access tokens (currently only User tokens), which client applications can employ to retrieve restricted data on behalf of the resource owner. Read more about how to generate a Contentstack OAuth token.
- Authtoken: A user-specific session token, used along with the stack API key, to make authorized Content Management requests. For more information please refer to this documentation.
The OAuth scopes available for Personalize Management API authorization are:
- personalize:manage: This scope lets you read, update and manage resources.
- personalize:read: This scope lets you only read and fetch the resources.
For Project UID and Authtoken-based authentication
- Pass the Project’s UID against the x-project-uid parameter as header.
- Pass the user Authtoken against the authtoken parameter as header.
For Project UID and OAuth Token-based authentication
- Pass the Project’s UID against the x-project-uid parameter as header for project-based APIs.
- Pass the OAuth Token value against the authorization parameter as header.
Authtokens vs OAuth Token
An Authtoken is a read-write token used to make authorized Contentstack Personalize Management API requests, and it is a user-specific token. This means that your personal user details are attached to every API request that you make using the authtoken. So, if a person were to obtain access to your authtoken, and knows the Project UID, this person would be able to make API requests that appeared to be coming from you.
Contentstack OAuth employs the OAuth 2.0 protocol, enabling external applications to access Contentstack APIs on behalf of users. It issues access tokens (currently only User tokens) to client applications, allowing them to retrieve restricted data from the Contentstack resource server without the need for the resource owner to share their credentials. Learn more about Contentstack OAuth and OAuth Scopes.
For Personalize Management API, we recommend using the Contentstack OAuth tokens.
Note: When trying out POST/PUT calls, in addition to the Project UID and Authtoken, you need to mandatorily pass Content-Type:application/json in the Header.
How to Get Project UID
To retrieve the project UID, perform the steps given below:
- Navigate to Personalize > your preferred project.
- Click the Settings icon in the left navigation panel.
- In the General tab, under Project Details, you will find the 24-character project UID.
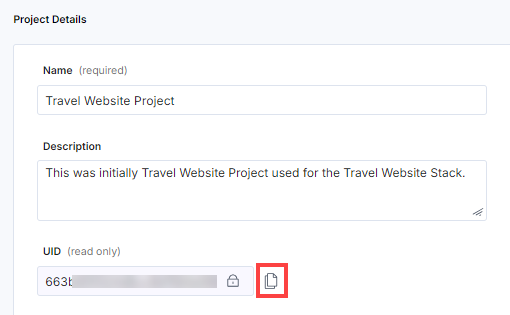
- Click the Copy icon to copy the project UID to your clipboard which will be used for the API calls.
How to Get Authtoken
To retrieve the authtoken, log in to your Contentstack account by using the "Log in to your account" request under "User Session". This request will return the authtoken in the response body.
You can generate multiple authtokens by executing the "Log in to your account" request multiple times. These tokens do not have an expiration time limit. However, currently, there is a maximum limit of 20 valid tokens that a user can use per account at a time, to execute Personalize Management API requests. If you already have valid 20 tokens, creating a new authtoken will automatically cause the oldest authtoken to expire without warning.
For SSO-enabled organizations, the "Log in to your account" request will not return the user authtoken for users who access the organization through Identity Provider login credentials. Consequently, any requests that require user authtoken will not work. Only the owner of the organization and users with permission to access the organization without SSO can use the Personalize Management APIs. Learn more about REST API Usage.
How to Get OAuth Tokens
To get the OAuth Token, perform the steps given within the Configuring Contentstack OAuth section after logging into your Contentstack account.
Note: Only the organization Owner and Admin users can create OAuth Tokens.
Rate Limiting
Rate limit is the maximum number of requests you can make using the Contentstack’s APIs in a given time period.
By default, the Personalize Management API enforces the following rate limits:
- Personalize Read (GET) and Manage (POST/PUT/PATCH) requests: 10 requests per second per organization.
Your application will receive the HTTP 429 response code if the requests for a given time period exceed the defined rate limits.
The aforementioned limits are configurable depending on your plan. For more information, contact our support team.
API Conventions
- Currently, the base URL for Personalize Management API is available for all the regions and can be found in the Base URL section.
- Personalize Management API supports GET/POST/PUT/DELETE verbs or methods.
- URL paths are written in lower case.
- Query parameters and JSON fields use camel casing.
- The success/failure status of an operation is determined by the HTTP status it returns. Additional information is included in the HTTP response body.
Errors
If there is something wrong with the API request, Contentstack returns an error.
Personalize uses conventional, standard HTTP status codes for errors, and returns a JSON body containing details about the error. In general, codes in the 2xx range signify success. The codes in the 4xx range indicate error, mainly due to information provided (for example, a required parameter or field was omitted). Lastly, codes in the 5xx range mean that there is something wrong with our servers; it is very rare though.
Let’s look at the error code and their meanings.
| HTTP status code | Description |
|---|---|
| 400 Bad Request | The request was incorrect or corrupted. |
| 401 Unauthorized User | The user is not authorized. |
| 403 Forbidden Error | The page or resource that is being accessed is forbidden. |
| 404 Not Found | The requested page or resource could not be found. |
| 500 Internal Server Error | The server is malfunctioning and is not specific on what the problem is. |
| 502 Bad Gateway Error | A server received an invalid response from another server. |
| 504 Gateway Timeout Error | A server did not receive a timely response from another server that it was accessing while attempting to load the web page or fill another request by the browser. |
Note: The error codes that we get in the JSON response are not HTTP error codes but are custom Contentstack error codes that are used for internal purposes.
Using OpenAPI Files
Contentstack provides the OpenAPI files of the Contentstack’s Personalize Management APIs that you can use to try out Contentstack APIs on any OpenAPI platform such as Swagger. You can download the OpenAPI JSON file of the Personalize Management API and open it on Swagger Editor to start using it.
To use Contentstack Personalize Management APIs with Swagger, perform the following steps:
- Download the JSON file from the above endpoints and go to Swagger Editor.
- On the Swagger Editor page, click File, and select the Import file option.
- To run any API request, enter either the OAuth token or Authtoken to authorize.
- Open any API request and click the Try it out button. Clicking this button will unlock the fields.
- Click Execute to run the API request.
API Reference
Attributes
Attributes are the individual data points or characteristics about a user that can be used to personalize content, recommendations, and experiences for that user. For example age, location, browsing history, purchases, campaign sources, and so on.
Create an Attribute
The Create an Attribute request lets you create a new attribute in a project.
To configure the permissions for your application via OAuth, include the personalize:manage scope.
Get all Attributes
The Get all Attributes request fetches the list of all the attributes in a project.
To configure the permissions for your application via OAuth, include the personalize:read or personalize:manage scope.
Update an Attribute
The Update an Attribute request lets you update an existing attribute in a project.
To configure the permissions for your application via OAuth, include the personalize:manage scope.
Delete an Attribute
The Delete an Attribute request lets you delete an existing attribute in a project.
To configure the permissions for your application via OAuth, include the personalize:manage scope.
Audiences
Audiences refer to a specific group of people who share certain characteristics, behaviors, or interests. These groups are identified based on various criteria such as demographics (age, gender, location), behavior (buying habits, website visits), interests (hobbies, favorite types of products), and more.
Create an Audience
The Create an Audience request lets you create a new audience in a project.
To configure the permissions for your application via OAuth, include the personalize:manage scope.
The examples below provide a detailed explanation on creating audiences with various parameters.
Create audience with Custom Attributes:
{
  "name": "Valuable US Visitors",
  "description": "US Visitors with an average order value greater than $1000",
  "definition": {
    "__type": "RuleCombination",
    "combinationType": "AND",
    "rules": [
      {
        "__type": "Rule",
        "attribute": {
          "__type": "PresetAttributeReference",
          "ref": "COUNTRY"
        },
        "attributeMatchCondition": "STRING_EQUALS",
        "attributeMatchOptions": {
          "__type": "StringMatchOptions",
          "value": "US"
        },
        "invertCondition": false
      },
      {
        "__type": "Rule",
        "attribute": {
          "__type": "CustomAttributeReference",
          "ref": "66702e03d84509d0106bec05"
        },
        "attributeMatchOptions": {
          "__type": "NumberMatchOptions",
          "value": 1000
        },
        "attributeMatchCondition": "NUMBER_GREATER_THAN",
        "invertCondition": false
      }
    ]
  }
}
This example creates an audience with Custom Attributes. We have two rules being matched here, the second one matching a custom attribute. The __type on the attribute allows you to specify whether the attribute is Custom or Preset.
Match Query Parameters:
{
  "name": "Black Friday Campaign",
  "description": "Visitors targeted with the Black Friday Campaign",
  "definition": {
    "__type": "RuleCombination",
    "combinationType": "AND",
    "rules": [
      {
        "__type": "Rule",
        "attribute": {
          "__type": "PresetAttributeReference",
          "ref": "QUERY_PARAMETERS"
        },
        "attributeMatchCondition": "JSON_MATCH",
        "attributeMatchOptions": {
          "__type": "JSONMatchOptions",
          "pointer": "/utm_campaign",
          "matchCondition": "STRING_EQUALS",
          "matchOptions": {
            "__type": "StringMatchOptions",
            "value": "BLACK_FRIDAY"
          },
          "invertCondition": false
        },
        "invertCondition": false
      }
    ]
  }
}
Query Parameters are a Preset Attribute. In this example, the query parameter utm_campaign is matched for a BLACK_FRIDAY value. The JSONMatchOptions type allow you to nest a matchOptions so that you can match specific values for the parameter.
Match Date and Time:
{
  "name": "Black Friday Campaign",
  "description": "Visitors targeted with the Black Friday Campaign",
  "definition": {
    "__type": "RuleCombination",
    "combinationType": "AND",
    "rules": [
      {
        "__type": "Rule",
        "attribute": {
          "__type": "PresetAttributeReference",
          "ref": "QUERY_PARAMETERS"
        },
        "attributeMatchOptions": {
          "__type": "JSONMatchOptions",
          "pointer": "/utm_campaign",
          "matchCondition": "STRING_EQUALS",
          "matchOptions": {
            "__type": "StringMatchOptions",
            "value": "BLACK_FRIDAY"
          },
          "invertCondition": false
        },
        "attributeMatchCondition": "JSON_MATCH",
        "invertCondition": false
      },
      {
        "__type": "Rule",
        "attribute": {
          "__type": "PresetAttributeReference",
          "ref": "DATE_AND_TIME"
        },
        "attributeMatchCondition": "BETWEEN_TIME",
        "attributeMatchOptions": {
          "__type": "DateTimeMatchOptions",
          "startTime": "2024-11-29T00:00:00",
          "endTime": "2024-11-29T23:59:59",
          "useVisitorTimezone": true
        },
        "invertCondition": false
      }
    ]
  }
}
Date and Time is a Preset Attribute. In this example, we extend the Black Friday Campaign audience to also match only on the day of Black Friday. useVisitorTimezone allows us to evaluate the conditions in the visitors timezone.
Get all Audiences
The Get all Audiences request fetches the list of all the audiences in a project.
To configure the permissions for your application via OAuth, include the personalize:read or personalize:manage scope.
Update an audience
The Update an Audience request lets you update an existing audience in a project.
To configure the permissions for your application via OAuth, include the personalize:manage scope.
For more detailed request body documentation, please refer to the Create an Audience request.
Delete an audience
The Delete an Audience request lets you delete an existing audience in a project.
To configure the permissions for your application via OAuth, include the personalize:manage scope.
Experiences
Experiences help you create different variations of content pages that cater to different sections of your audience. Experiences are also versioned, so that you can make draft changes on an active version of an experience. The following requests allow you to manage the Segmented and A/B Test Experiences within a project.
Create an Experience
The Create an Experience request lets you create a new experience in a project. An experience can be either of SEGMENTED or AB_TEST type. Creating an experience also creates an empty draft version for the configuration.
To configure the permissions for your application via OAuth, include the personalize:manage scope.
Create a Segmented Experience:
{
  "name": "Australian Users Experience",
  "description": "This is the experience for Australian users.",
  "__type": "SEGMENTED"
}
In this example, we create a Segmented Experience. The __type field is used to set the type of the experience. Note that the experience in the response has a latestVersion field pointing to the draft version configuration created along with the experience.
Get all Experiences
The Get all Experiences request fetches the list of all the experiences in a project.
To configure the permissions for your application via OAuth, include the personalize:read or personalize:manage scope.
Update an Experience
The Update an Experience request lets you update an existing experience in a project. Note that once an experience of a particular type has been created, the type cannot be changed with this request.
To configure the permissions for your application via OAuth, include the personalize:manage scope.
Get a Single Experience
The Get a Single Experience request fetches a specific experience created in your project.
To configure the permissions for your application via OAuth, include the personalize:read scope.
Delete an Experience
The Delete an Experience request lets you delete an existing experience in a project.
To configure the permissions for your application via OAuth, include the personalize:manage scope.
Create an Experience Version
The Create an Experience Version request lets you create a new version of an experience in a project.
Creating a new version allows you to modify the configuration of an existing active version. A version can be created with a DRAFT or ACTIVE status. A new version cannot be created if a DRAFT version already exists, in which case you can only modify the existing DRAFT version.
To configure the permissions for your application via OAuth, include the personalize:manage scope.
Create a Segmented Experience version:
{
  "status": "DRAFT",
  "variants": [
    {
      "__type": "SegmentedVariant",
      "name": "Australian Continent Visitors",
      "shortUid": "0",
      "audiences": [
        "388888800000000087654321",
        "399999900000000044444444"
      ],
      "audienceCombinationType": "OR"
    }
  ]
}
In this example, we create a new DRAFT version of our segmented experience. We want to target the entire Australian continent instead of just the country, and accordingly, we also target one more audience in the variant and change the audienceCombinationType. The short UID refers to the existing variant's short UID so that we can update it.
Create an active version:
{
  "status": "ACTIVE",
  "variants": [
    {
      "__type": "ABTestVariant",
      "name": "Control",
      "shortUid": "0",
      "trafficDistribution": 33.33
    },
    {
      "__type": "ABTestVariant",
      "name": "Purple",
      "shortUid": "1",
      "trafficDistribution": 33.33
    },
    {
      "__type": "ABTestVariant",
      "name": "Red",
      "trafficDistribution": 33.33
    }
  ],
  "variantSplit": "EQUALLY_SPLIT",
  "metrics": [
    {
      "__type": "Primary",
      "event": "244444400000000087654321",
      "name": "Click on CTA"
    }
  ],
  "targeting": {
    "audience": {
      "audiences": [
        "155555500000000012345678"
      ],
      "audienceCombinationType": "AND"
    }
  }
}
The example here is the same A/B test, however, instead of creating a DRAFT version, we're activating the version instantly. The changes in the version are instantly reflected and the existing version is ARCHIVED.
Get all Experience Versions
The Get all Experience Versions request fetches the list of all the versions for a given Experience.
The list of versions is sorted by the createdAt date.
To configure the permissions for your application via OAuth, include the personalize:read or personalize:manage scope.
Update an Experience Version
The Update an Experience Version request lets you update an existing version of an Experience. After creating an Experience initially, an empty draft version is already created, and you can update it to modify the configuration of the Experience. Once the configuration is ready, you can activate the version by updating the status to ACTIVE. Any existing active version's status will change to ARCHIVED. You can also PAUSE an active version with this request.
To configure the permissions for your application via OAuth, include the personalize:manage scope.
Update a Segmented Experience version:
{
  "status": "DRAFT",
  "variants": [
    {
      "__type": "SegmentedVariant",
      "name": "Australian Visitors",
      "audiences": [
        "388888800000000087654321"
      ],
      "audienceCombinationType": "AND"
    }
  ]
}
In this example, we update the configuration for the Segmented Experience created previously. We're creating a variant for the visitors from Australia, with the variant targeted to the Australian audience. Notice that the shortUid is skipped for the new variant as it will be generated on the server side.
Activate a version:
{
  "status": "ACTIVE",
  "variants": [
    {
      "__type": "ABTestVariant",
      "name": "Control",
      "trafficDistribution": 50
    },
    {
      "__type": "ABTestVariant",
      "name": "Purple",
      "trafficDistribution": 50
    }
  ],
  "variantSplit": "EQUALLY_SPLIT",
  "metrics": [
    {
      "__type": "Primary",
      "event": "244444400000000087654321",
      "name": "Click on CTA"
    }
  ]
}
Activating a version is done by updating the status to ACTIVE. Any existing active version will be ARCHIVED following the activation of a new version.
Pause a version:
{
  "status": "PAUSED",
  "variants": [
    {
      "__type": "ABTestVariant",
      "name": "Control",
      "trafficDistribution": 50
    },
    {
      "__type": "ABTestVariant",
      "name": "Purple",
      "trafficDistribution": 50
    }
  ],
  "variantSplit": "EQUALLY_SPLIT",
  "metrics": [
    {
      "__type": "Primary",
      "event": "244444400000000087654321",
      "name": "Click on CTA"
    }
  ]
}
Pausing a version is achieved by updating the status to PAUSED. Once paused, the experience does not match any variants and will return null in the Manifest API. You can also re-activate the version again by updating it with the ACTIVE status.
Delete an Experience Version
The Delete an Experience Version request lets you discard the draft version of an Experience. Attempting to delete an ACTIVE, PAUSED or ARCHIVED version will return an error.
To configure the permissions for your application via OAuth, include the personalize:manage scope.
Events
Events refer to specific actions or behaviors that users perform. These actions can then be tracked and analyzed to better understand user's preferences and tailor experiences accordingly. The following Events requests allow you to manage the defined events within a project.
Create an Event
The Create an Event request lets you create a new event in a project.
The key field is used to uniquely identify the event. You'll use it when triggering an event from the API or SDK.
To configure the permissions for your application via OAuth, include the personalize:manage scope.
Get all Events
The Get all Events request fetches the list of all the events in a project.
To configure the permissions for your application via OAuth, include the personalize:read or personalize:manage scope.
Update an Event
The Update an Event request lets you update an existing event in a project.
The key field is used to uniquely identify the event. You'll use it when triggering an event from the API or SDK.
To configure the permissions for your application via OAuth, include the personalize:manage scope.
Delete an Event
The Delete an Event request lets you delete an existing event in a project.
To configure the permissions for your application via OAuth, include the personalize:manage scope.
Experiences Priority
Experiences Priority helps you define the degree of importance for each experience in your project. If mulitple experiences customize the same section of your digital property, it needs to be decided which experience's personalized content is to be ultimately presented. The priority order can be used to make this decision. It contains the UIDs of each experience in the project, in decreasing order of priority. The following requests allow you to manage the priority order of the experiences within a project.
Get Experiences Priority
The Get Experiences Priority request retrieves the experience priority order for a given project. This contains every experience available within the project sorted in decreasing order of priority.
To configure the permissions for your application via OAuth, include the personalize:read or personalize:manage scope.
Update Experiences Priority
The Update Experiences Priority request lets you rearrange experiences in the priority order at any given time. For example, if you create a new experience that should have a higher priority than others, the priority order can be updated after creating the new experience.
To configure the permissions for your application via OAuth, include the personalize:manage scope.
Experience Analytics
Experience Analytics refers to the process of collecting, analyzing, and interpreting data about user interactions to understand and improve the Personalize experiences. Analytics is only available for activated experiences. The following requests allow you to fetch the analytics of the specific experiences performance within a project.
Get Analytics Summary
The Get Analytics Summary request fetches the analytics summary of a specific experience of a project. The summary gives you a count of impressions and conversions for a variant, along with its probability to be best in the given timeframe. The leading or winning variant information as determined by the analytics engine is also calculated and returned provided that sufficient data exists.
Please note that leading variant and conversion information is only available on A/B test experiences.
To configure the permissions for your application via OAuth, include the personalize:read or the personalize:manage scope.
Get Time-series Analytics
The Get Time-series Analytics request fetches the time-series analytics of a specific experience of a project. The response contains hourly impressions and conversions for the specified time-frame. The duration for each interval is specified in the ISO-8601 interval format.
To configure the permissions for your application via OAuth, include the personalize:read or personalize:manage scope.
Geolocation
Geolocation, in the context of personalization, is about using a user's geographic location to tailor the experience, making services or content more relevant to their specific physical location. Geolocation APIs in Personalize allow you to access the underlying dataset of Countries, Regions and Cities that you can target.
This product includes GeoLite2 data created by MaxMind, available from https://www.maxmind.com.
Get all Regions
The Get all Regions request fetches all the region-based information based on the provided search query. Regions are administrative divisions of a country, such as states or provinces, defined according to ISO 3166-2 (https://en.wikipedia.org/wiki/ISO_3166-2) standard. You can also filter the list by name and region codes.
To configure the permissions for your application via OAuth, include the personalize:read or personalize:manage scope.
Get all Countries
The Get all Countries request fetches all the country-based information based on the provided search query. The country list is based on the current ISO 3166-1 (https://en.wikipedia.org/wiki/ISO_3166-1) standard.
To configure the permissions for your application via OAuth, include the personalize:read or personalize:manage scope.
Get all Cities
The Get all Cities request fetches all the city-based information based on the provided search query. You can also filter the list by name and city codes.
To configure the permissions for your application via OAuth, include the personalize:read or personalize:manage scope.
