What is Terraform and How to Use It with S3

With Infrastructure as Code (IaC), developers can automate an entire data center using programming scripts. It is a method of building, managing, and provisioning IT infrastructures combining both physical and virtual machines. IaC has multiple benefits; who would not want to use code to create and provision IT infrastructure rather than do it through a grueling manual process?
IaC does suffer from a few significant hurdles:
- One has to learn the code
- The change impact is often undetermined
- Changes are untrackable
- It cannot automate a resource
A simple solution to these challenges is Terraform.
That brings us to one of the most trending questions in the tech industry today.
What Is Terraform?
Developed by HashiCorp, Terraform is a popular open-source IaC tool. Developers use it to create, define, and provision infrastructures using easy-to-follow declarative languages.
Using Terraform, you can set up a cloud infrastructure as codes. It is similar to CloudFormation used to automate AWS, with the only difference being Terraform can be used in combination with other cloud platforms.
How Does Terraform Operate?
For a complete understanding of Terraform, it’s beneficial to know how its life cycle operates and its four primary stages.
Init - Plan- Apply- Destroy
Init: In this stage, Terraform initializes the dictionary, which contains all the configuration files. Terraform downloads the required provider’s configuration in the current working directory.
Plan: Once a developer creates a desired state of infrastructure, creating an execution plan helps to reach that state. Changes made in the existing configuration files achieve that state.
Apply: As the name suggests, the Apply stage executes the plans developed in the planning stage. By the end of this stage, the infrastructure’s state mirrors the desired one.
Destroy: This stage lets you delete old infrastructure files and resources rendered inapplicable in the Apply phase.
After making the changes, your desired infrastructure is ready. All you have to do is store your codes.
Storing code is where Terraform’s remote state comes into play.
Terraform Remote State
Terraform state is simply a screengrab of the infrastructure from when you last ran the Apply command. You might have done it on your S3 bucket, DNS record, or even the Github repository.
It’s simply a JSON file that includes the details of each configuration characteristic since you last applied the Terraform scripts. Virtually, these states are essential as it is through these that Terraform determines what’s new and what’s redundant.
As a rule of thumb, Terraform stores the states locally, which works as long as there are not many developers working on it. As soon as more than two developers work on it, the simple magic of Terraform gets complicated. Besides, each user will require the latest state to take the work further, and when one is using the Terraform, others will not be able to run it.
Terraform’s remote state presents a simple solution.
Using backends informs Terraform to move snapshots of the infrastructure from the terraform.tfstate file on the local filesystem to a remote location, such as on S3 buckets, Azure Blob Storage, Alibaba Cloud OSS, or something else.
Cloud engineers dread the idea of losing Terraform state files, a problem cleverly avoided by using Terraform’s remote state. The following explains other benefits that make the Terraform remote state popular.
Benefits of Terraform Remote State
A centralized repository: This is one of the primary benefits of Terraform’s remote state, a centralized location of facts. A single source of truth becomes crucial if a team is working on a specific project and using more than one machine. After issuing the Terraform apply command, the state of the infrastructure following each change is uploaded to the backend. That way, any person or machine wanting to make further changes will be aware of the changes already made, thereby not removing or undoing them.
You can check out a few Terraform remote state examples to get a better understanding of the process.
An extra durability wall: When you store remotely, you can take durability a notch up. In simpler words, Terraform remote state makes it a lot harder to delete any .tfstate file stored remotely accidentally.
State locking: In case multiple engineers are working on a single environment using a terraform code, the remote state is locked if any changes are being made to the infrastructure by any engineer. This feature further prevents data corruption that might occur if two engineers are applying different changes simultaneously. Terraform keeps other tasks on hold until applying all changes.
Intermodule referencing: Storing state files remotely helps when retrieving resource details created outside the current module.
Example:
The AWS Security group module requires an association with a VPC ID. In a scenario where VPC and Security groups are written separately, the state file of the VPC module is fetched in the security groups’ code.

To store the VPC module’s state file in an AWS S3 bucket, you use a remote backend configuration like this:
terraform {
  backend "s3" {
    bucket         = "s3_bucket_name_to_store_state_file"
    key            = "vpc/terraform.tfstate"
    region         = "aws_s3_bucket_region"
    }
}
The VPC ID needs to be exported as output to be referred by other modules like this:
output "vpc_id" {
  value = aws_vpc.vpc.id
}
In the Security group module, VPC ID stored in terraform state file needs to be fetched with a data resource as shown below:
Data resource:
data "terraform_remote_state" "vpc" {
  backend = "s3"
  config = {
    bucket = "s3_bucket_name_for_state_file"
    key    = "vpc/terraform.tfstate"
    region = "aws_s3_bucket_region"
  }
}
The above data resource fetches the VPC state file. Here the output file plays a key role while reading the values from the backend. To get VPC ID from the output of the VPC module, we can use the following:
data.terraform_remote_state.vpc.outputs.vpc_id
Terraform Workspace
Once you know what Terraform is and have worked with Terraform workflow using the init, plan, apply, and destroy stages, you already have a working knowledge of Terraform workspace as its a default feature.
Terraform workspace allows you to create a diverse independent state using the same configuration. Moreover, since these are compatible with the remote backend, all teams share the workspaces.
An associated backend is assigned to each Terraform configuration highlighting the operation progress and the specific location of a given Terraform state.
This persistent data that is stored in the backend belongs to the workspace. Though initially there is only one “default” workspace, specific backends support multiple workspaces using a single configuration. The default workspace, however, cannot be deleted.
The list contains S3, Manta, AzureRM, Local, and Postgres, among a few others.
Of course, there are multiple advantages of using Terraform workspace, two of which are:
- Chances of improved features coming up
- Reduced code usage
One of the primary advantages of Terraform workspace is the simplicity it brings to the entire coding process, as seen in the following use case.
Example:
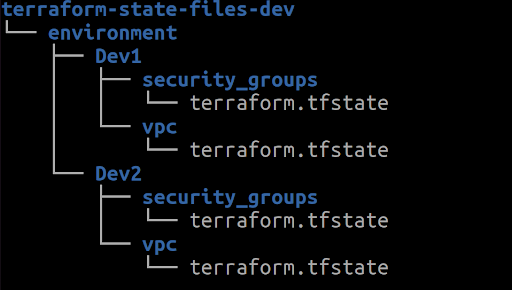
Two or more development servers require similar Terraform codes in the initial development phase. However, Terraform anticipates further infrastructure changes. Now let’s consider storing the backend files to AWS S3 and add them in the following manner:

In this scenario, the Terraform workspace is effective. But before applying the Terraform code, it’s advisable to create workspaces, for instance, Dev1 and Dev2, using the following command:
terraform workspace new Dev1 && terraform workspace new Dev2
Note: Environment is workspace_key_prefix in the above use case.
terraform {
  backend "s3" {
    bucket         = "s3_bucket_name_to_store_state_file"
    workspace_key_prefix = "environment"
            key            = "vpc/terraform.tfstate"
    region         = "aws_s3_bucket_region"
    }
}
S3 and Terraform, and Deployment with Jenkins
While other storage facilities are compatible with Terraform, S3 is considered the safest for the following reasons.
Simple usage: The S3 bucket is straightforward to use. It’s a unique platform designed to simplify functions as much as possible. It also features mobile and web app management consoles. Besides, developers can use APIs to integrate S3 with other technologies. Overall, it’s cost-effective and transfers data to third-party networks.
Enhanced security: Not only does S3 allow data transfer on SSL, but it also enables automatic data encryption upon uploading. You can also use it to configure policies that grant permission to objects. Initiating the AWS identity, S3 makes way for controlled access to crucial information.
It’s possible to monitor who is accessing the data, location, and devices used. S3 also features VPC endpoints which makes way for secured connection creation.
Reliability and durability: S3 offers a robust infrastructure for storing essential data. Additionally, it provides 98.99% durability of objects. Since S3 stores data across multiple devices, it improves data accessibility. Being available in different regions, S3 allows geographical redundancy per region.
Integration: It’s simple to integrate S3 with other services available on AWS. It can be embedded with other security platforms like KNS or IAM and even with computing platforms like Lambda.
For these reasons and more, the S3 bucket is quite popular among developers using Terraform. However, the deployment of S3 with Jenkins gets tricky.
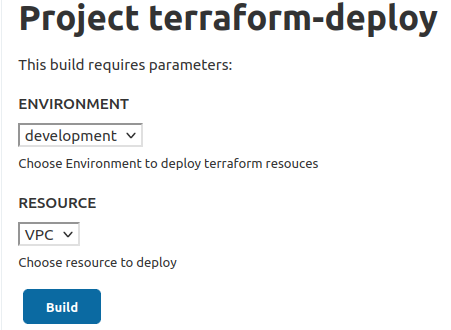
At Contentstack, we use Jenkins for Terraform code deployment. We include two bash scripts to run the codes, requiring two inputs, i.e., environment and resource names.

The following tasks are required to execute a bash script using Jenkins:
- Download the code from GitHub. You can opt for a simple git clone too
- Validate the Terraform syntax: terraform validate
- Copy the configuration of the specific environment: tfvars file from the S3 bucket
- Terraform Plan stage: Execute the plan command and get the outputs displayed in the Jenkins console
- Terraform Apply stage: Launches the resources
Note: At Contentstack, we use separate Jenkins jobs for the Terraform Apply command in the test environments.
Contentstack and Terraform
At Contentstack, we use Terraform for two purposes: infrastructure management and disaster recovery. The following sections share examples of how Contentstack uses Terraform for infrastructure management and disaster recovery.
Infrastructure Management Using Terraform
Opting for traditional click-ops can take days to deploy or even months; besides, there is no guarantee that they will be error-free. However, with Terraform, complete deployment and migration happen in a matter of minutes. Thus, Contentstack is currently using Terraforms to migrate all its services from EC2 to dockers, specifically Kubernetes.
Contentstack currently runs on hybrid infrastructure, combining EC2 and dockers. All the code is written using Terraform to ensure zero human error and repetition. We chose Kubernetes for managing the infrastructure, and the infrastructure was launched using AWS. You can use code from AWS resources like EC2, EKS, SNS, S3, SQS, WAF, and load balancers.
While the migration is still in progress, the existing Terraform templates ensure effective disaster recovery.
Disaster Recovery
Terraform allows Contentstack to be flexible and dynamic from the disaster recovery perspective. The cloud infrastructure enables us to set the infrastructure on demand which is easier to do using Terraform.
We provide an RTO (Recovery Time Objective) of 12-15 hours, i.e., we can launch and restore the complete infrastructure within a 15-hour timeline, which, if done manually, will take days altogether.
In the worst-case scenario, if AWS goes down regionally, Contentstack can restore data in a short time, thanks to Terraform.
The Recovery Point Objective or RPO provided is till the last minute preventing any form of data loss.
For a closer look, view our source code.
Hacker’s Corner!
Terraform hack:
Selecting a single resource from the Jenkins choice box is not feasible in a scenario where you want to launch multiple resources. In this case, using a loop for launching multiple resources rather than selecting one resource at a time is time-saving.
Example:
- ENVIRONMENT=$1 //Input from Jenkins parameter
- Jenkins Shell command: For RESOURCES in vpc sg ec2 sns sqs eks; do bash terraform-deploy.sh $ENVIRONMENT $RESOURCES; done
Summary
From improving multi-cloud infrastructure deployment to automating infrastructure management, Terraform is a powerful tool. This infrastructure as code software tool is why more and more developers are using it to help manage their infrastructures. Terraform is indeed the future as it helps enterprises improve and automate their DevOps methodologies.
About Contentstack
The Contentstack team comprises highly skilled professionals specializing in product marketing, customer acquisition and retention, and digital marketing strategy. With extensive experience holding senior positions at renowned technology companies across Fortune 500, mid-size, and start-up sectors, our team offers impactful solutions based on diverse backgrounds and extensive industry knowledge.
Contentstack is on a mission to deliver the world’s best digital experiences through a fusion of cutting-edge content management, customer data, personalization, and AI technology. Iconic brands, such as AirFrance KLM, ASICS, Burberry, Mattel, Mitsubishi, and Walmart, depend on the platform to rise above the noise in today's crowded digital markets and gain their competitive edge.
In January 2025, Contentstack proudly secured its first-ever position as a Visionary in the 2025 Gartner® Magic Quadrant™ for Digital Experience Platforms (DXP). Further solidifying its prominent standing, Contentstack was recognized as a Leader in the Forrester Research, Inc. March 2025 report, “The Forrester Wave™: Content Management Systems (CMS), Q1 2025.” Contentstack was the only pure headless provider named as a Leader in the report, which evaluated 13 top CMS providers on 19 criteria for current offering and strategy.
Follow Contentstack on LinkedIn.


.svg?format=pjpg&auto=webp)
.svg?format=pjpg&auto=webp)
.png?format=pjpg&auto=webp)


.png?format=pjpg&auto=webp)


