
.svg?format=pjpg&auto=webp)
.svg?format=pjpg&auto=webp)
.png?format=pjpg&auto=webp)


.png?format=pjpg&auto=webp)
Wordbee App Installation Guide
Wordbee is a translation management system (TMS) designed to help organizations manage content translation and localization. With features such as translation workflow management, collaboration tools for translators, and integration with machine translation engines, it lets organizations reach international audiences effortlessly.
With the Contentstack Marketplace Wordbee app, you can easily translate your entries into multiple languages and provide localized versions within your Contentstack entries. You can translate entries using the Wordbee Full Page app and Sidebar Widget and view the translation status.
Prerequisites
- Wordbee (Beebox) account
- Contentstack account
- Access to the Contentstack Organization/Stack as the Owner/Admin
Let's follow this step-by-step guide to install and configure the Wordbee app within your stack.
Steps for Execution
- Retrieve Configuration Details from Wordbee
- Install and Configure the Wordbee app in Contentstack Marketplace
- Use the Wordbee app within your Stack
-
Retrieve Configuration Details from Wordbee
Note: This guide assumes you have an active Wordbee account. If not, please create a trial account to try the steps mentioned here. Alternatively, you can purchase a Wordbee subscription.
Once you have set up your account, you will receive an email with your login details and a URL. Follow the instructions in the email to complete the account setup process.To get your configuration details for Wordbee, follow the steps given below:
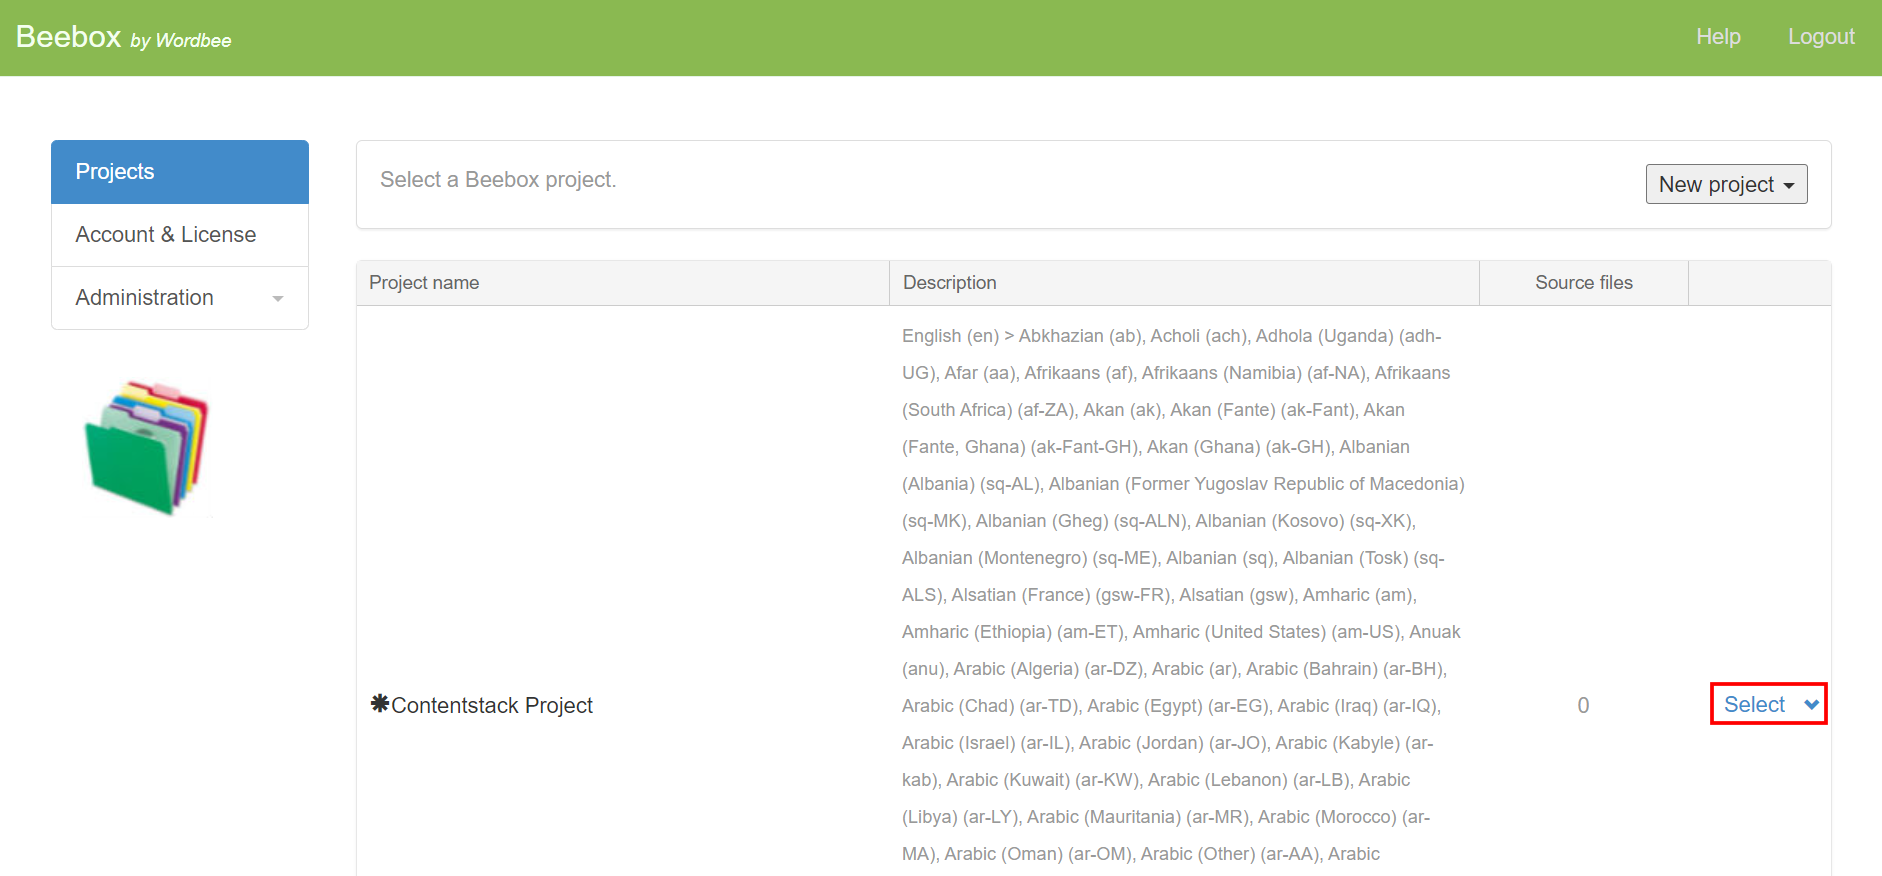
- Log in to the Wordbee (Beebox) account using your Wordbee account credentials.
- On the Wordbee (Beebox) dashboard, choose your project and click Select.
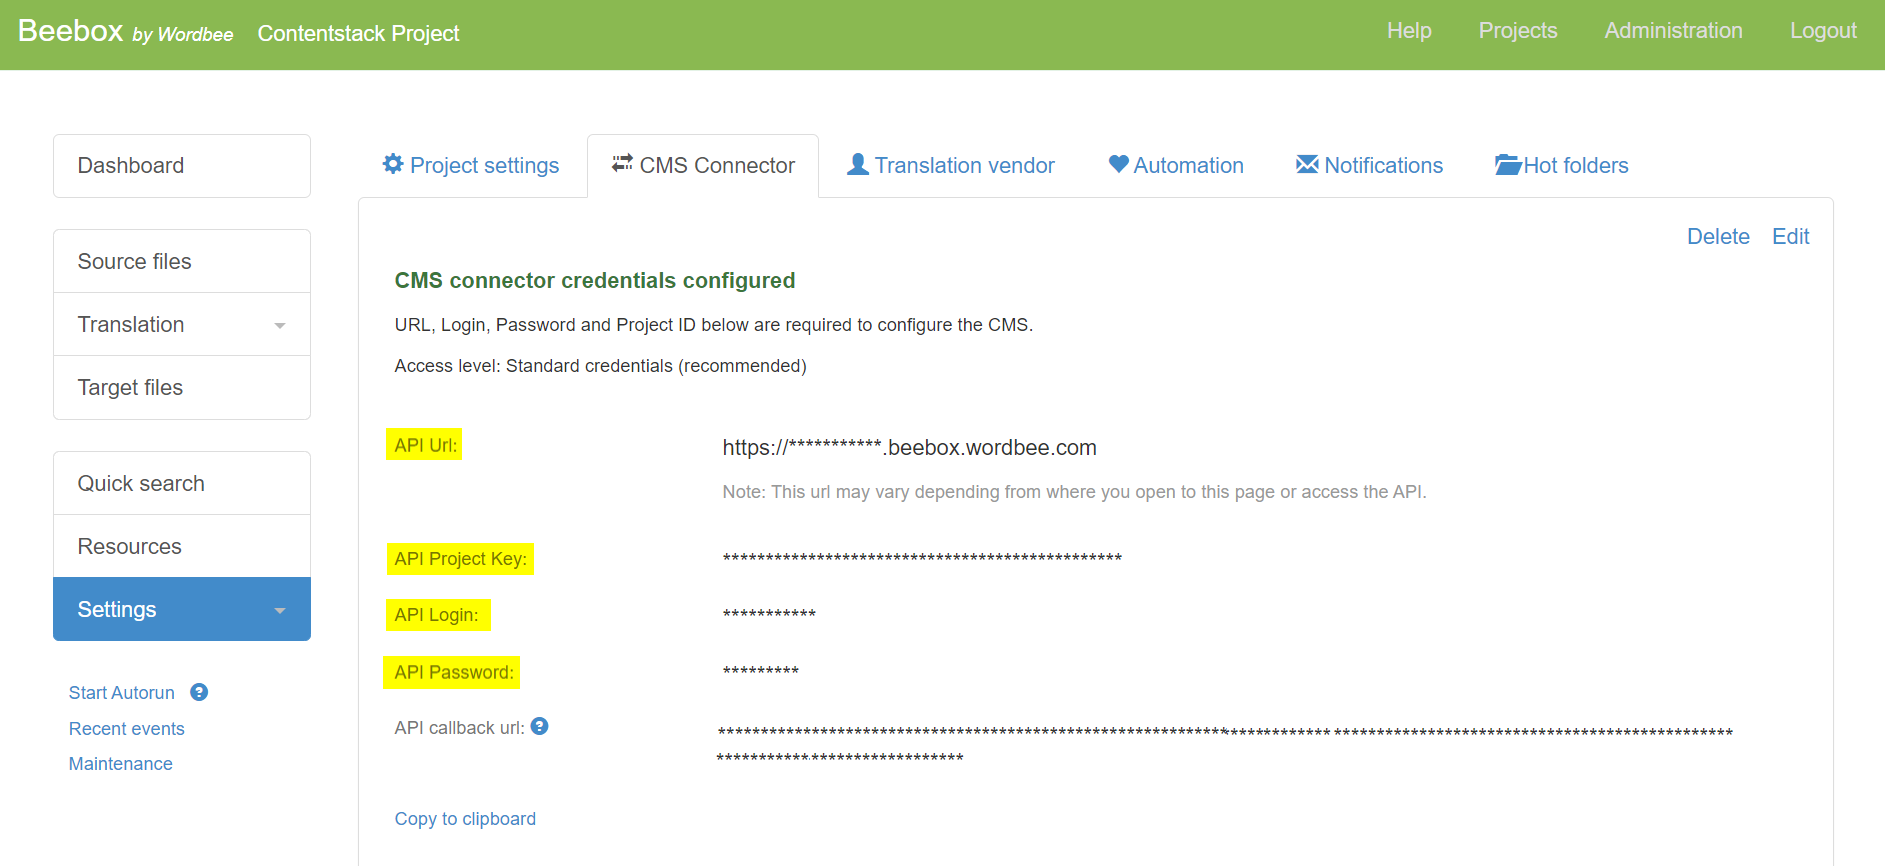
- Go to Settings from the left navigation panel and click the CMS Connector tab to get the API Url, API Project Key, API Login, and API Password of your project.
- To get the API Callback URL, add your Stack API Key to the following link:
https://wordbee.contentstackmarket.com/api/prod-marketplace-wordbee-consumer-api?api_key=<Your Stack API Key> - Copy and paste the information to your clipboard. We will need these details while configuring the Wordbee app in Step 2.
- In Project settings, verify if the Rule name under Text extraction rules is JSON.
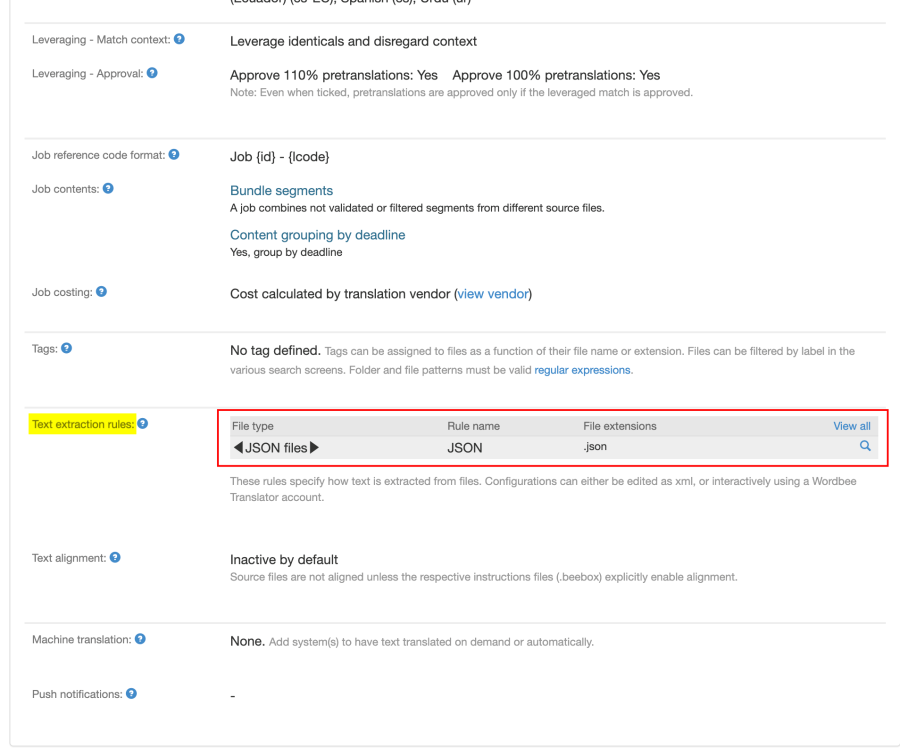 When the Rule name is not JSON, then click the View all button and copy the following rule:
<?xml version="1.0" encoding="utf-8"?>
<ParserConfigurations xmlns="http://www.wordbee.com/config">

    <ParserConfiguration xmlns="http://www.wordbee.com/config">
      <Name>JSON</Name>
      <Description>For translation of all JSON node values.</Description>
      <ParserDomain>JSON</ParserDomain>
      <EParser>34</EParser>
      <Implementation>v2</Implementation>
      <SegmentationMode>SRX</SegmentationMode>
      <SegmentationParameters>{}</SegmentationParameters>
      <SegmentationSplitAtNewlines>false</SegmentationSplitAtNewlines>
      <SegmentationSplitAtInlineTags>true</SegmentationSplitAtInlineTags>
      <SegmentationTrimWhitespaces>true</SegmentationTrimWhitespaces>
      <SegmentationTrimMarkup>false</SegmentationTrimMarkup>
      <SegmentationRulesEnabled>true</SegmentationRulesEnabled>
      <VersionPretranslation>CompareTexts</VersionPretranslation>
      <SubConfigurations>
        <SubConfiguration Key="HTML">
          <ParserConfiguration>
            <Name>Default</Name>
            <Description>
  </Description>
          <ParserDomain>HTML</ParserDomain>
          <EParser>1</EParser>
          <Implementation />
          <SegmentationMode>SRX</SegmentationMode>
          <SegmentationParameters>{}</SegmentationParameters>
          <SegmentationSplitAtNewlines>false</SegmentationSplitAtNewlines>
          <SegmentationSplitAtInlineTags>true</SegmentationSplitAtInlineTags>
          <SegmentationTrimWhitespaces>true</SegmentationTrimWhitespaces>
          <SegmentationTrimMarkup>false</SegmentationTrimMarkup>
          <SegmentationRulesEnabled>true</SegmentationRulesEnabled>
          <VersionPretranslation>CompareTexts</VersionPretranslation>
          <CompactingOption xmlns="">0</CompactingOption>
          <ModulesVersion />
          <QA />
          <TrimAsianSpacesOnBuild>false</TrimAsianSpacesOnBuild>
          <AppendSpacesOnBuild>false</AppendSpacesOnBuild>
          <HtmlConfiguration xmlns="http://www.wordbee.com/config/html">
            <IncludeSpaces>false</IncludeSpaces>
            <CompressSpaces>true</CompressSpaces>
            <ConvertEntities>AllToCharacter</ConvertEntities>
            <CompressNbsp>false</CompressNbsp>
            <KeepInlineTags>false</KeepInlineTags>
            <AttCompressSpaces>false</AttCompressSpaces>
            <AttIncludeSpaces>false</AttIncludeSpaces>
            <AttConvertEntities>AllToCharacter</AttConvertEntities>
            <UseEntitiesForBadCharsInTarget>True</UseEntitiesForBadCharsInTarget>
            <WebEncoding>utf-8</WebEncoding>
            <DoNotSegment>false</DoNotSegment>
            <ExcludeNoLetterDigit>false</ExcludeNoLetterDigit>
            <ParseShortCodes>false</ParseShortCodes>
            <TextPatterns />
            <Code>
              <CodeTags>
                <Tag>script</Tag>
                <Tag>style</Tag>
              </CodeTags>
              <IncludeSpaces>false</IncludeSpaces>
              <CompressSpaces>false</CompressSpaces>
              <ActiveParserVersion>750</ActiveParserVersion>
              <FreeTextPatterns />
              <QuotedTextPatterns DefaultTrans="true" />
              <EnableNoTrans>True</EnableNoTrans>
            </Code>
            <InlineTags>
              <Tag>a</Tag>
              <Tag>acronym</Tag>
              <Tag>b</Tag>
              <Tag>big</Tag>
              <Tag>blink</Tag>
              <Tag>br</Tag>
              <Tag>cite</Tag>
              <Tag>code</Tag>
              <Tag>dfn</Tag>
              <Tag>em</Tag>
              <Tag>font</Tag>
              <Tag>i</Tag>
              <Tag>iframe</Tag>
              <Tag>img</Tag>
              <Tag>kbd</Tag>
              <Tag>s</Tag>
              <Tag>small</Tag>
              <Tag>span</Tag>
              <Tag>strike</Tag>
              <Tag>strong</Tag>
              <Tag>small</Tag>
              <Tag>sub</Tag>
              <Tag>sup</Tag>
              <Tag>tt</Tag>
              <Tag>u</Tag>
              <Tag>var</Tag>
              <Tag>ruby</Tag>
              <Tag>rt</Tag>
              <Tag>rc</Tag>
              <Tag>rp</Tag>
              <Tag>rbc</Tag>
              <Tag>rtc</Tag>
              <Tag>asp:label</Tag>
            </InlineTags>
            <Attributes>
              <Attribute Translatable="true" Visibility="Dynamic">
                <Attribute Pattern="alt" IsRegex="false" />
              </Attribute>
              <Attribute Translatable="true" Visibility="Dynamic">
                <Attribute Pattern="title" IsRegex="false" />
              </Attribute>
              <Attribute Translatable="true" Visibility="Dynamic">
                <Attribute Pattern="placeholder" IsRegex="false" />
              </Attribute>
              <Attribute Translatable="true" Visibility="Dynamic">
                <Attribute Pattern="tooltip" IsRegex="false" />
              </Attribute>
              <Attribute Translatable="true" Visibility="NotVisible">
                <Attribute Pattern="content" IsRegex="false" />
                <Tag Pattern="meta" IsRegex="false" />
                <Conditions>
                  <Condition>
                    <Attribute Pattern="name" IsRegex="false" />
                    <Value Pattern="keywords" IsRegex="false" />
                  </Condition>
                  <Condition>
                    <Attribute Pattern="name" IsRegex="false" />
                    <Value Pattern="description" IsRegex="false" />
                  </Condition>
                </Conditions>
              </Attribute>
              <Attribute Translatable="true" Visibility="Visible">
                <Attribute Pattern="text" IsRegex="false" />
                <Tag Pattern="asp:*" IsRegex="true" />
              </Attribute>
              <Attribute Translatable="true" Visibility="Visible">
                <Attribute Pattern="value" IsRegex="false" />
                <Tag Pattern="input" IsRegex="false" />
                <Conditions>
                  <Condition>
                    <Attribute Pattern="type" IsRegex="false" />
                    <Value Pattern="text" IsRegex="false" />
                  </Condition>
                  <Condition>
                    <Attribute Pattern="type" IsRegex="false" />
                    <Value Pattern="button" IsRegex="false" />
                  </Condition>
                  <Condition>
                    <Attribute Pattern="type" IsRegex="false" />
                    <Value Pattern="email" IsRegex="false" />
                  </Condition>
                  <Condition>
                    <Attribute Pattern="type" IsRegex="false" />
                    <Value Pattern="search" IsRegex="false" />
                  </Condition>
                  <Condition>
                    <Attribute Pattern="type" IsRegex="false" />
                    <Value Pattern="submit" IsRegex="false" />
                  </Condition>
                </Conditions>
              </Attribute>
              <Attribute Translatable="true" Visibility="Visible">
                <Attribute Pattern="text" IsRegex="false" />
                <Tag Pattern="asp:.*" IsRegex="true" />
              </Attribute>
            </Attributes>
            <PreTags>
              <Tag>pre</Tag>
              <Tag>script</Tag>
              <Tag>style</Tag>
            </PreTags>
            <PseudoEndTags>
              <Tag>head</Tag>
              <Tag>body</Tag>
              <Tag>table</Tag>
              <Tag>p</Tag>
            </PseudoEndTags>
            <NoTemplateForReconstruction>false</NoTemplateForReconstruction>
            <ActiveParserVersion>0</ActiveParserVersion>
          </HtmlConfiguration>
        </ParserConfiguration>
      </SubConfiguration>
    </SubConfigurations>
    <CompactingOption xmlns="">0</CompactingOption>
    <ModulesVersion>
      <item key="HtmlWrapper" value="1" xmlns="" />
    </ModulesVersion>
    <QA>
      <ExcludeByLanguage>
        <AcceptanceRate>0</AcceptanceRate>
        <Enabled>false</Enabled>
        <AllowedLocales>
</AllowedLocales>
    </ExcludeByLanguage>
  </QA>
  <TrimAsianSpacesOnBuild>false</TrimAsianSpacesOnBuild>
  <AppendSpacesOnBuild>false</AppendSpacesOnBuild>
  <JsonConfiguration xmlns="http://www.wordbee.com/config/json">
    <TrimWhitespaces>true</TrimWhitespaces>
    <ExcludeNoLetterDigit>false</ExcludeNoLetterDigit>
    <IndentJson>true</IndentJson>
    <IsMultilingual>false</IsMultilingual>
    <FileEncoding />
    <NodeSelectors>[{"path":"..*","includeChildren":false,"filterChildren":null,"ishtml":false,"ishtmlEncoded":false,"mappings":{"locales":[],"mapLocaleByDefault":true},"key":null,"min":null,"max":null,"cfs":null}]</NodeSelectors>
    <NodeLanguageMappings>{"locales":[],"mapLocaleByDefault":true}</NodeLanguageMappings>
    <TextPatterns />
  </JsonConfiguration>
</ParserConfiguration>
</ParserConfigurations>
-
Install and Configure the Wordbee app in Contentstack Marketplace
To install the app in your stack, log in to your Contentstack account and follow the steps below:
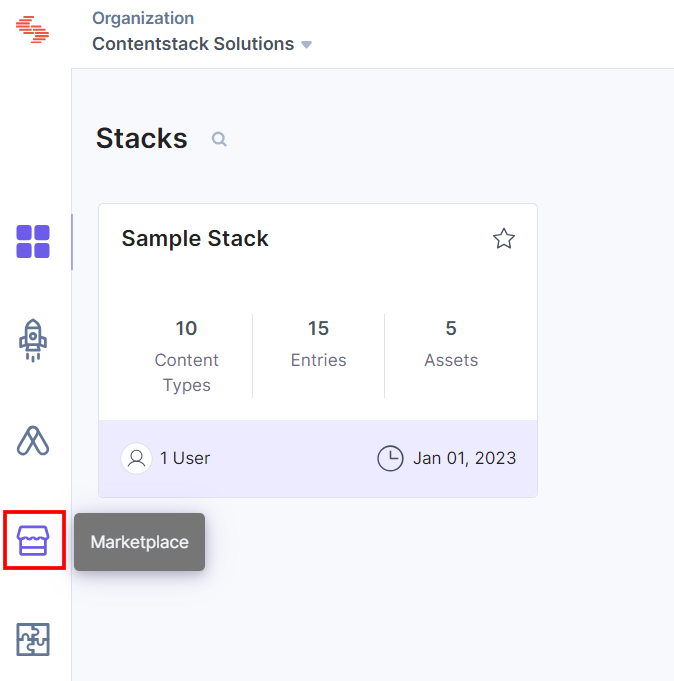
- From the left-hand side primary navigation, click the Marketplace icon.
- Click Apps from the left panel.
- Within the Marketplace, you can see all available apps. Hover over the Wordbee app and click Install.

- In the pop-up window, select the stack where you want to install the Wordbee app, scroll-down, accept the Terms of Service, and click the Authorize & Install button.

- On the Configuration screen, enter the following details:
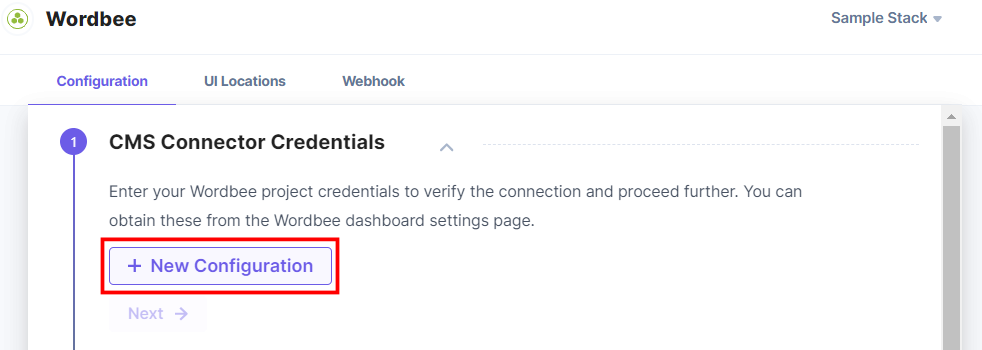
- CMS Connector Credentials:
- Click the + New Configuration button to add new configuration details.
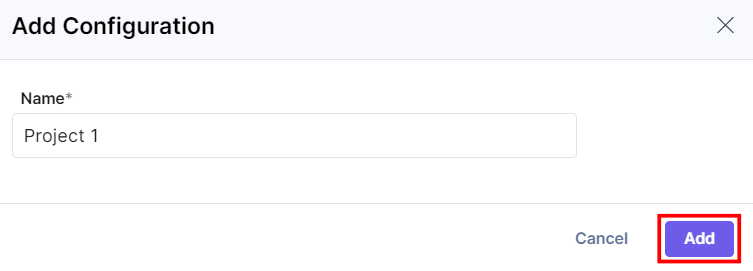
- In the Add Configuration modal, enter the configuration Name and click Add.
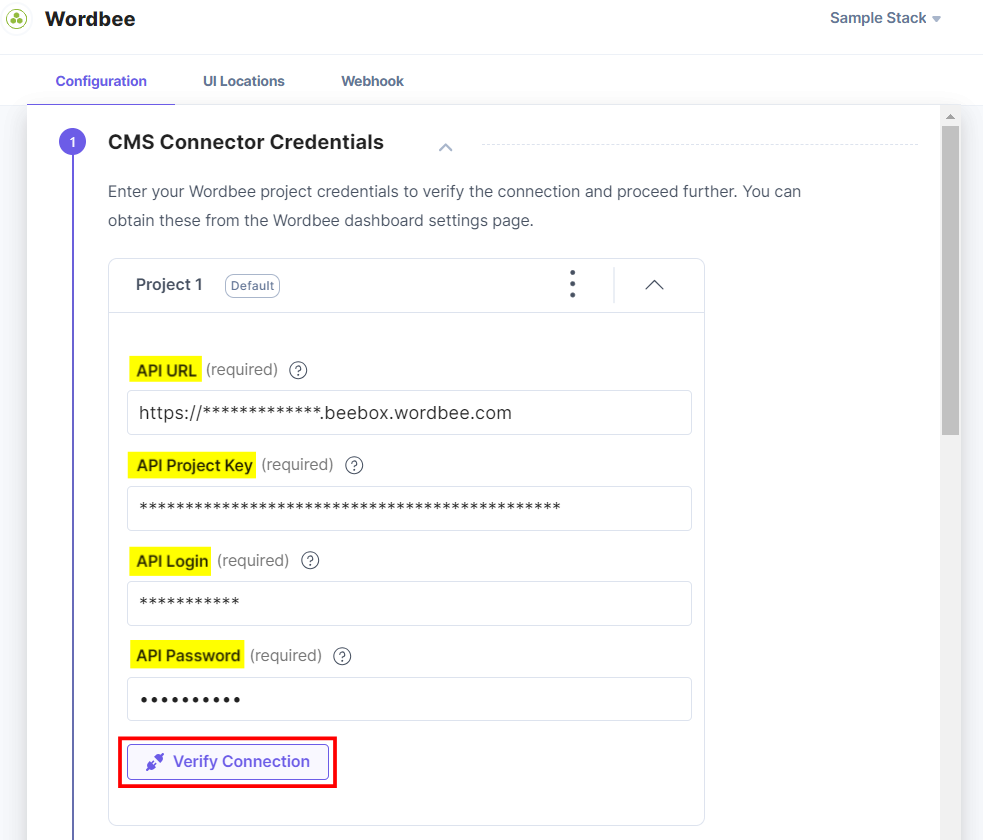
- After adding the configuration, enter the following details:
- Enter the API URL, API Project Key, API Login, and API Password of your Wordbee account retrieved in Step 1.
- Click the Verify Connection button to authorize the access.
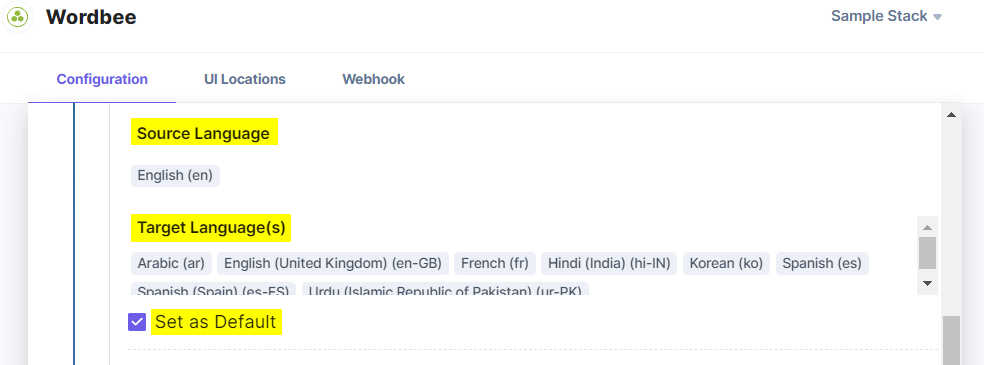
- After verifying the connection, you can see the Wordbee Project Source Language and Target Language(s).
- Set As Default: To set this configuration as the default, click this checkbox.
Alternatively, you can set a configuration as the default by clicking three dots on the top-right side of the configuration section and then selecting Set As Default.
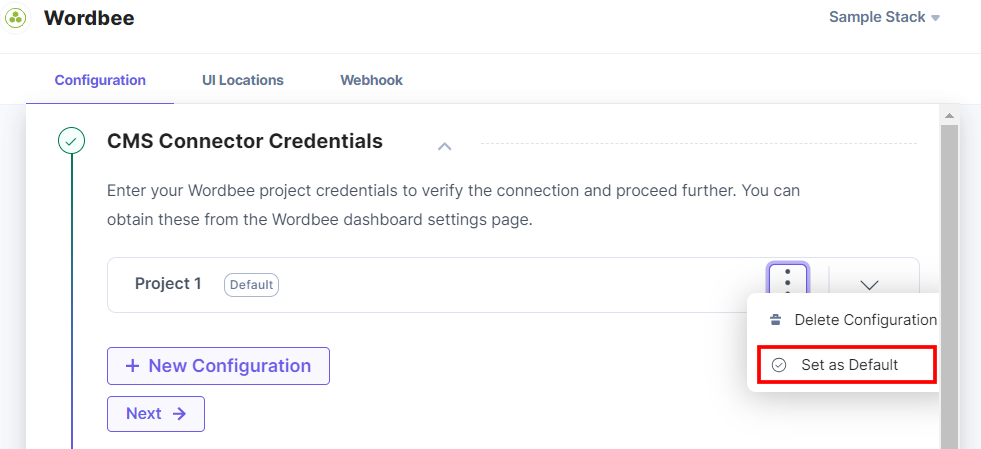
Note: At least one project configuration should be selected as the default.
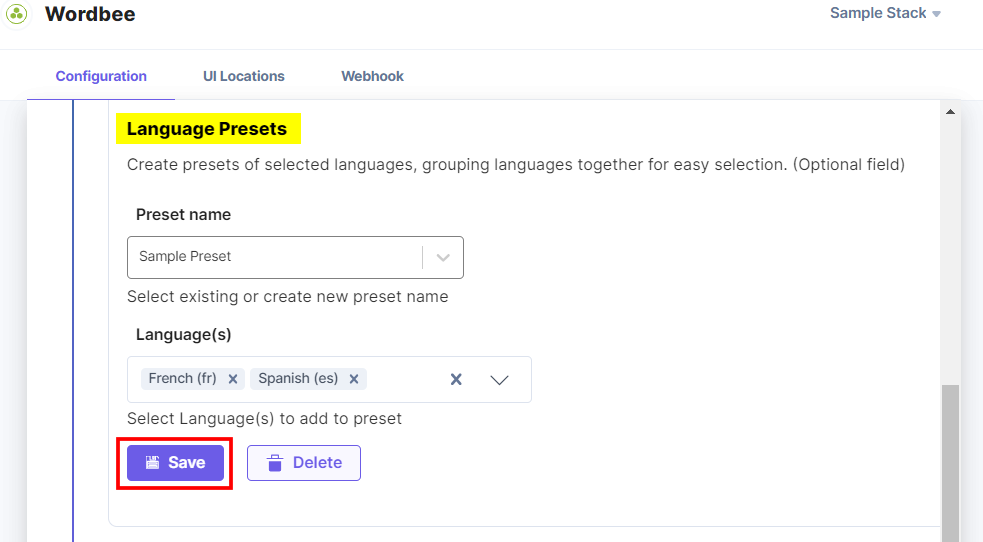
- Language Presets: Language Presets are pre-configured sets of languages used for creating and managing multilingual content in a content management system.
Select the existing Preset Name or Create the new preset, add the Language(s), and click Save to save the language configurations.
Similarly, you can add multiple configurations by following the steps discussed above.
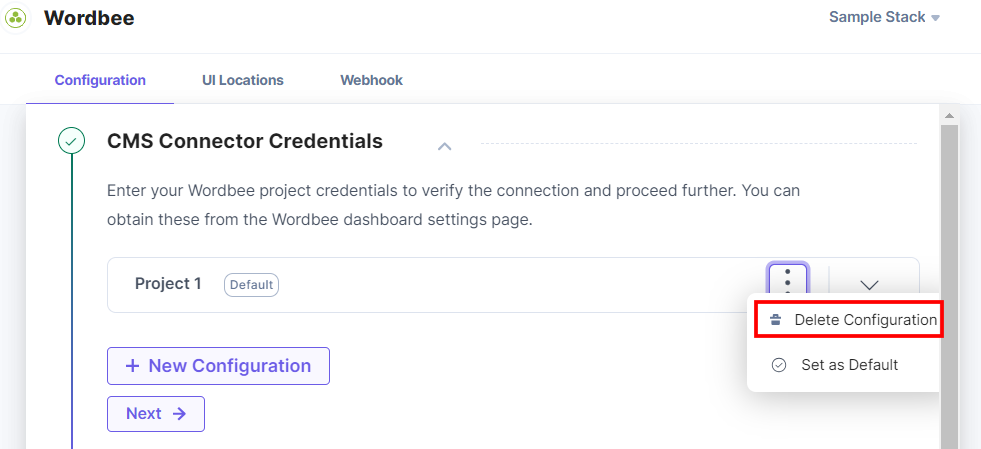
- To delete the configuration, click the three dots and select Delete Configuration.
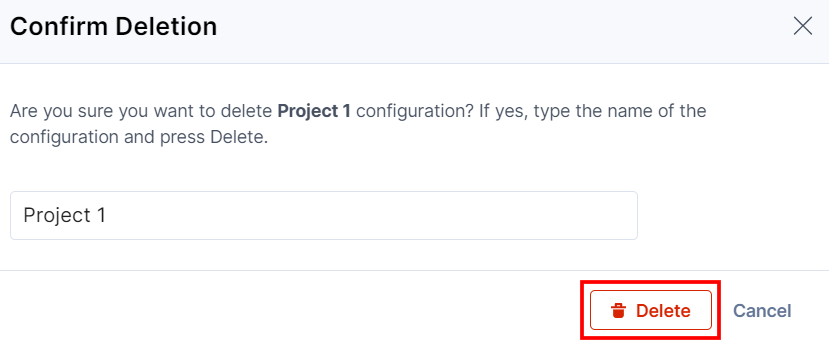
In the Confirm Deletion modal, add the configuration name and click Delete.
- Click the + New Configuration button to add new configuration details.
- Click the Next button.
- Content Type Settings:
- Click the Manage Fields button to include or exclude the fields for translation.
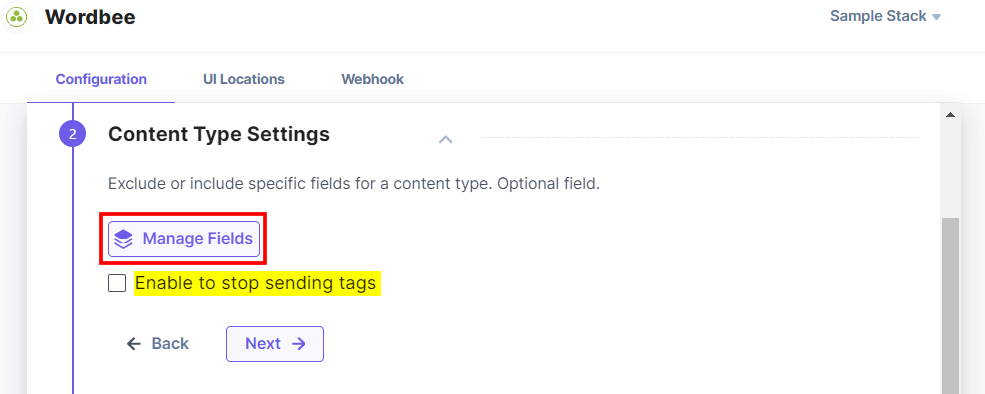
In the Content Type Settings modal, select the content type. You will notice that all fields are selected by default. Deselect the fields you want to exclude from the translation and click Save.

- Also, click the Enable to stop sending tags checkbox to not send the tags.
- Click the Manage Fields button to include or exclude the fields for translation.
- Click the Next button.
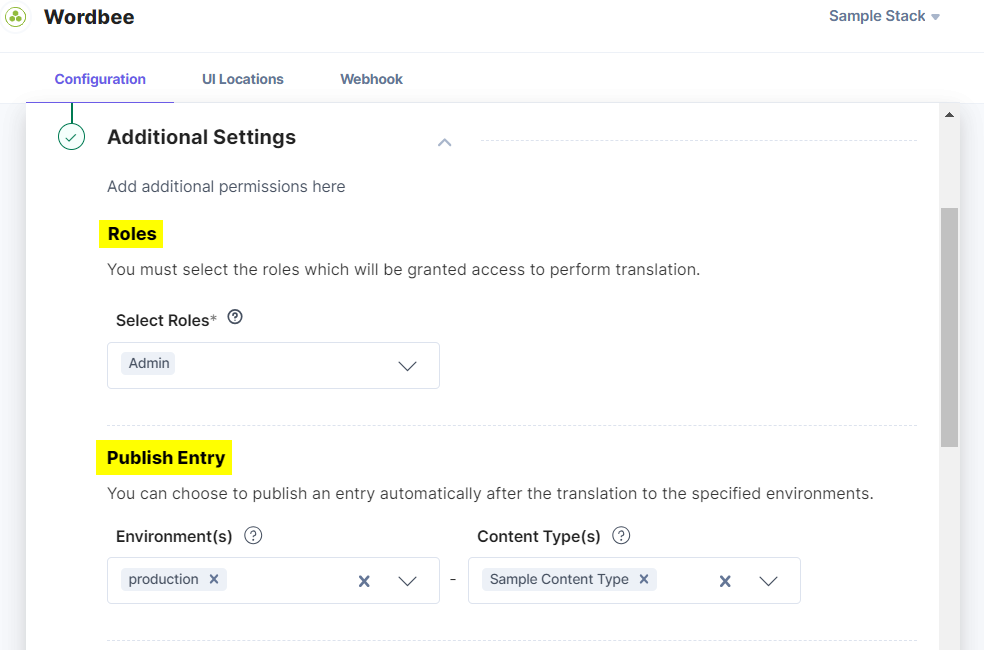
- Additional Settings:
- Roles: Select the Roles from this dropdown who can send the content of the entries for translation. By default, the Admin role is selected. You can add Content Managers and/or Developer roles as well. However, only Admin can manipulate the app configuration settings.
- Publish Entry: If you want to publish the entry automatically after the content has been translated, you can set the Environment(s) and Content Type(s) for publishing accordingly.
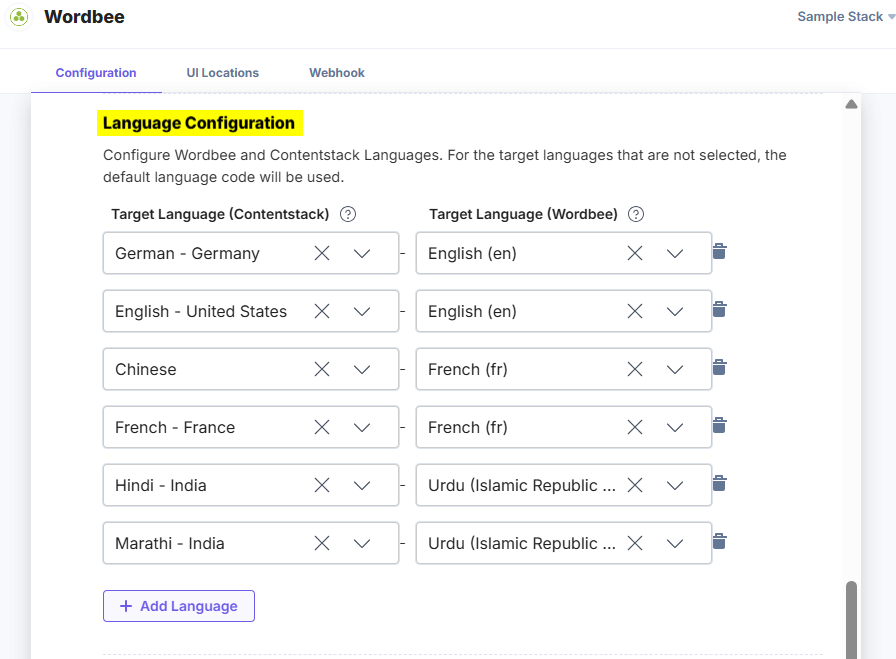
- Language Configuration: In the Language Configuration section, define the content translation languages for Wordbee and Contentstack to avoid any mismatch between the language codes.
All entries from Wordbee languages will be localized into Contentstack languages. For any target languages not selected, the app will use the default language code of the stack.
Note: Wordbee supports 2:1 mapping. You can map two Wordbee languages to a single Contentstack language.
Click the + Add Language button to add a language.
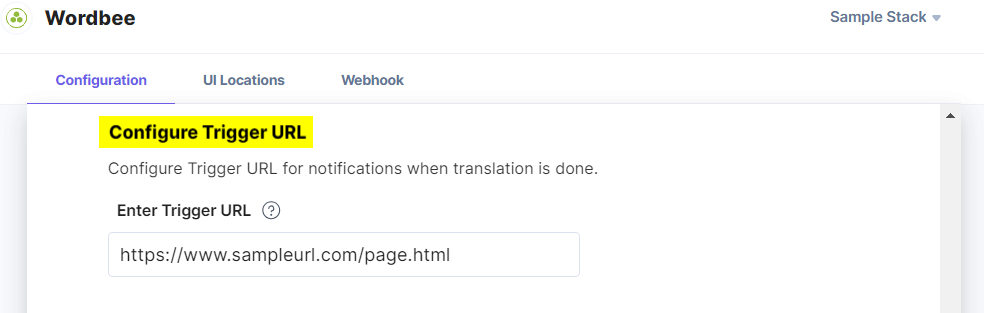
- Configure Trigger URL: Provide the Trigger URL to send the entry details along with entry UID, link, translation status, and error, if any. You can use these details to frame it for sending emails.
- Once done, click the Finish button. If you want to reset the configuration, click the Reset Configuration button.
- CMS Connector Credentials:
- After configuring all the details, click the Save button.
- On the UI Locations tab, you can see the predefined app locations. You can use the toggle button corresponding to each UI location to enable or disable it based on your requirements.
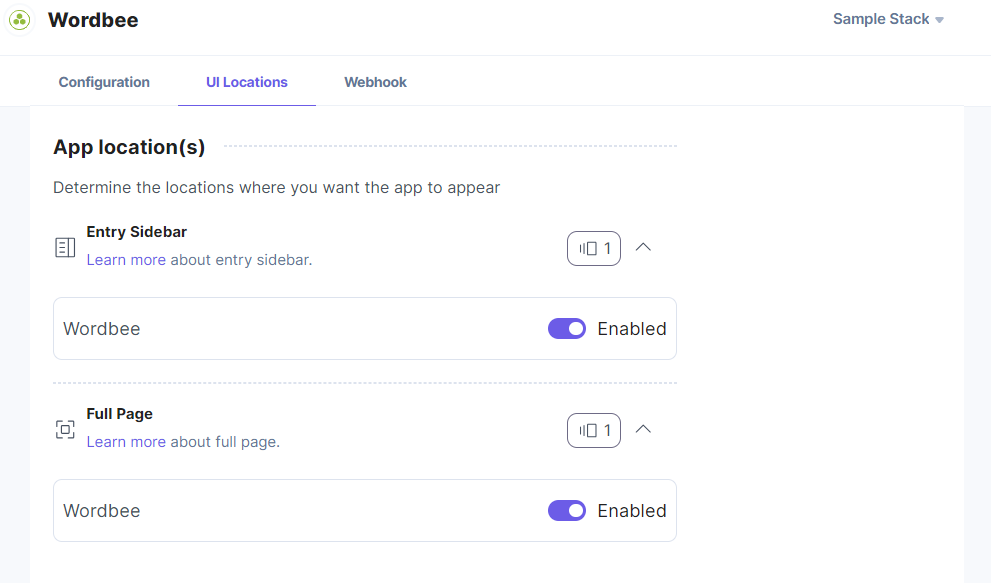
- If the webhook is enabled for your app, you can view the webhook logs under the Webhook tab.
Additional Resource: For more information on UI location and webhooks, please refer to the Installed Apps guide.
- Click the Open Stack button to start using the Wordbee app.
- From the left-hand side primary navigation, click the Marketplace icon.
-
Use the Wordbee App within your Stack
To use the Wordbee app in your stack, you can use Full Page Location and Sidebar Widget.
Using Wordbee as a Full Page Location App
To use the Wordbee app in Contentstack, log in to your Contentstack account and follow the steps below:
- Go to the stack dashboard. On the left-hand side primary navigation, you will find the Wordbee app icon (as shown below).
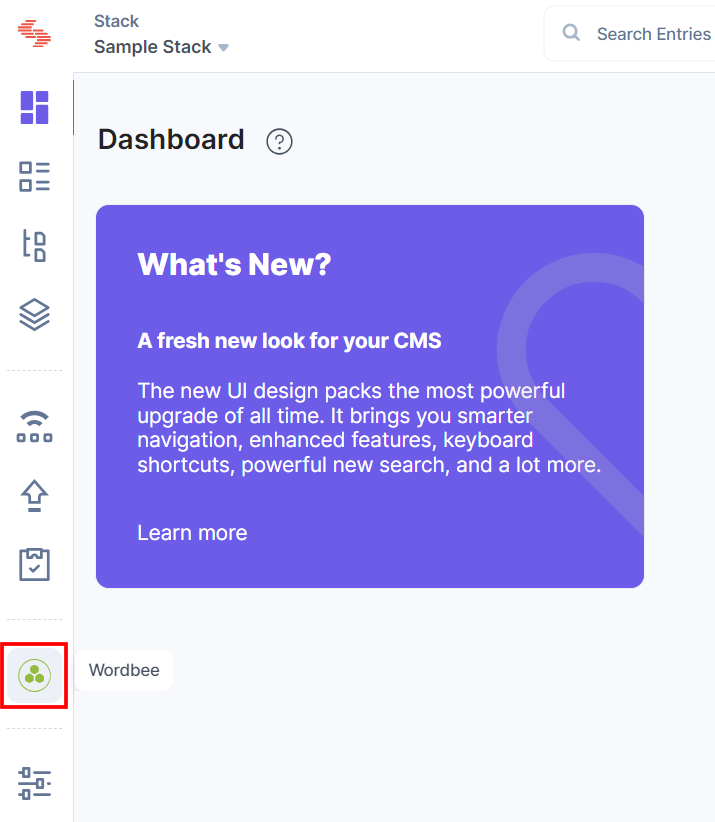
- Click the app icon to view the Wordbee app within your CMS.
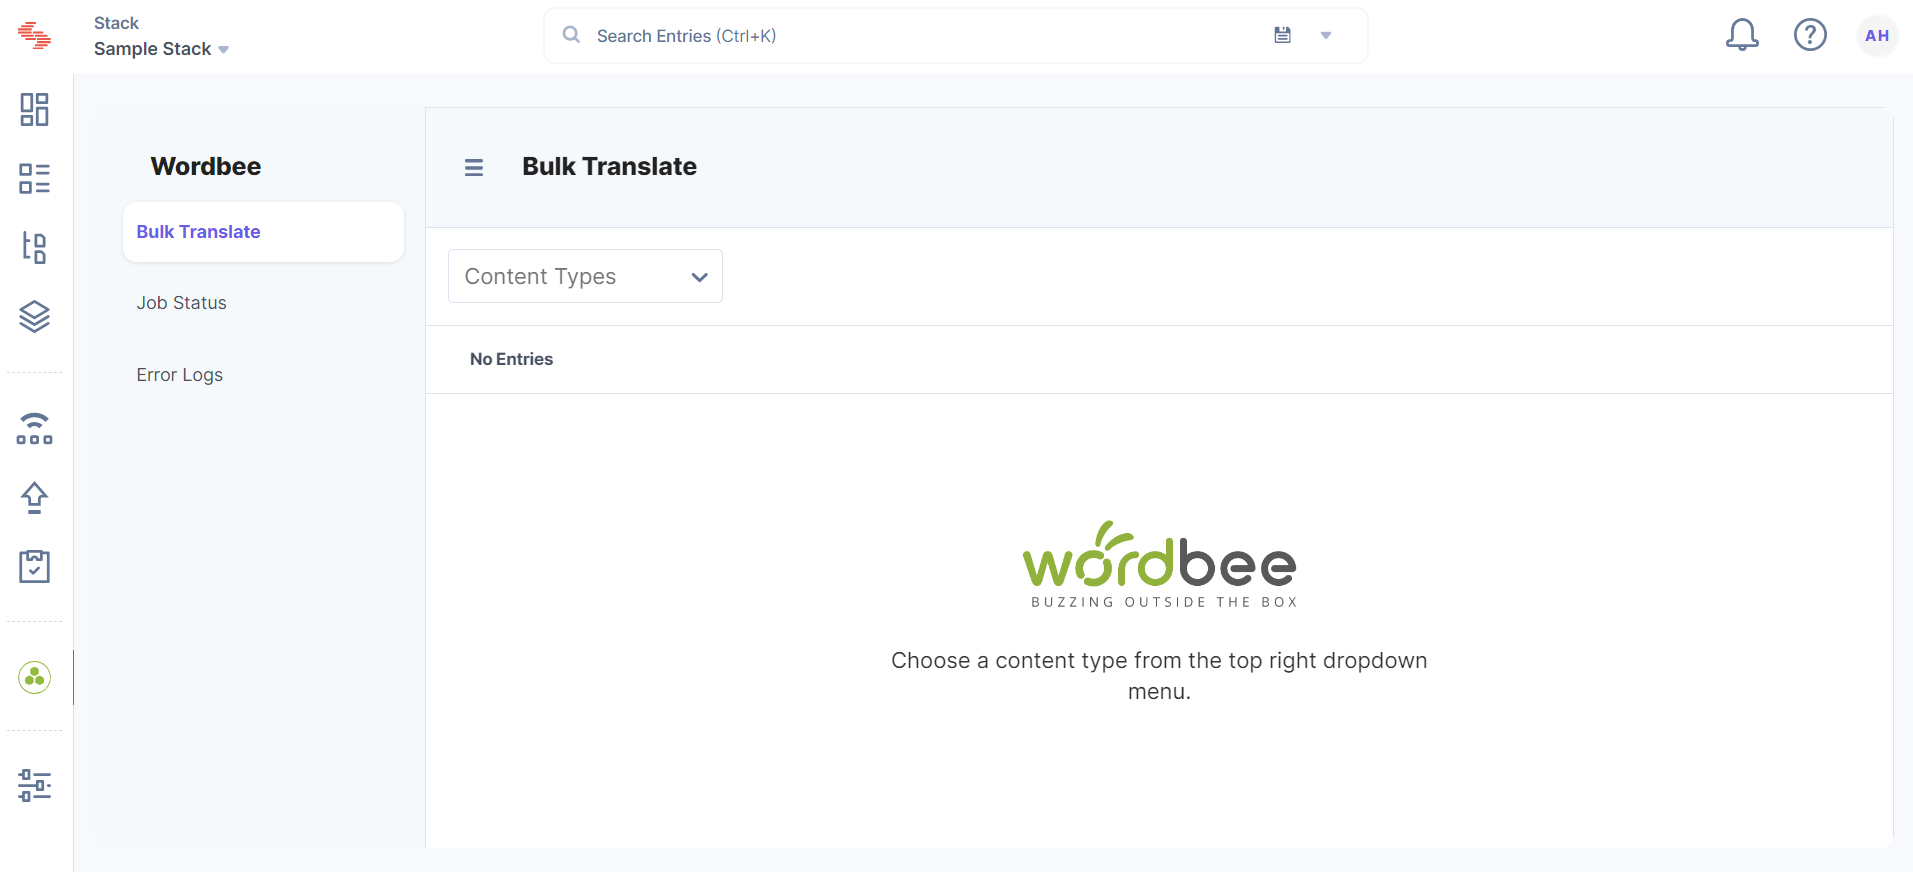
- In the Bulk Translate page, select the Content Type and add entries for translation.
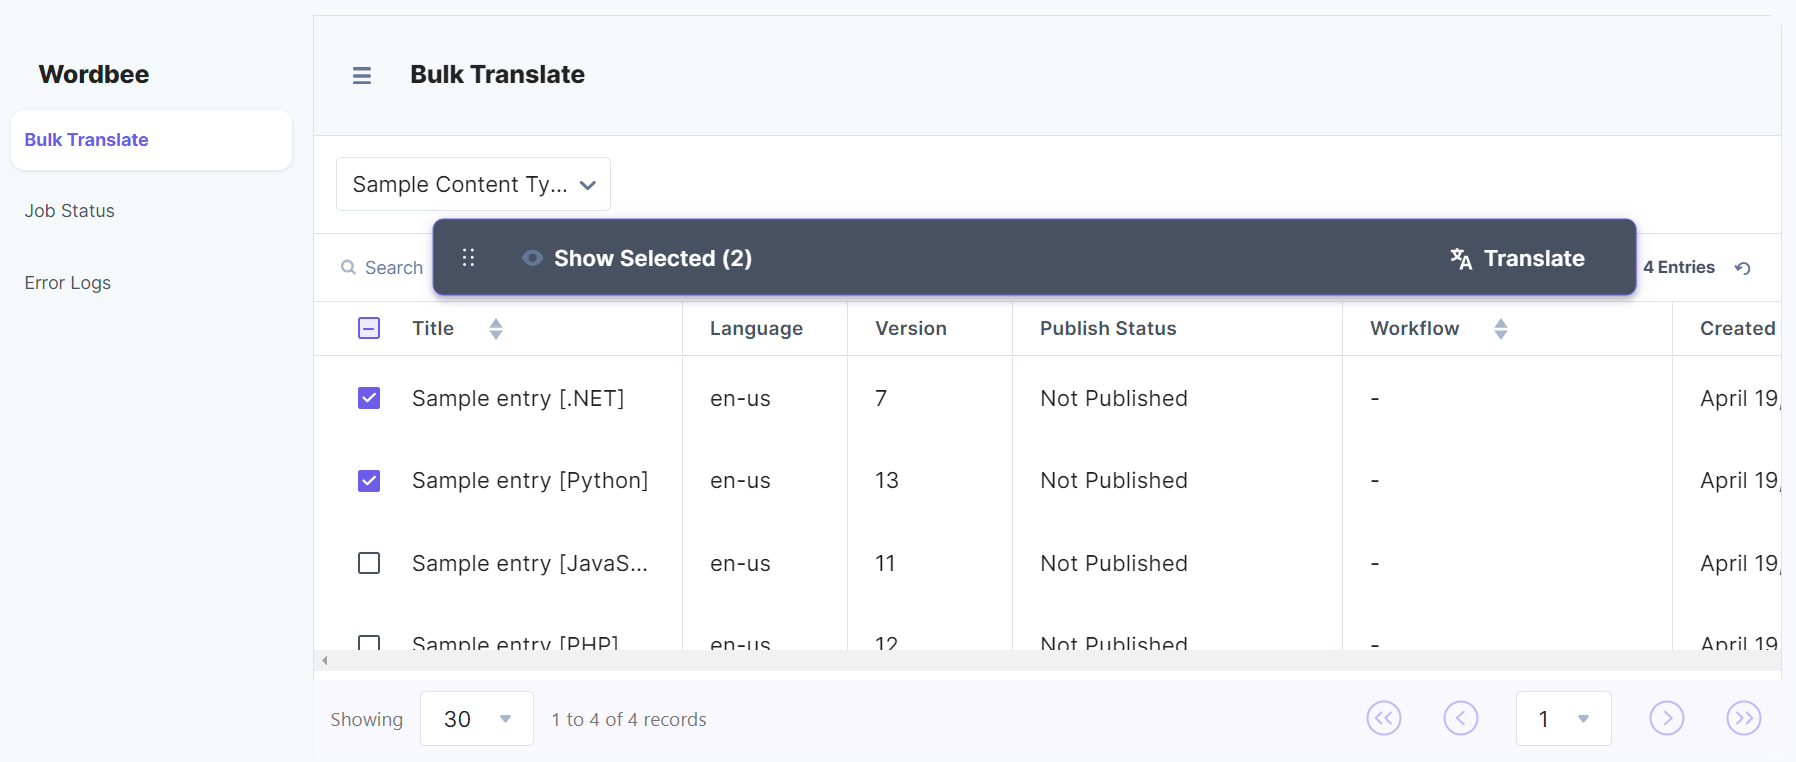
Note: As of now you can add or select 10 entries from different content types for translation.
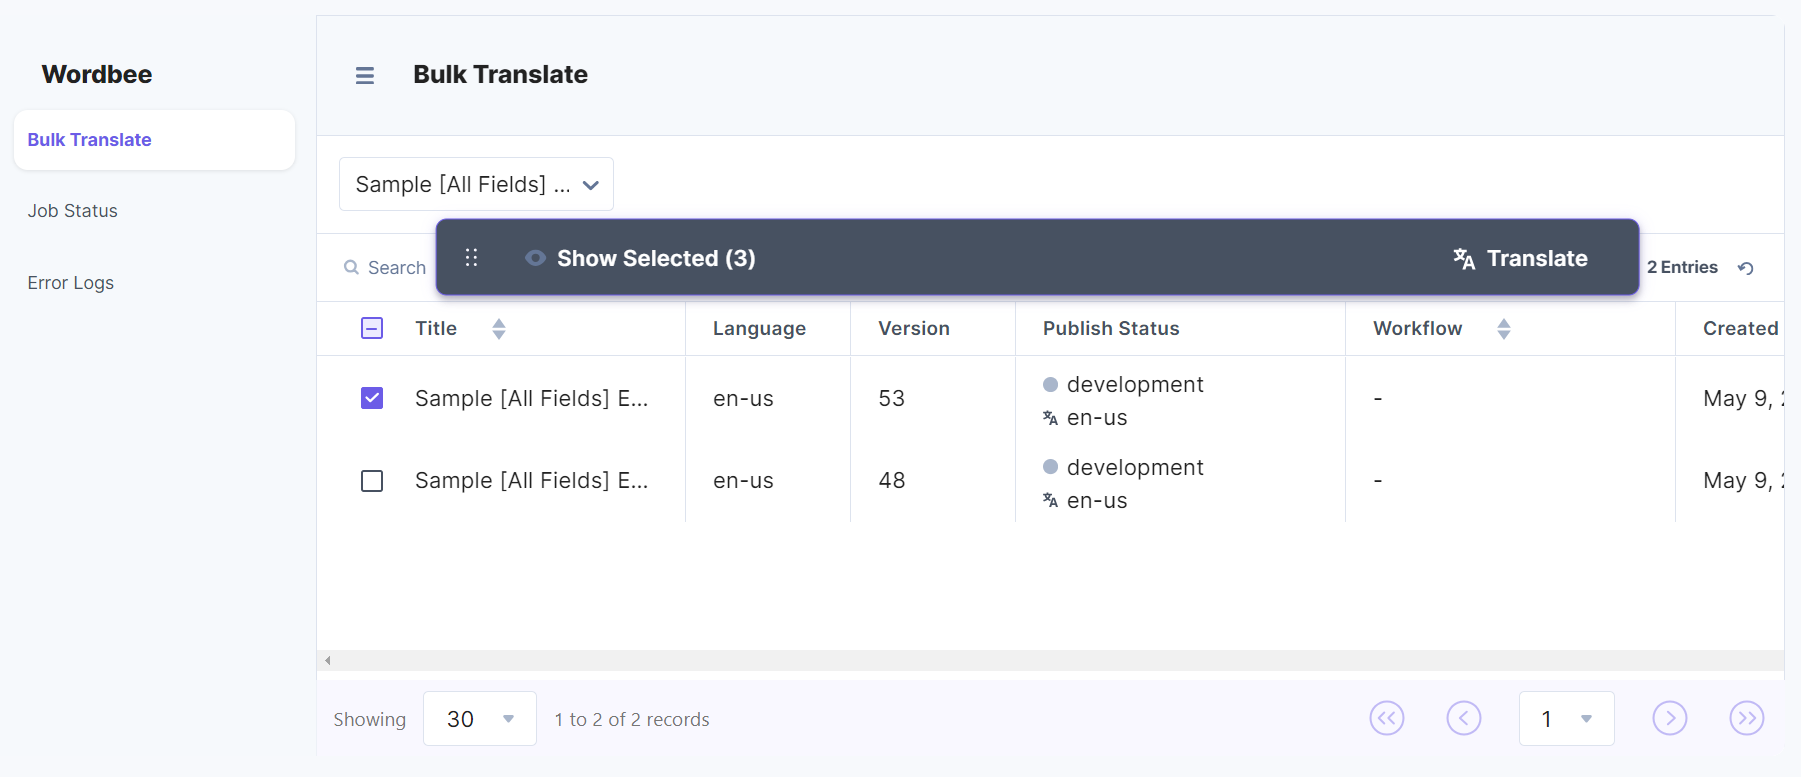
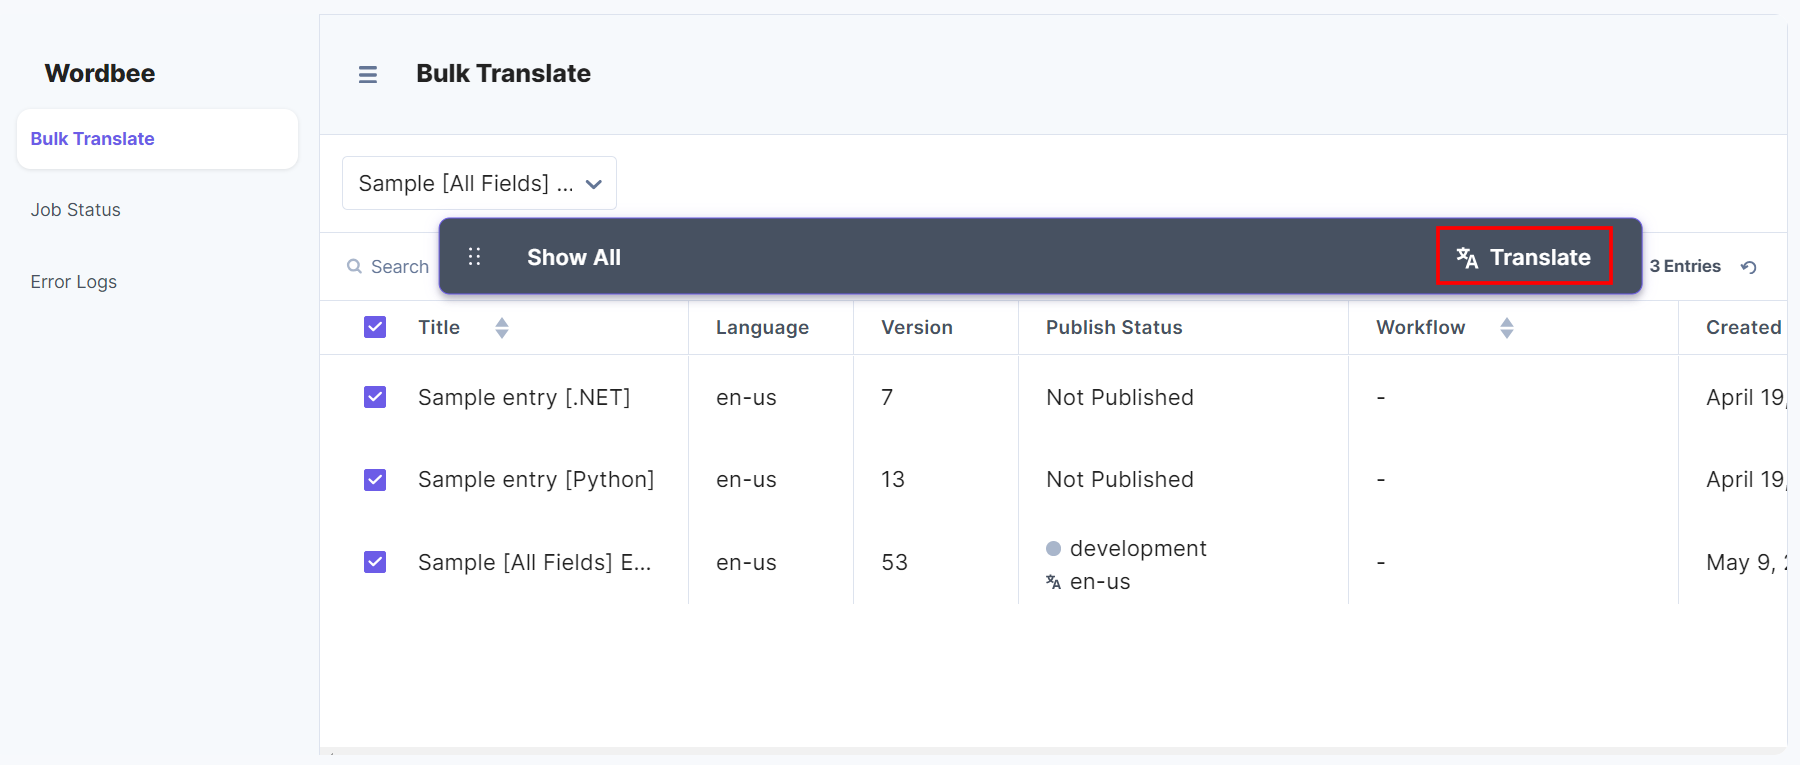
- After adding the entries, you can click Show Selected to view all the entries added for translation.
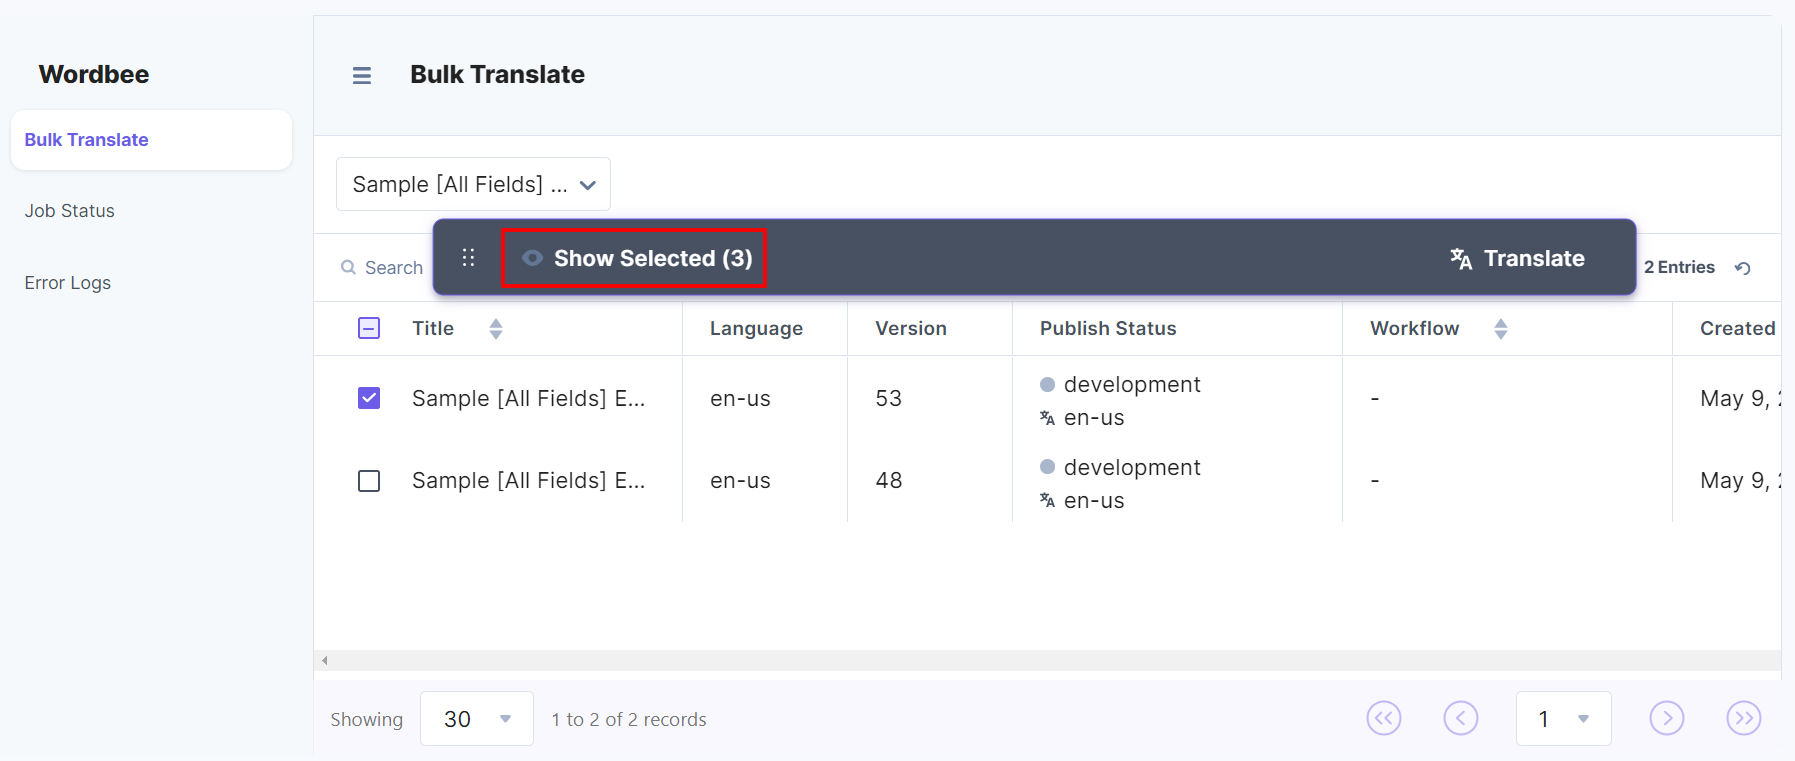
- To initiate the translation process, click Translate.
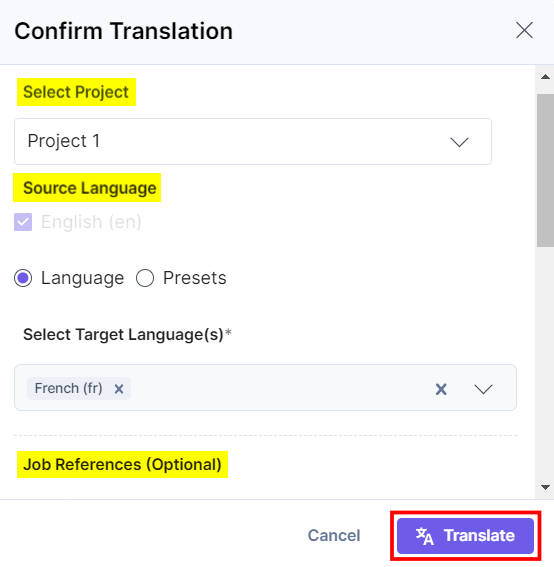
- In the Confirm Translation modal, fill in the details as follows:
- Choose the translation project from the Select Project dropdown. You can see the project which is set as default at the time of app configuration in step 2.
- Source Language is by default selected. You can choose between the Language (Target Languages) or Preset(s) (Language Presets) options.
- Optionally, you can add Job References settings such as Deadline Date, Job comments, Live Environment URL, Internal Comments, and Image Source File URL.
Note: The Deadline Date format is mm:dd:yyyy, and the time format is hh:mm:ssZZ, where ZZ refers to the time zone.
- Once these details are added, click the Translate button.
Note: You can translate up to 500 entries (including the locale versions) at once.
- To view the translation status of the entries, click Job Status from the left panel, and then choose the project from the Select Project drop down.
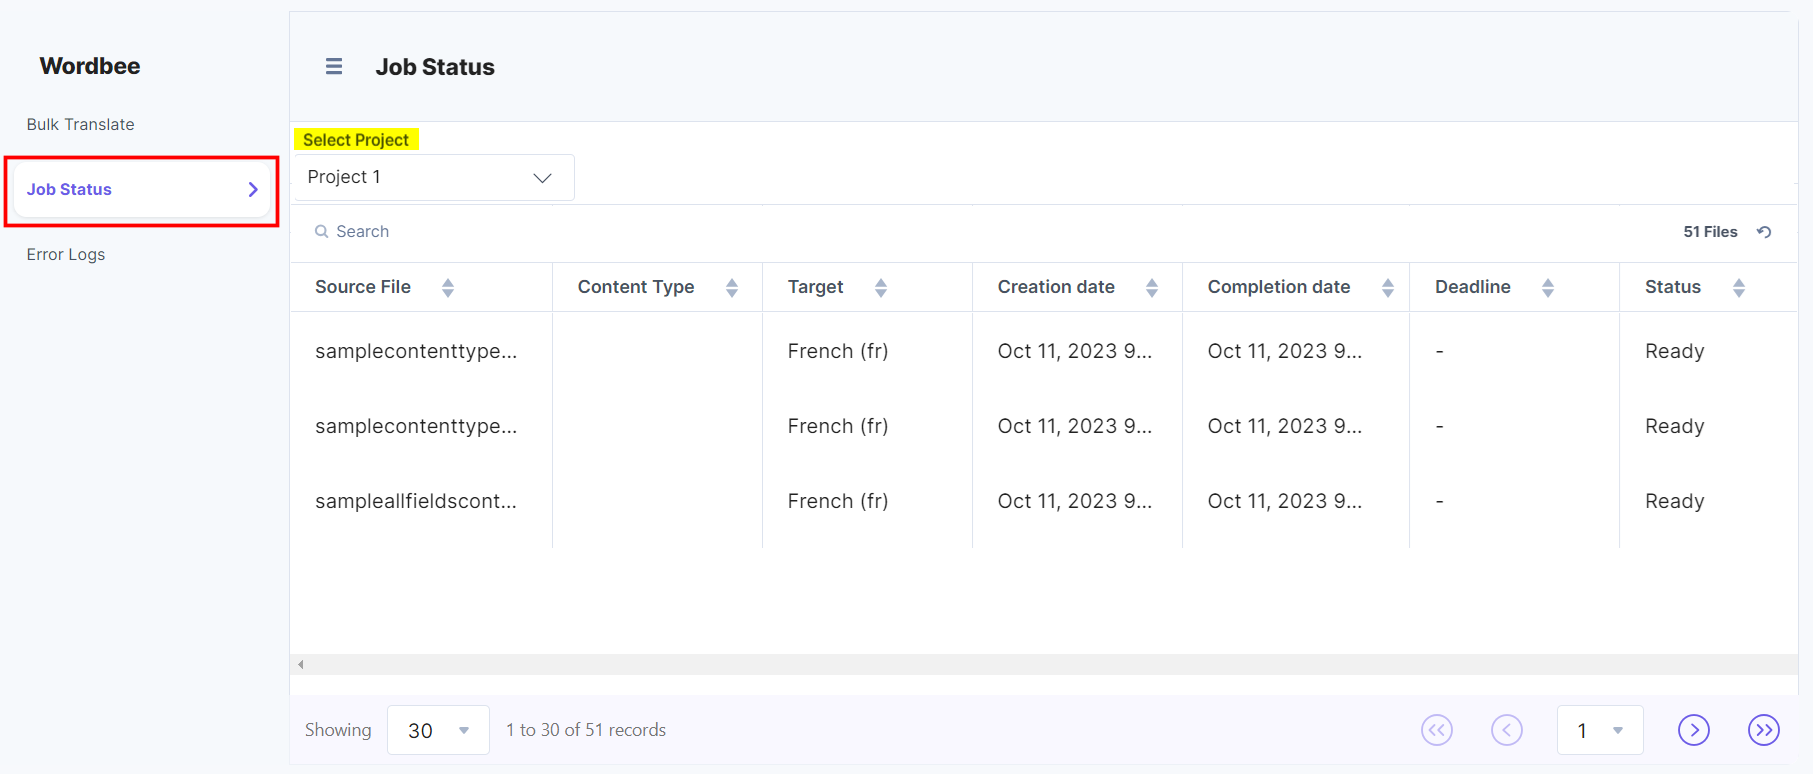
Note: You can also view the translation status in the Wordbee project dashboard.
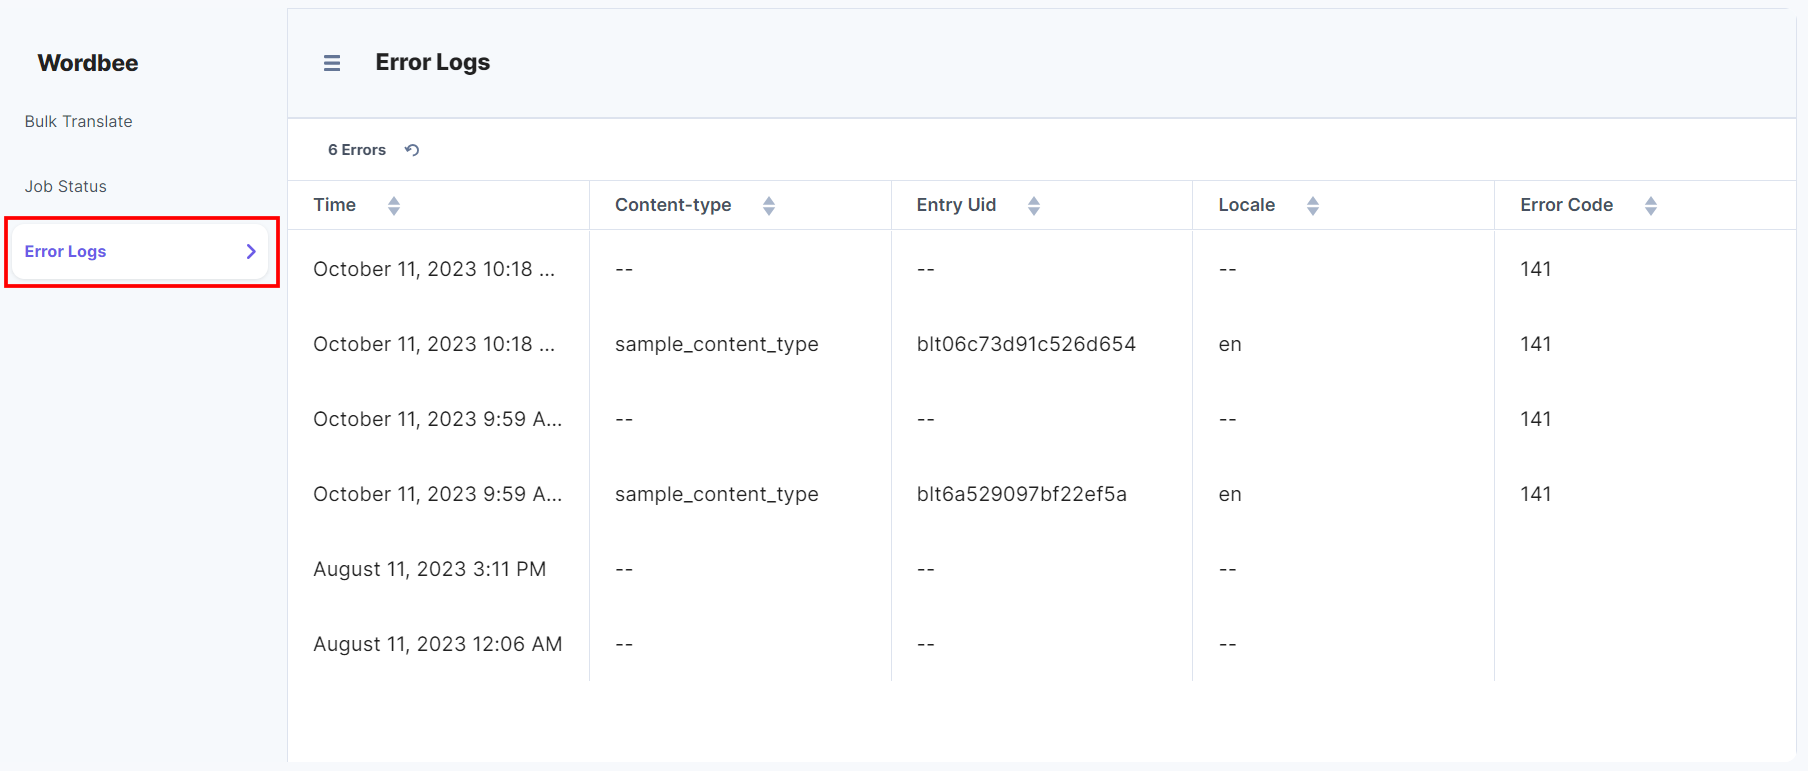
- Click Error Logs to view the error logs in detail.
After successful translation, you can view the translated content in the entries.
Using the Wordbee App as a Sidebar Widget
To use the Wordbee app as a Sidebar Widget, log in to your Contentstack account and follow the steps given below:
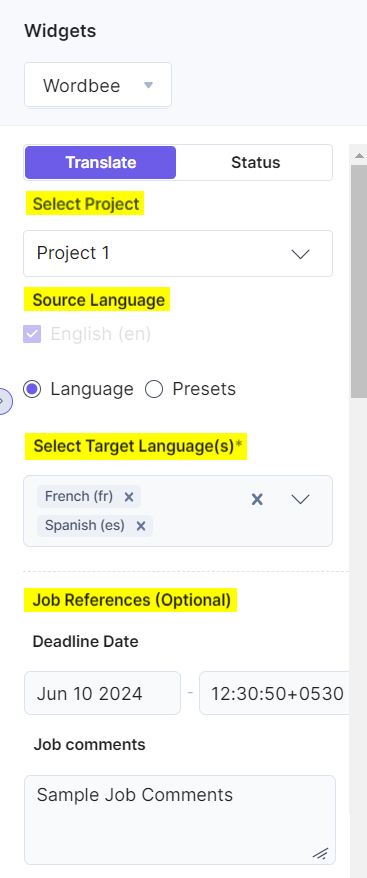
- Go to the stack dashboard and navigate to the Entries page, then open the entry you want to translate. Click the Widgets icon from the right navigation panel.
- Select Wordbee from the dropdown and fill in all the fields under the Translate tab.
- Choose the translation project from the Select Project dropdown. You can see the project which is set as default at the time of app configuration in Step 2.
- Source Language is by default selected. You can choose between the Language (Target Languages) or Preset(s) (Language Presets) options.
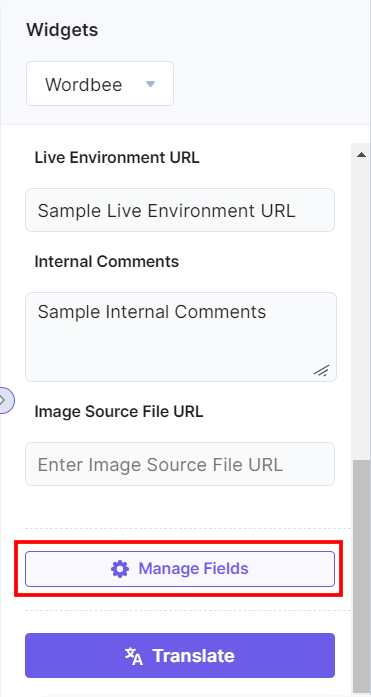
- Optionally, you can add Job References (optional) settings such as Deadline Date, Job comments, Live Environment URL, Internal Comments, and Image Source File URL.
Note: The Deadline Date format is mm:dd:yyyy, and the time format is hh:mm:ssZZ, where ZZ refers to the time zone.
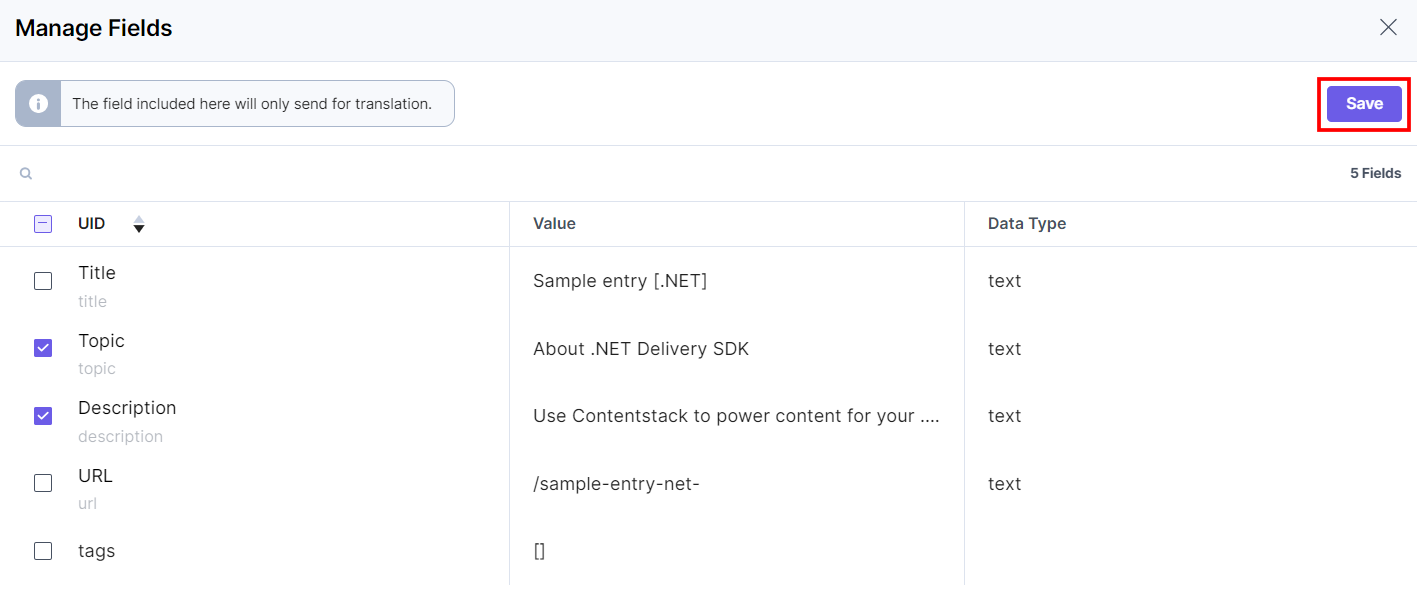
- Click the Manage Fields button to include or exclude the fields for translation.
- In the Manage Fields modal, all fields are selected by default. Deselect the fields you want to exclude from the translation and click Save.
Note: Manage Fields settings will be saved for only one instance.
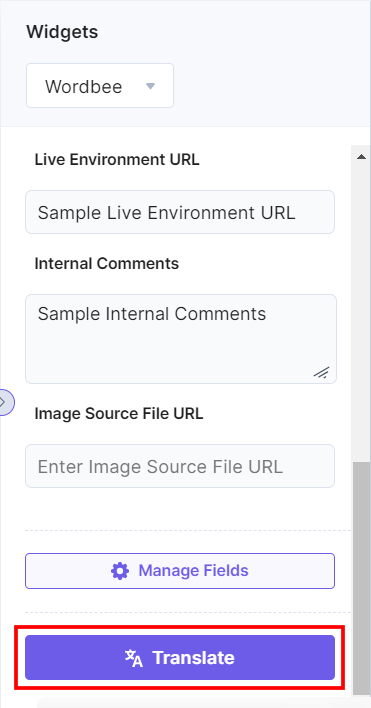
- Click the Translate button to start the translation.
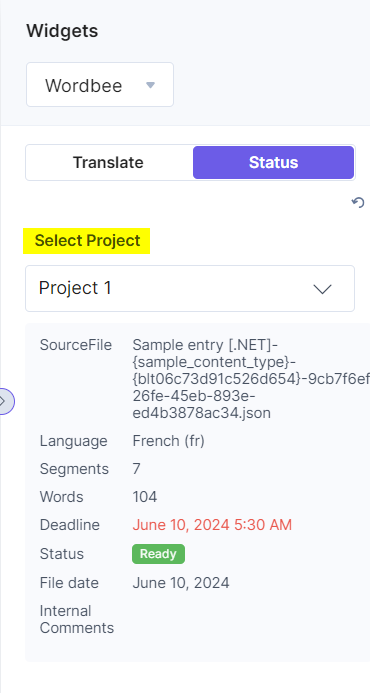
- You can view the translation status under the Status tab by selecting a project using the Select Project drop down.
 After successful translation, you can view the translated content in the entries.
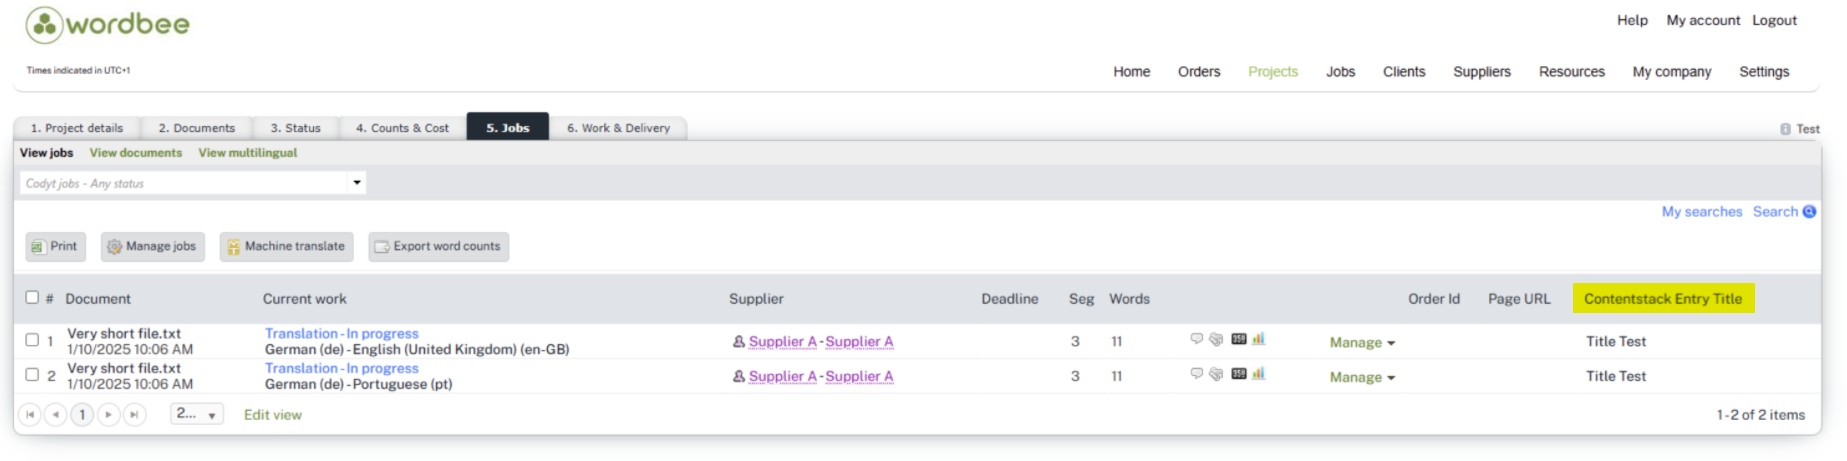
Project Naming Convention
To ensure clear and consistent identification, each project name in the SourceFile follows a three-part structure: Entry Title, Content Type UID, and Entry ID.
This structure makes it easier to identify and track files throughout the translation workflow, helping maintain consistency and efficiency across multiple localization projects.
By default, only the first 20 characters of the Entry Title are shown in the project name. To display the full title, you need to perform the following steps in Wordbee:
- Log in to the Wordbee (Beebox) account.
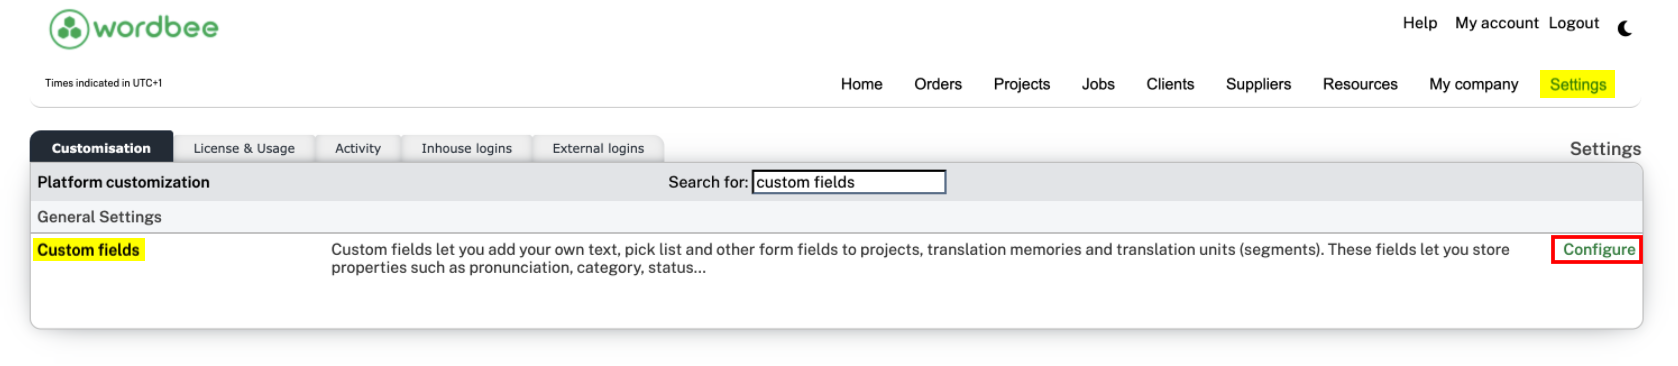
- Go to Settings from the left navigation panel, search for Custom Fields, and click Configure.
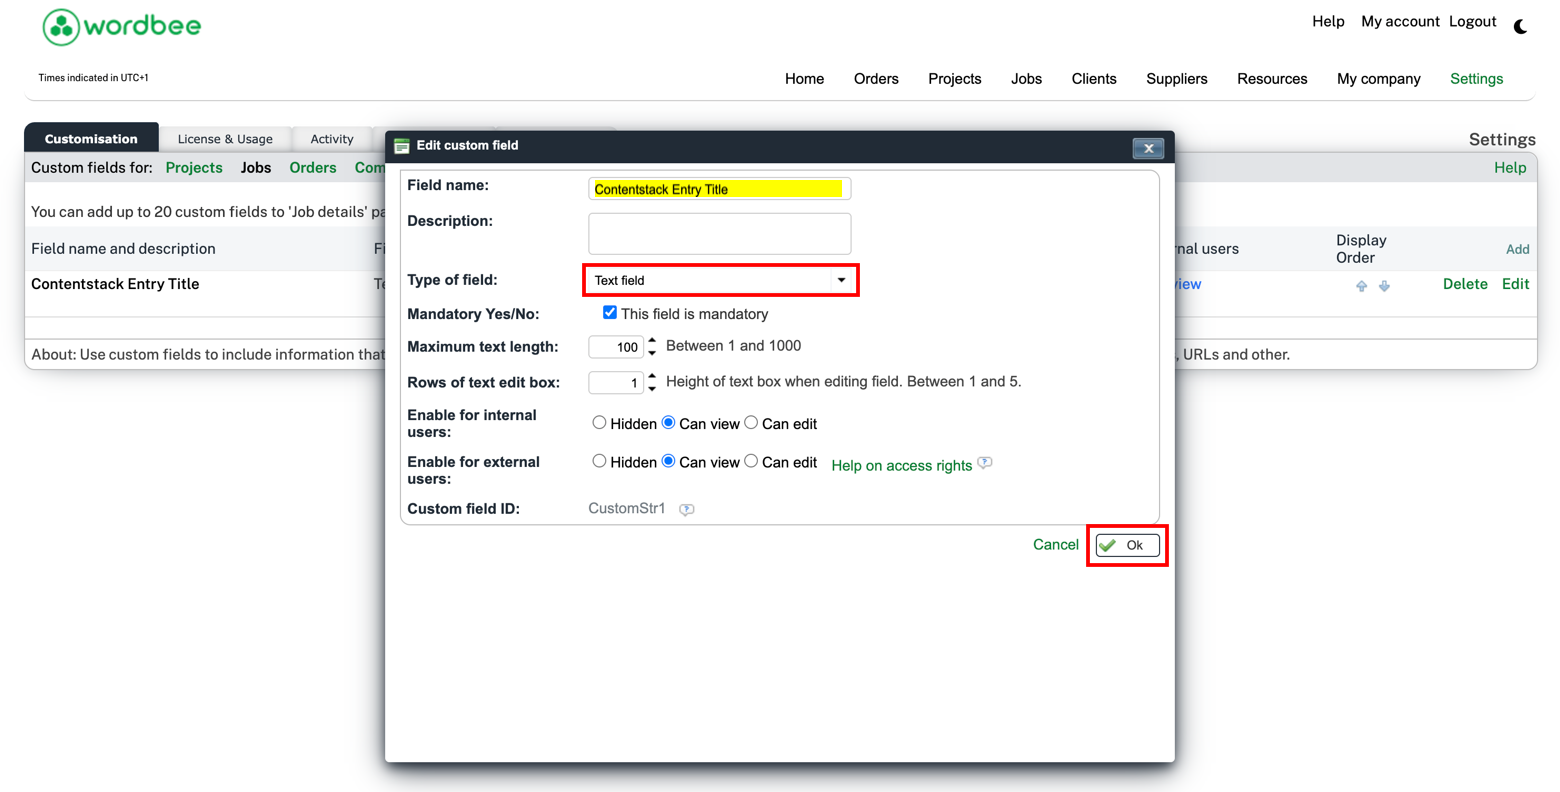
- In the Jobs tab, click the Add button, then enter Contentstack Entry Title as the Field name, select Text field as the Type of field, and click OK.
- In your Wordbee project under Beebox, go to Job Custom Fields and select Contentstack Entry Title next to CustomStr1.
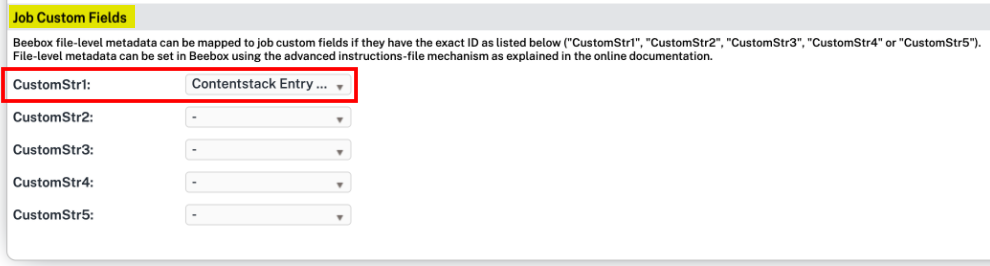
Note: CustomStr1 must be the Custom field ID.
- Finally, click the Edit View option in the Jobs Dashboard and enable Contentstack Entry Title.
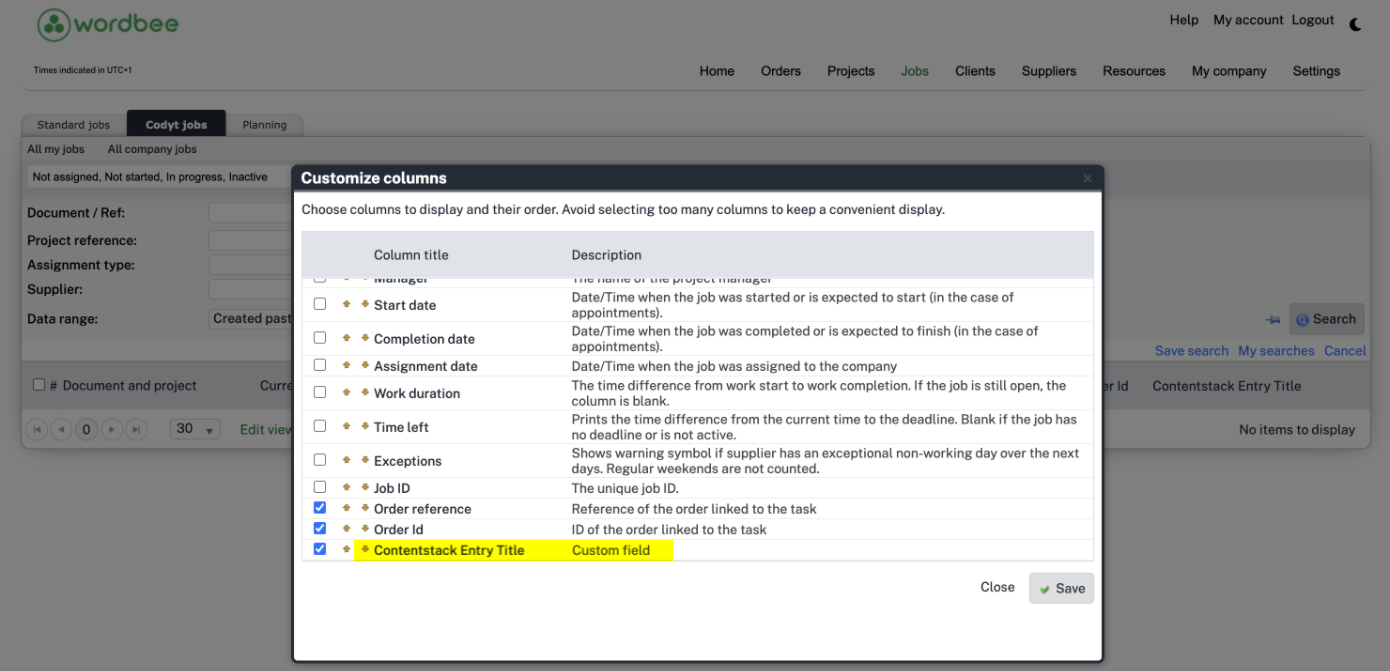
- Now you can view the full Entry Title in the Contentstack Entry Title custom field.
- Go to the stack dashboard. On the left-hand side primary navigation, you will find the Wordbee app icon (as shown below).
More articles in "Translation"
