
.svg?format=pjpg&auto=webp)
.svg?format=pjpg&auto=webp)
.png?format=pjpg&auto=webp)


.png?format=pjpg&auto=webp)
Salesforce Commerce App Installation Guide
Salesforce Commerce is a seamless cloud-based eCommerce platform that can help deliver a personalized and cohesive commerce experience. With its robust online store management features, you can set up an online store, create AI-powered shopping experiences and grow your online businesses.
Contentstack Marketplace allows you to easily install the Salesforce Commerce application and use it within your stack to add products and categories from the Salesforce Commerce store within your entries.
Prerequisites
- Salesforce Commerce account
- Contentstack account
- Access to the Contentstack Organization/Stack as the Owner/Admin
This step-by-step guide explains how to install and configure the Salesforce Commerce app within your stack.
Steps for Execution
- Retrieve your client credentials from Salesforce Commerce
- Install and Configure Salesforce Commerce in Marketplace
- Use Salesforce Commerce within your Stack
-
Retrieve your client credentials from Salesforce Commerce
Follow the steps given below to retrieve the API client ID:
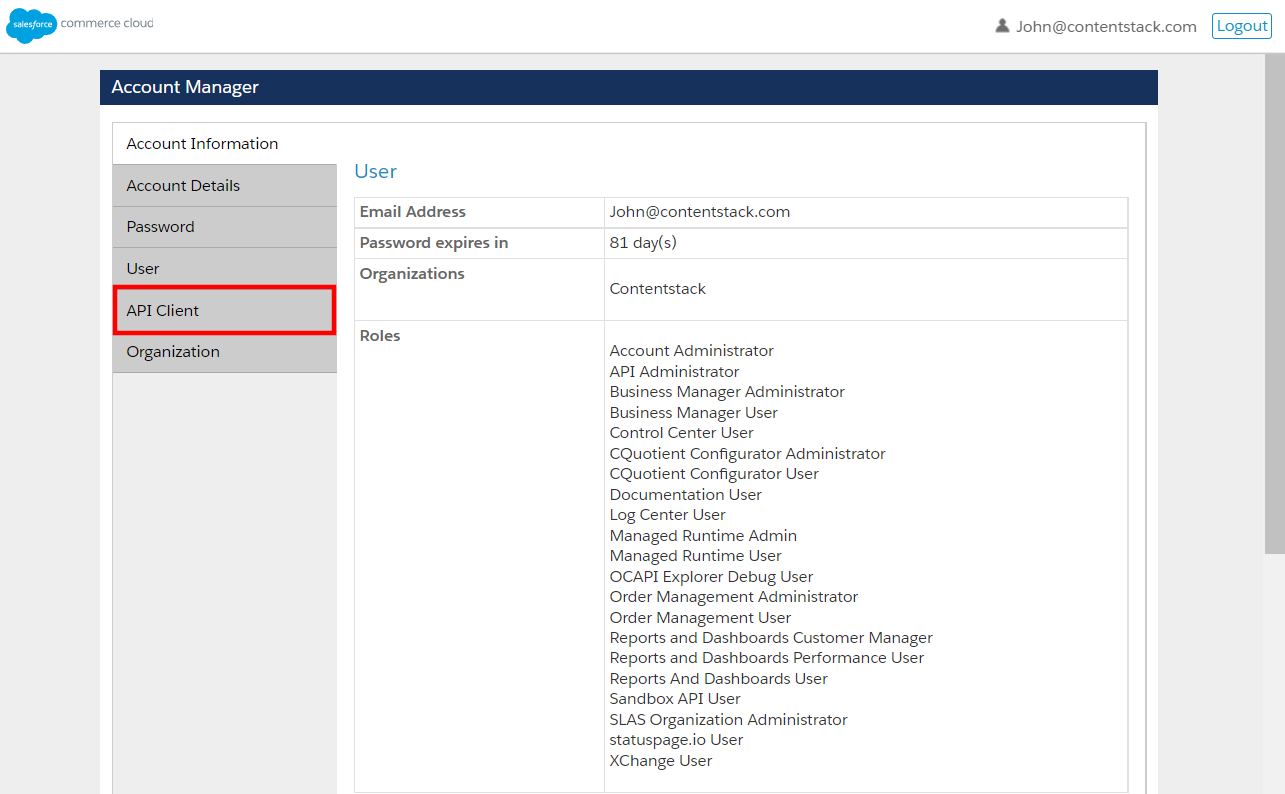
- Log in to Commerce Cloud Account Manager.
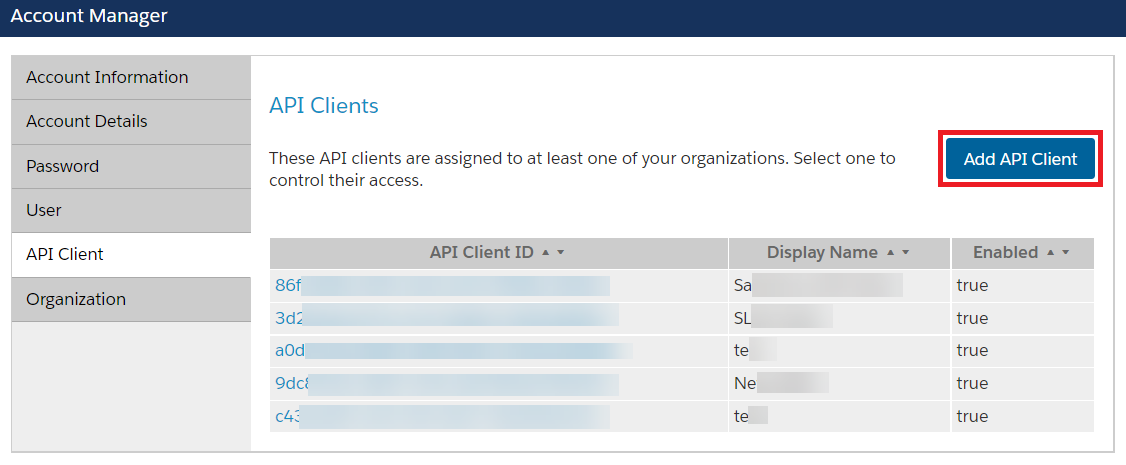
- Click API Client from the menu.
- Click the Add API Client button.
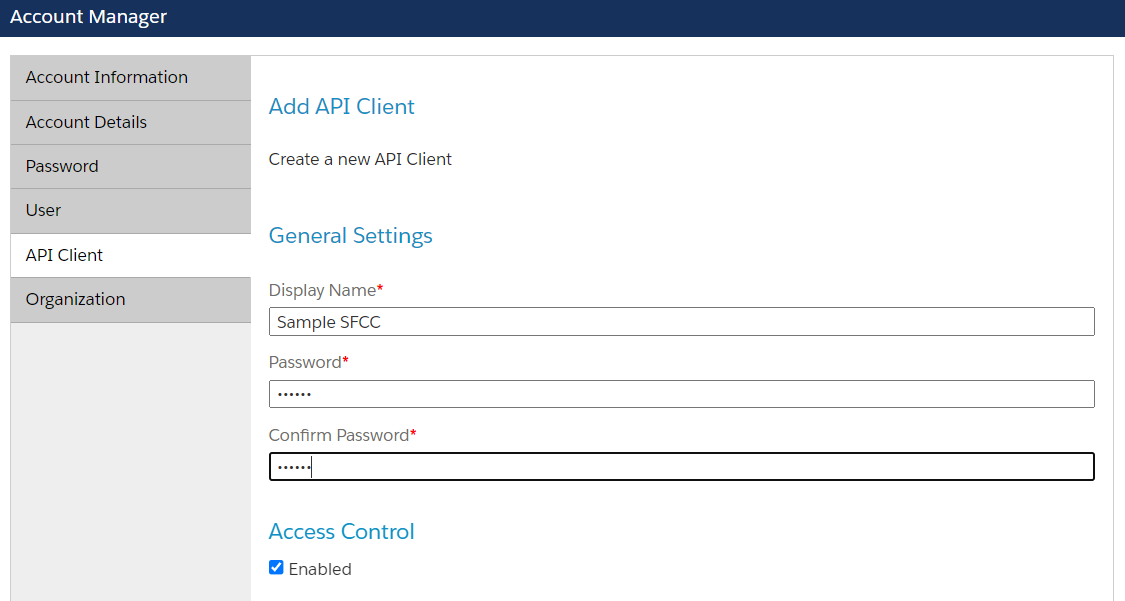
- Provide the following details for the new API client:
- Enter a Display Name and set a Password.
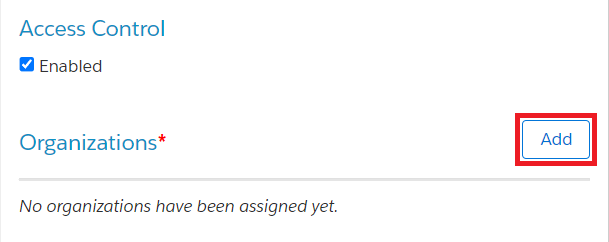
- Add an organization.
- Click the Add button for Organizations.
- Select your organization and click the Add button.
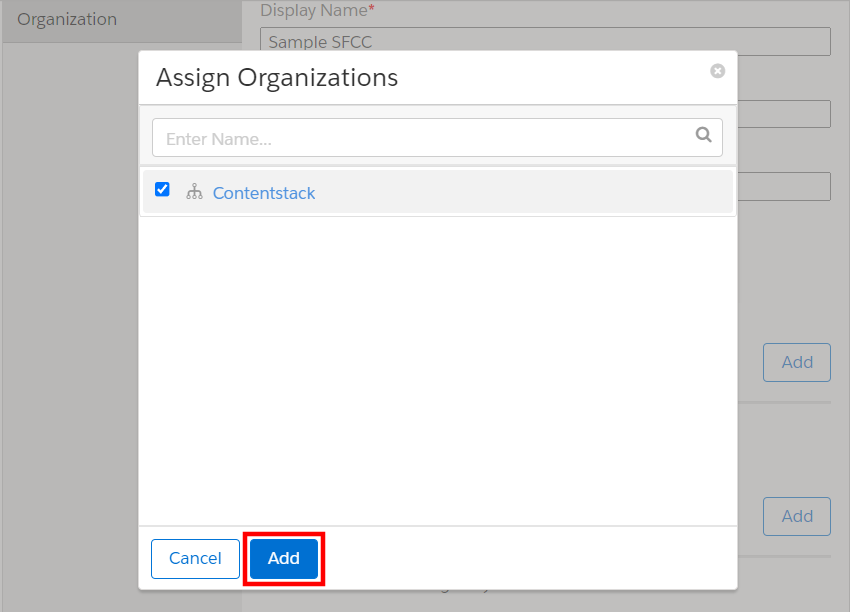
- Click the Add button for Organizations.
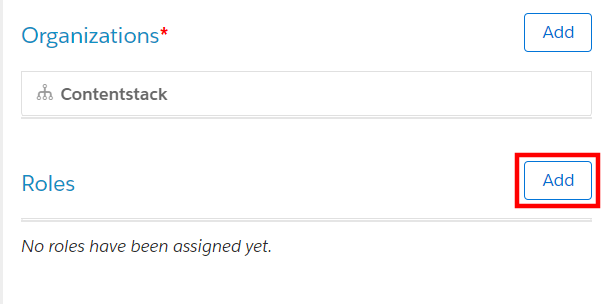
- Add roles.
- Click the Add button for Roles.
- Select the required roles and click the Add button.
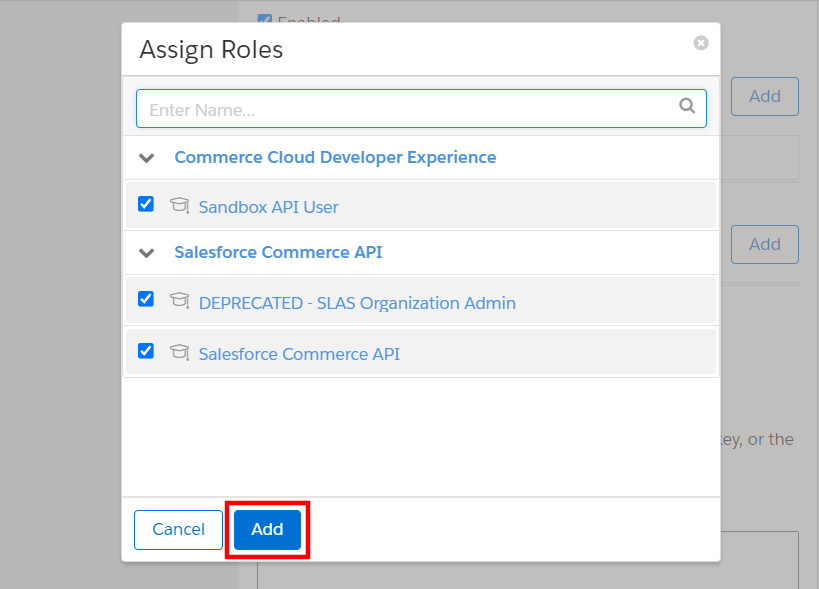
- Click the Add button for Roles.
- Add scopes under OpenID Connect.
Enter the following scopes in Default Scopes:
mail
roles
tenantFilter
profile
openId
Enter the following scopes in Allowed Scopes:
sfcc.shopper-baskets-orders.rw
sfcc.shopper-promotions
sfcc.shopper-gift-certificates
sfcc.shopper-categories
sfcc.shopper-product-search
sfcc.shopper.stores
sfcc.shopper-customers.register
sfcc.shopper-customers.login
sfcc.shopper-myaccount.rw
sfcc.shopper-myaccount.addresses.rw
sfcc.shopper-myaccount.baskets
sfcc.shopper-myaccount.orders
sfcc.shopper-myaccount.paymentinstruments.rw
sfcc.shopper-myaccount.productlists.rw
sfcc.products.rw
sfcc.catalogs.rw
sfcc.shopper-products
sfcc.shopper-productlists
Note: By default, you will see the scope mail in the Default Scopes.
- Select client_secret_post as the Token Endpoint Auth Method.

- Click the Save button.
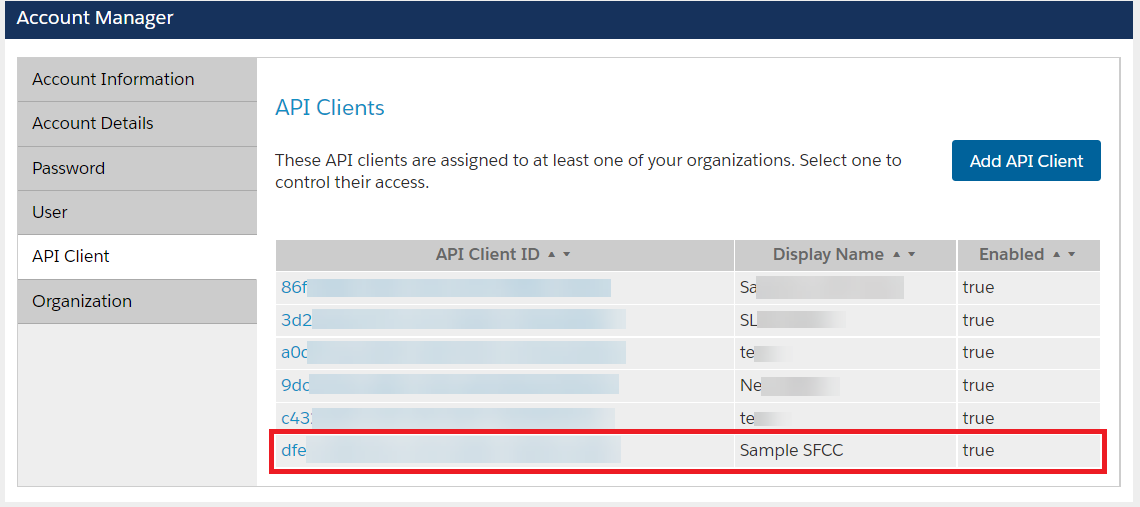
You can see your API client ID in the Account Manager screen. - Copy the API client ID for future reference.
- Enter a Display Name and set a Password.
Follow the steps given below to retrieve the Short code, Site ID, and Organization ID:
- Log in to Business Manager using the Account Manager credentials.
Note:Contact the Salesforce Support Team to get the Business Manager account link.
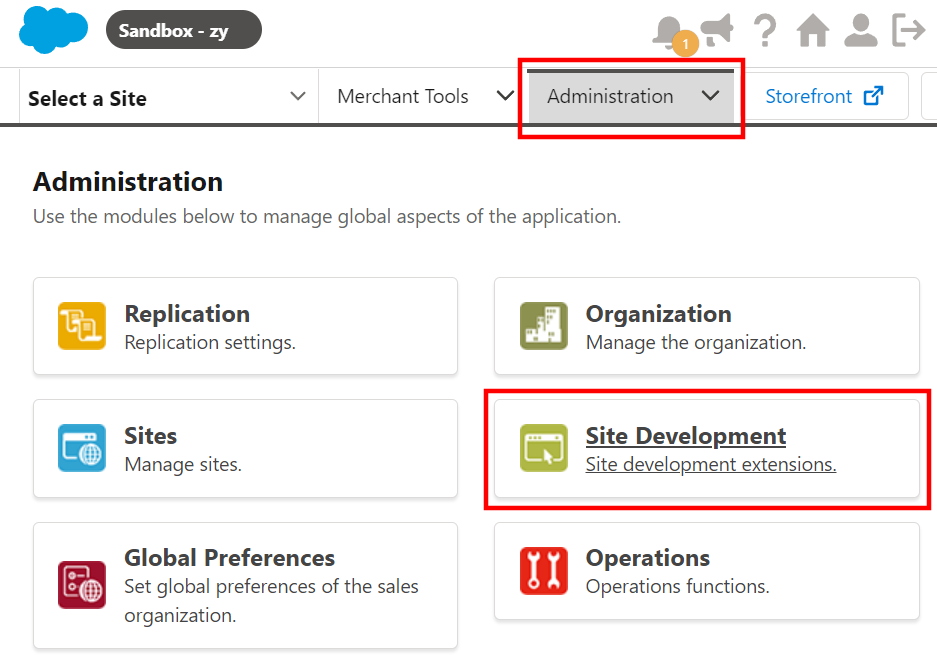
- Go to Administration and click Site Development.
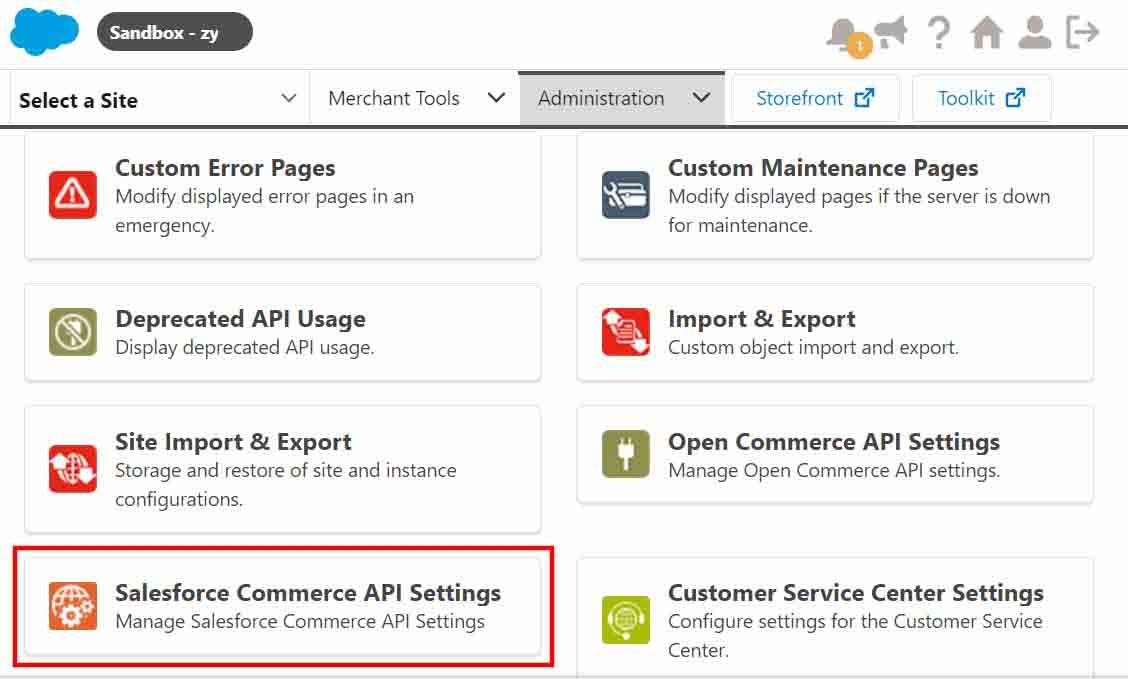
- Click Salesforce Commerce API Settings on the following screen.
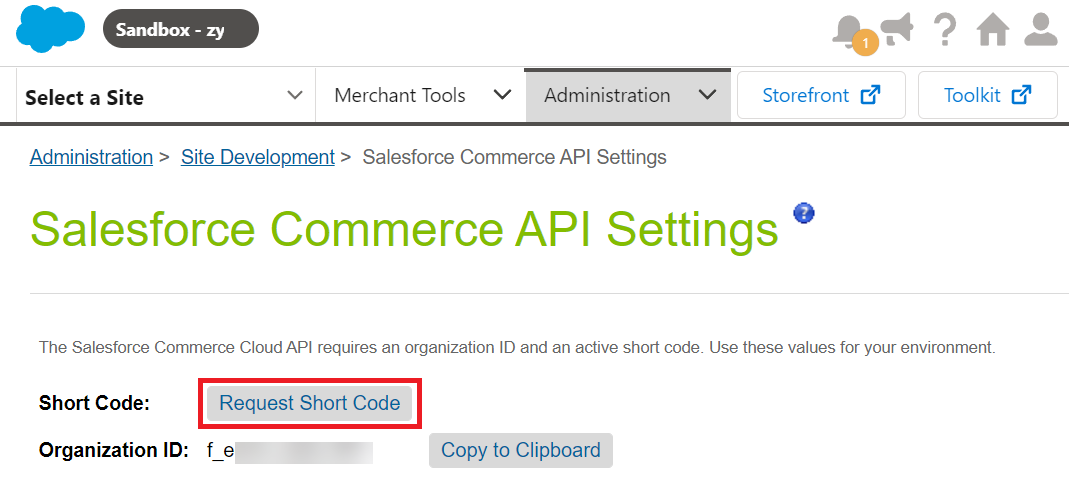
- Click the Request Short Code button to retrieve the Short Code.
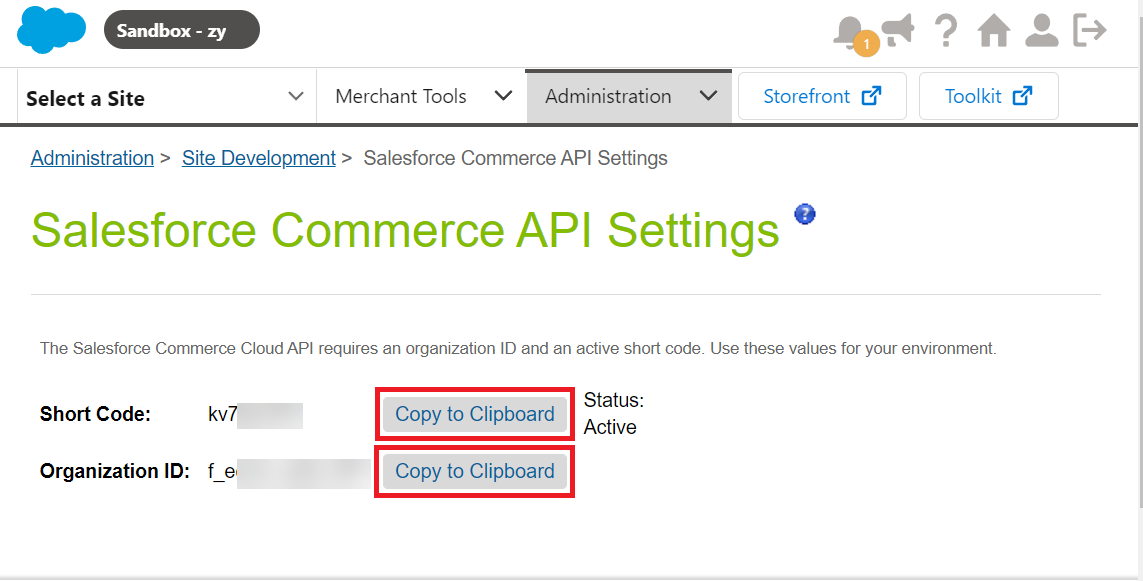
- Click the Copy to Clipboard buttons next to Short Code and Organization ID and save these values for future purposes.
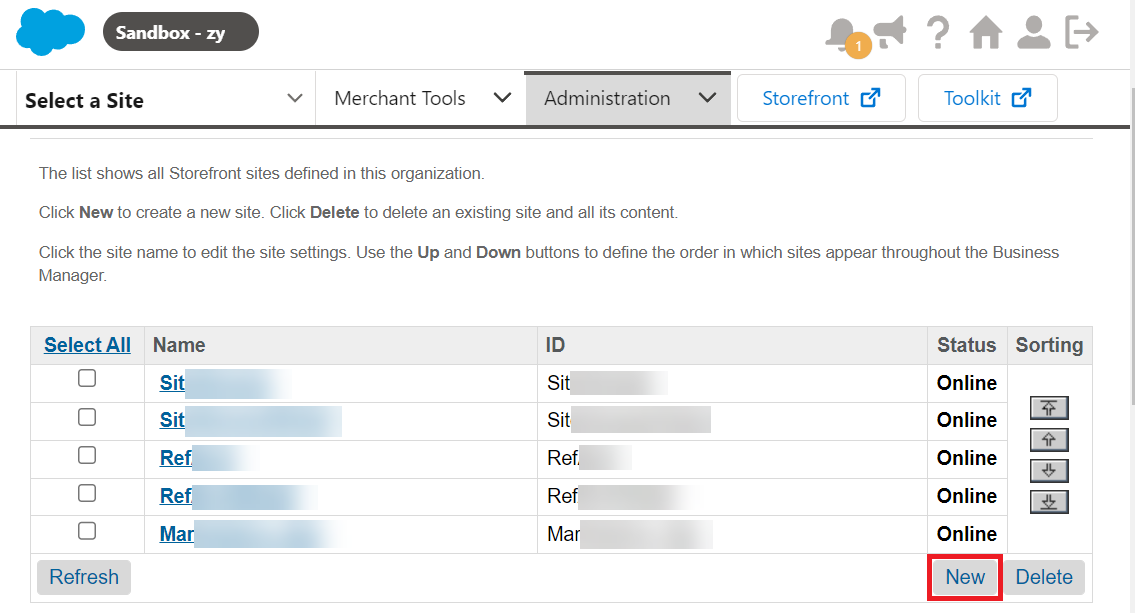
- Go to Administration and click Sites.
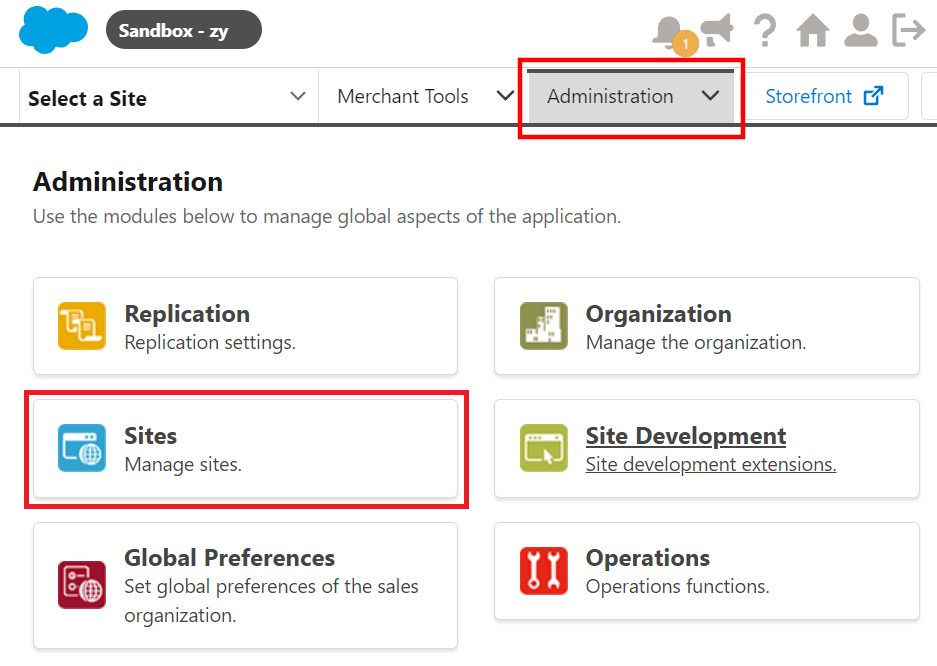
- Click Manage Sites on the following screen.

- Note down the required Site ID from the list or create a new one.
Note: Before retrieving the Client Secret, go to the Authorization for Shopper APIs guide and follow the steps listed in the Set Up User Roles and Filters section to set the SLAS Organization Administrator roles.
Follow the steps given below to retrieve the Client Secret:
- Use the following URL to open the SLAS User Login page.
https://{{short-code}}.api.commercecloud.salesforce.com/shopper/auth-admin/v1/ui/Note: Replace the {{short-code}} in the URL with the Short Code retrieved in the previous steps.
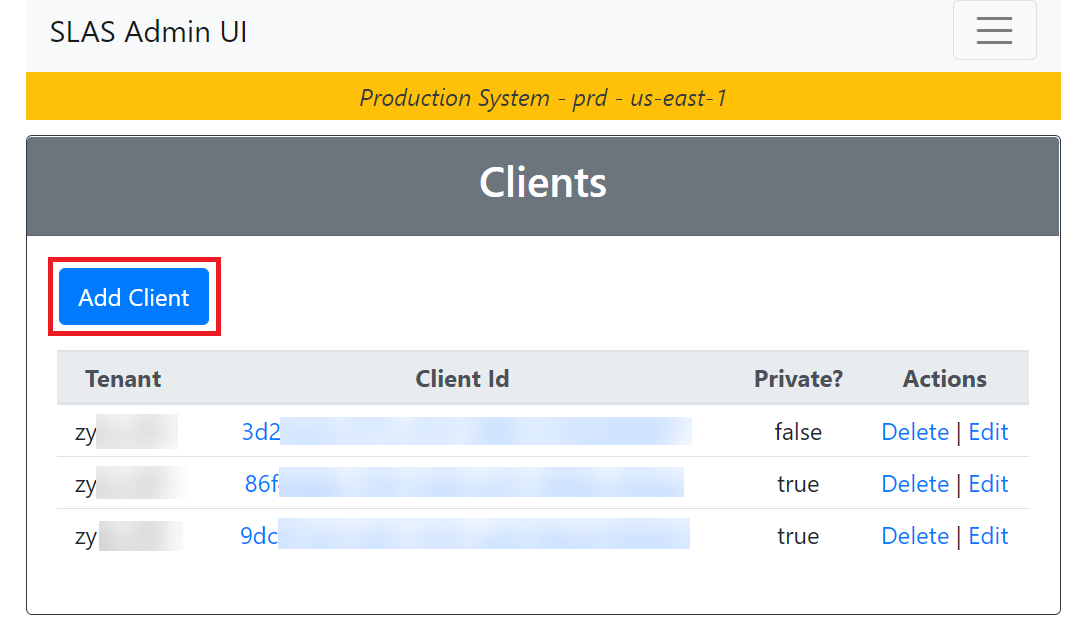
- Log in to SLAS Admin UI using the Account Manager credentials.
- From the menu on top, click Clients.
- Click the Add Client button.
- On the next screen that appears, provide the following details:
- From the What tenant will be used? drop-down, select your tenant ID.
Note: The tenant ID will be the same as the last portion of your organization ID. For example, if the organization ID is abc_zybz_001, the tenant ID will be zybz_001.
- From the What site will be used? drop-down, enter the site name if the site is not already populated.
- Enter the API client ID retrieved in the previous steps in the Client Id field.
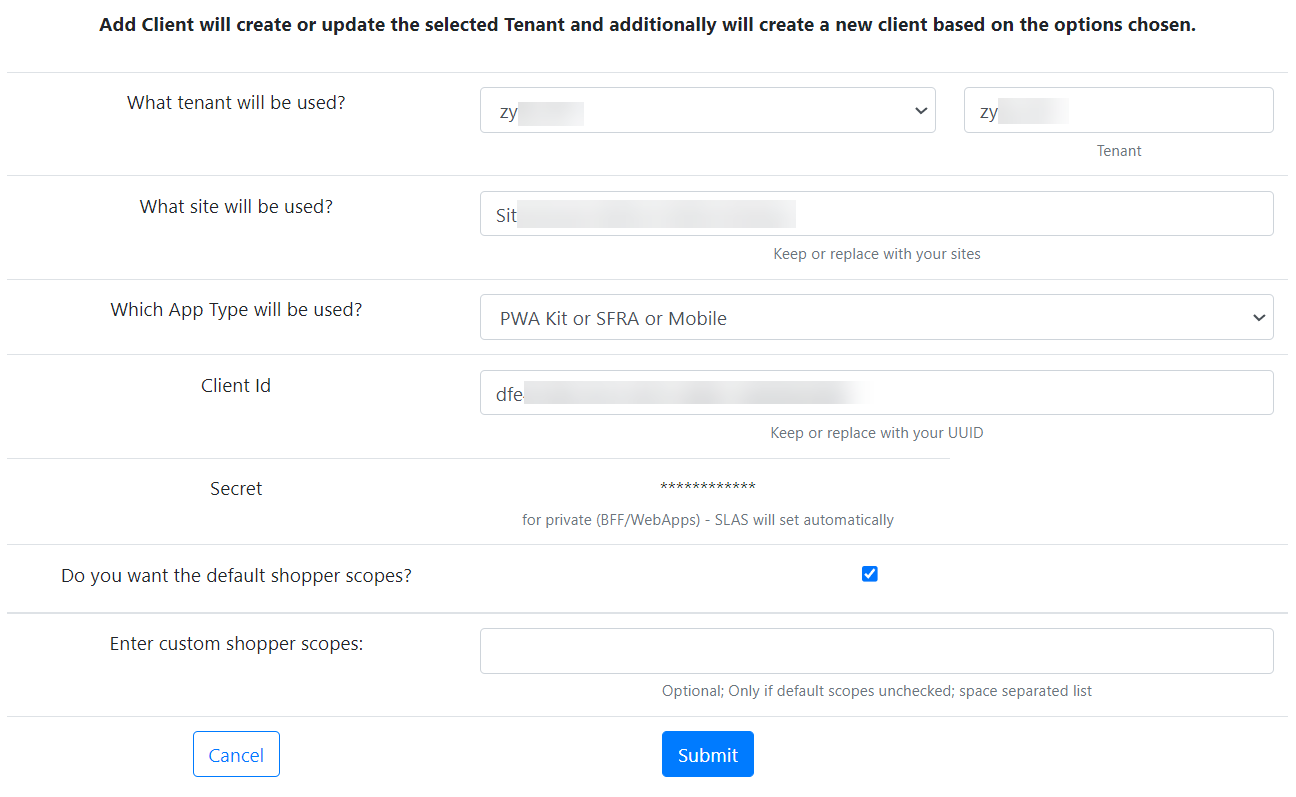
- From the What tenant will be used? drop-down, select your tenant ID.
- Click the Submit button.
You can view the Client Secret generated at the top.
-
Your app, by default, is Public.
- Copy and save the Client Secret.
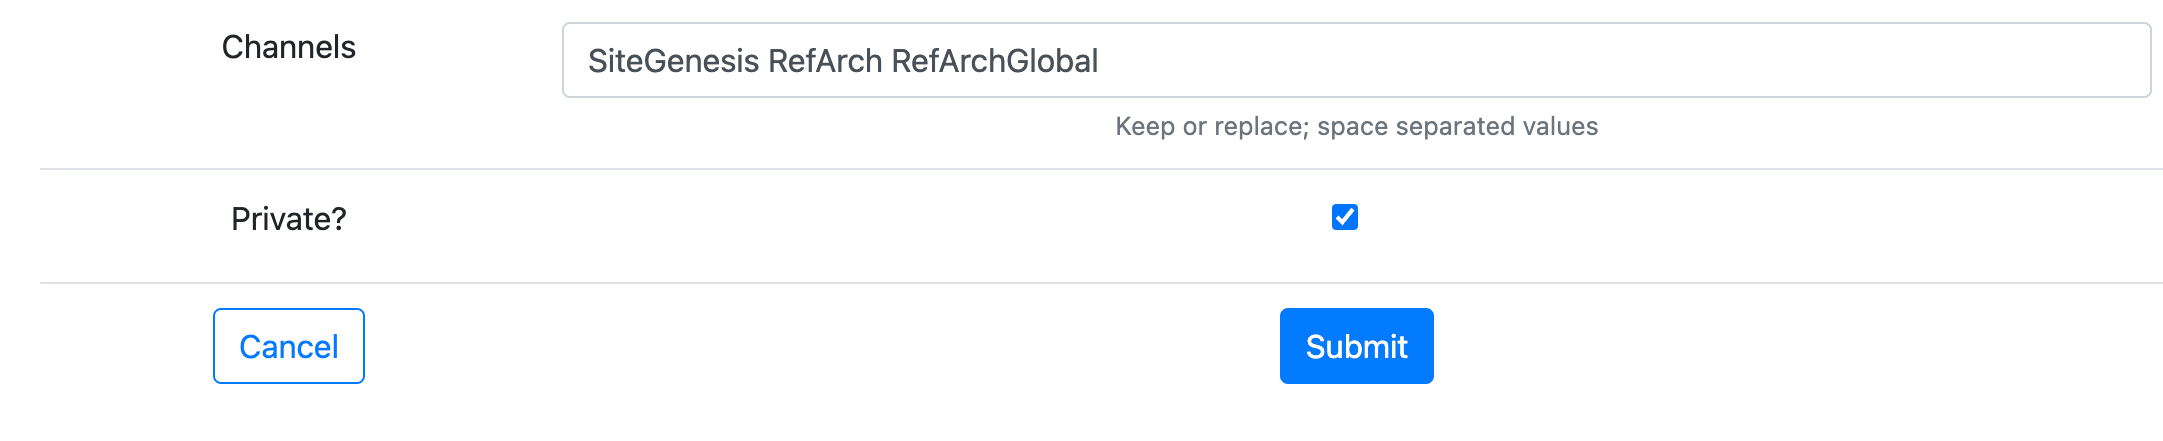
- Follow the steps below if you want to make your app Private:
- From the top menu, click Clients.
- Click the Edit option under Actions against your Client ID.
- Mark the checkbox next to Private?.
- Click the Submit button.
-
Install and Configure Salesforce Commerce in Marketplace
Log in to your Contentstack account and follow the steps below:
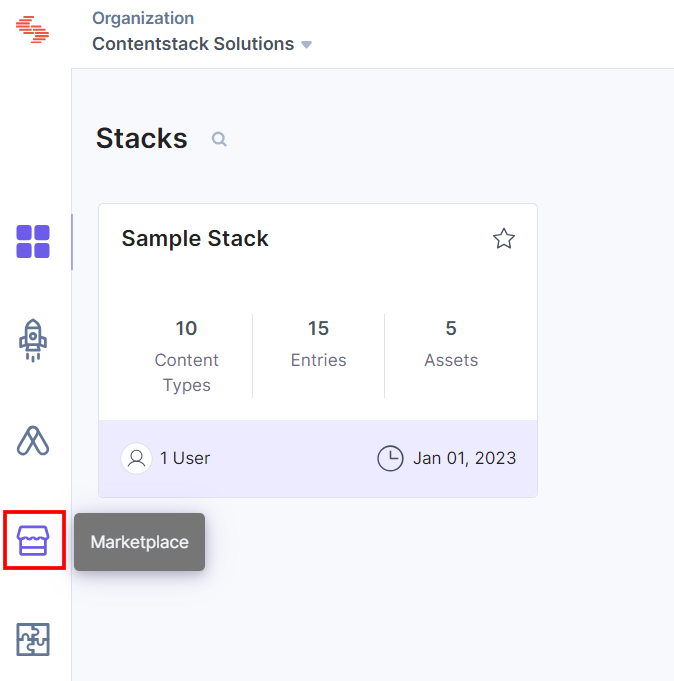
- In the left-hand side primary navigation, click the Marketplace icon.
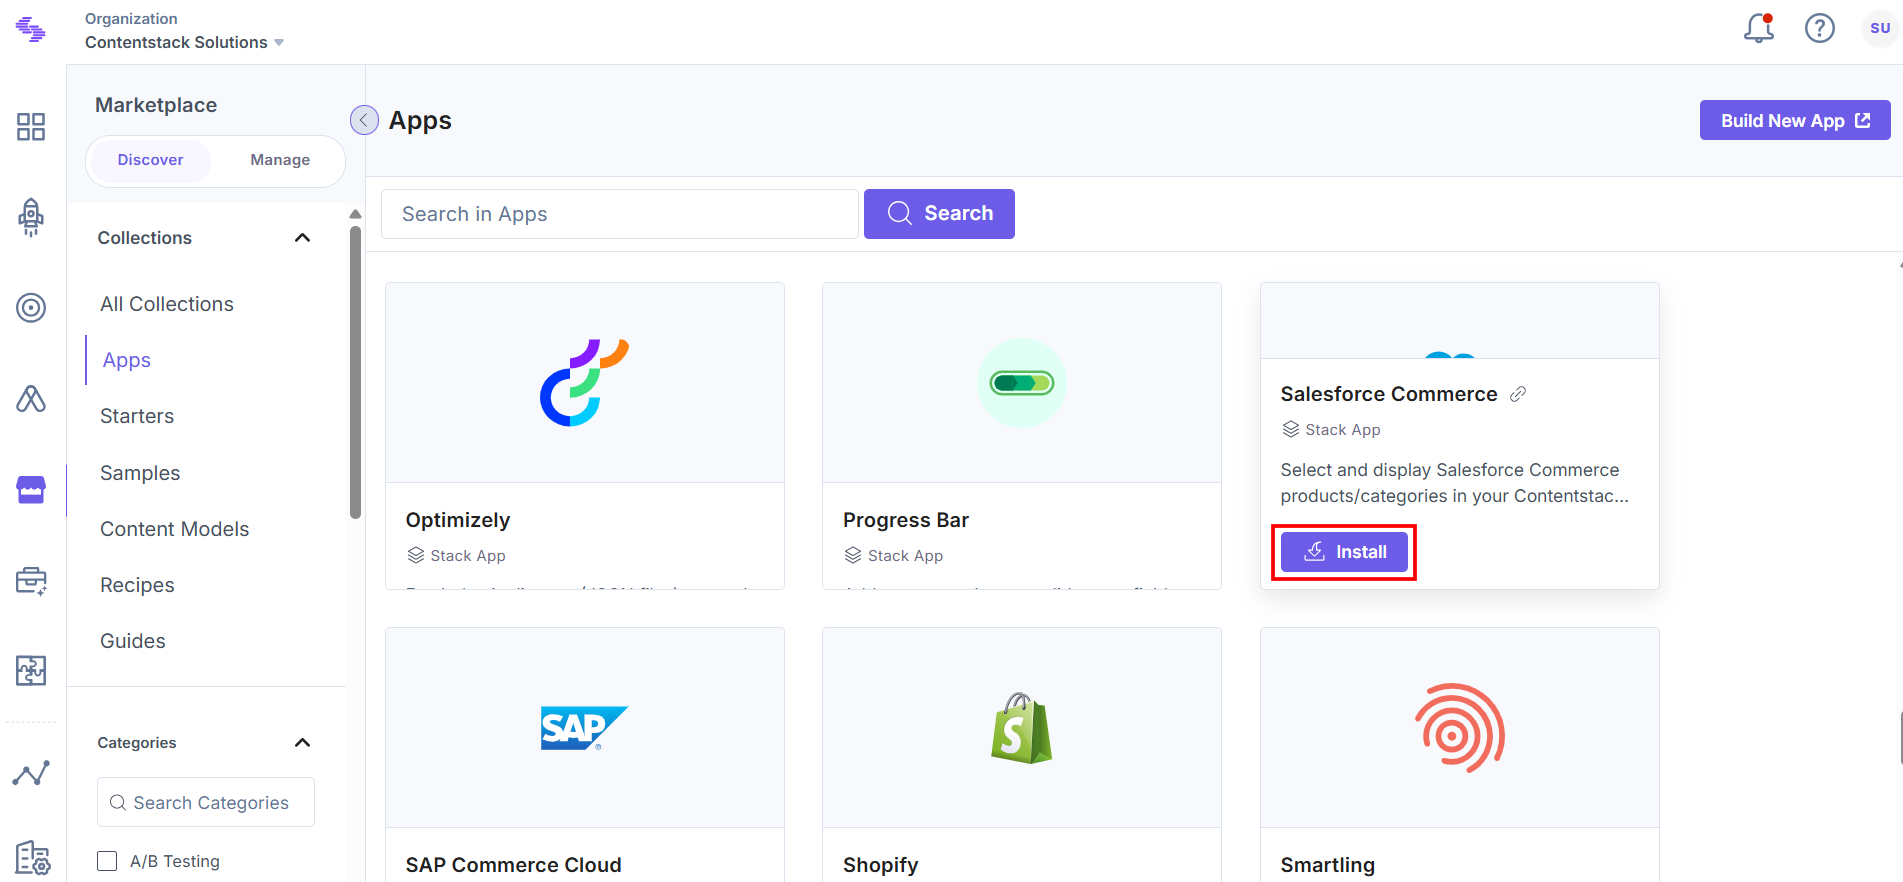
- Click Apps from the left panel.
- Within the Marketplace, you can see the available apps. Hover over the Salesforce Commerce app and click the Install button.
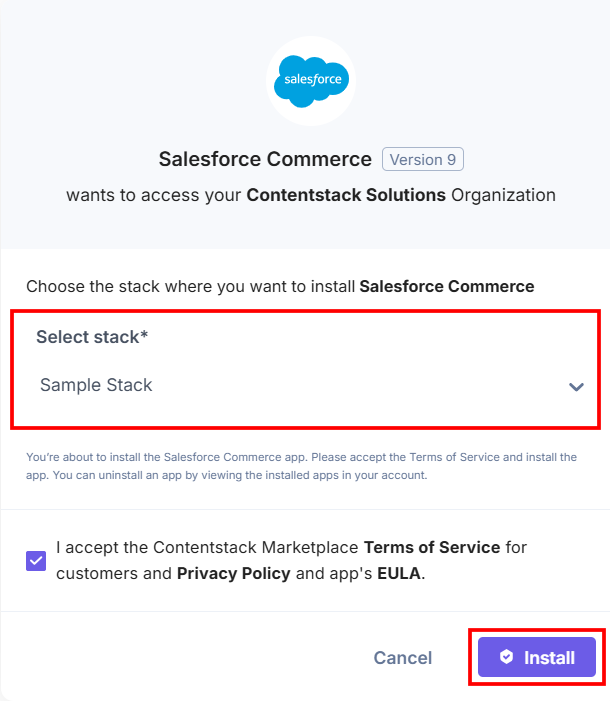
- In the pop-up window, select the stack where you want to install the Salesforce Commerce app, accept the Terms of Service, and click Install.
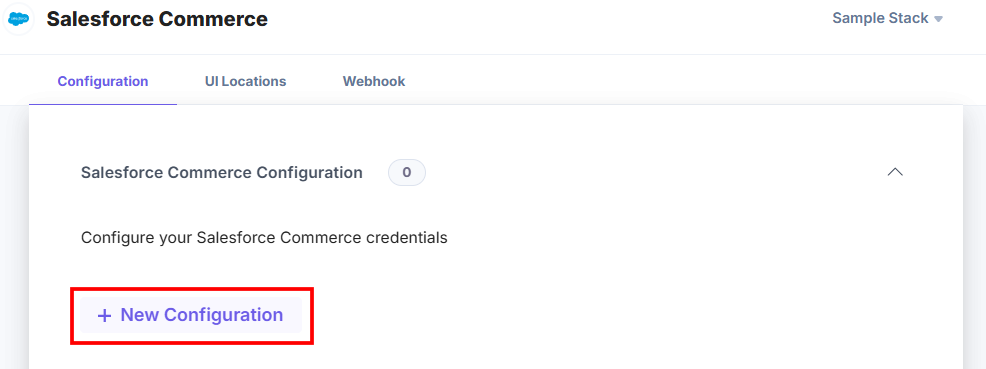
- On the Configuration screen, you can add multiple configurations for Salesforce Commerce. To do this, follow the steps given below:
- Click the + New Configuration button to add new configuration details.
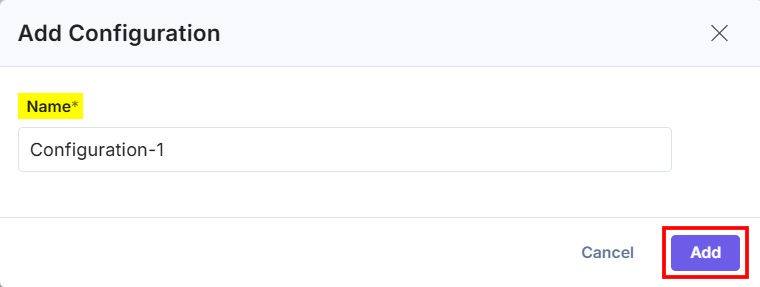
- In the Add Configuration modal, enter the configuration Name and click Add.
- After adding the configuration, enter the following details:
- Enter the Client ID (API client ID), Client Secret, Organization ID, Short Code, and Site Id retrieved from your Salesforce Commerce account in step 1.
- Category Levels: This represents the nesting of product categories on the selector page.
Note: If you do not specify any value, the default value sets to 1.
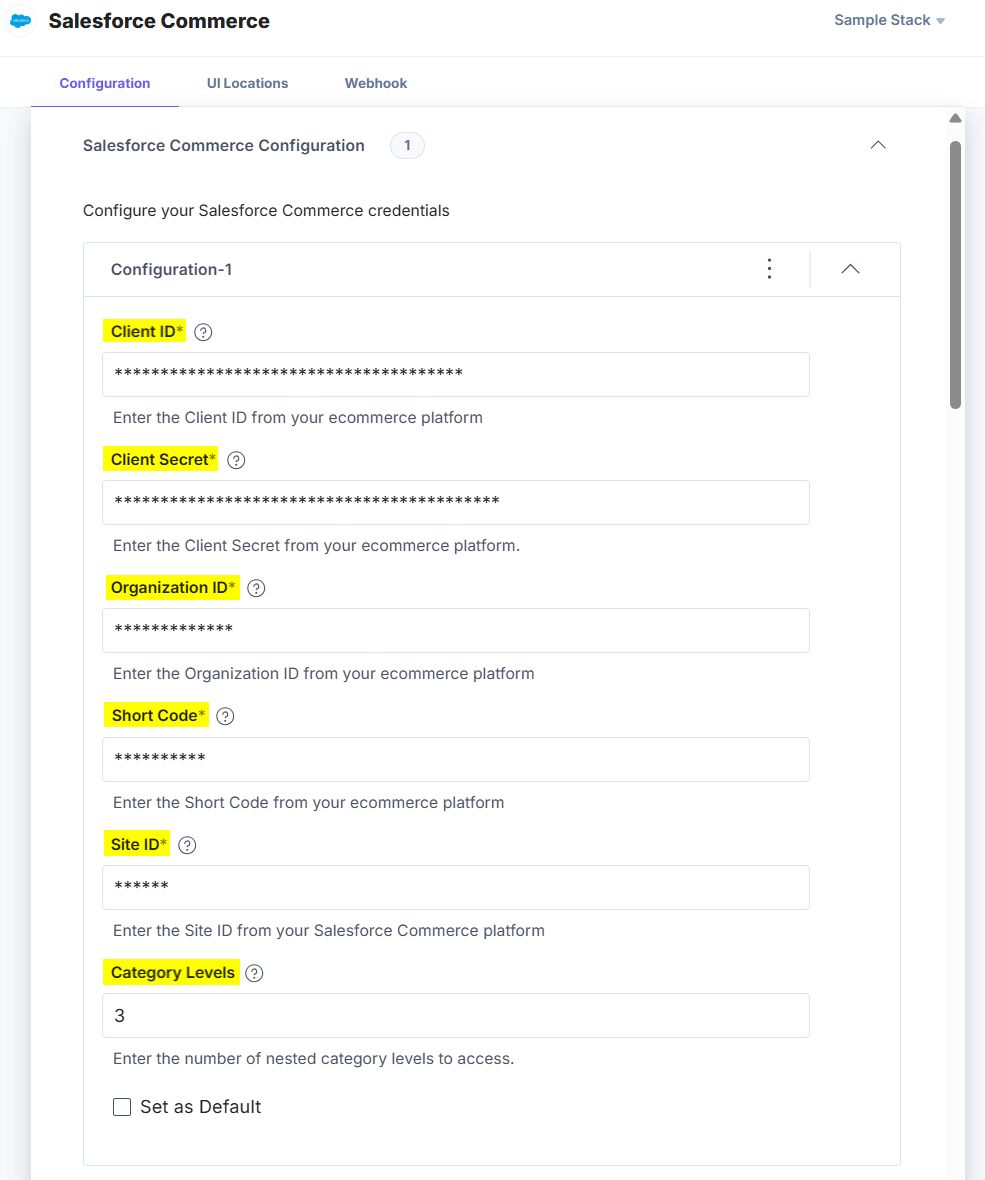
- Set as Default: To set this configuration as the default, click this checkbox.
Alternatively, you can set a configuration as the default by clicking the three dots on the top-right side of the configuration section and then selecting Set as Default.
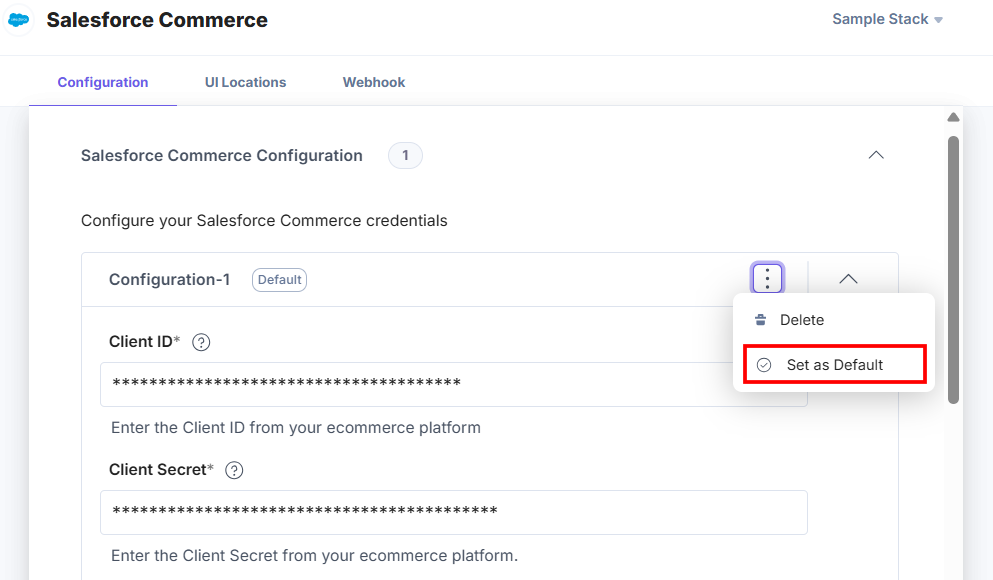
Note: At least one app configuration should be selected as the default.
Similarly, you can add multiple configurations by following the steps discussed above.
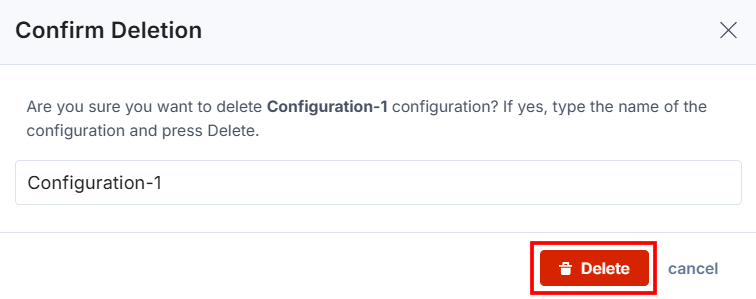
- To delete the configuration, click the three dots and select Delete Configuration.
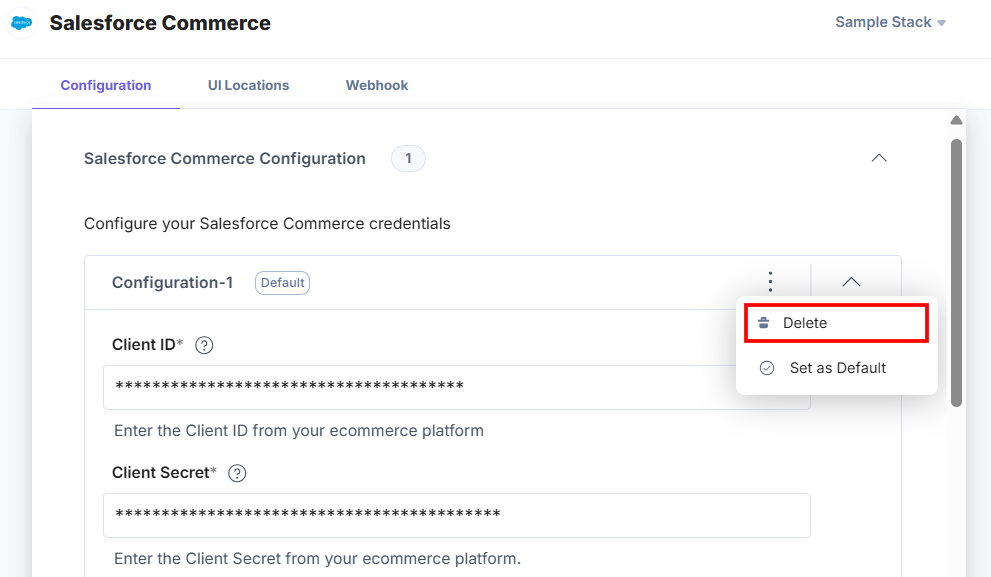
In the Confirm Deletion modal, add the configuration name and click Delete.
- For an existing user, the credentials will be added as the default configuration, and named as legacy_config.
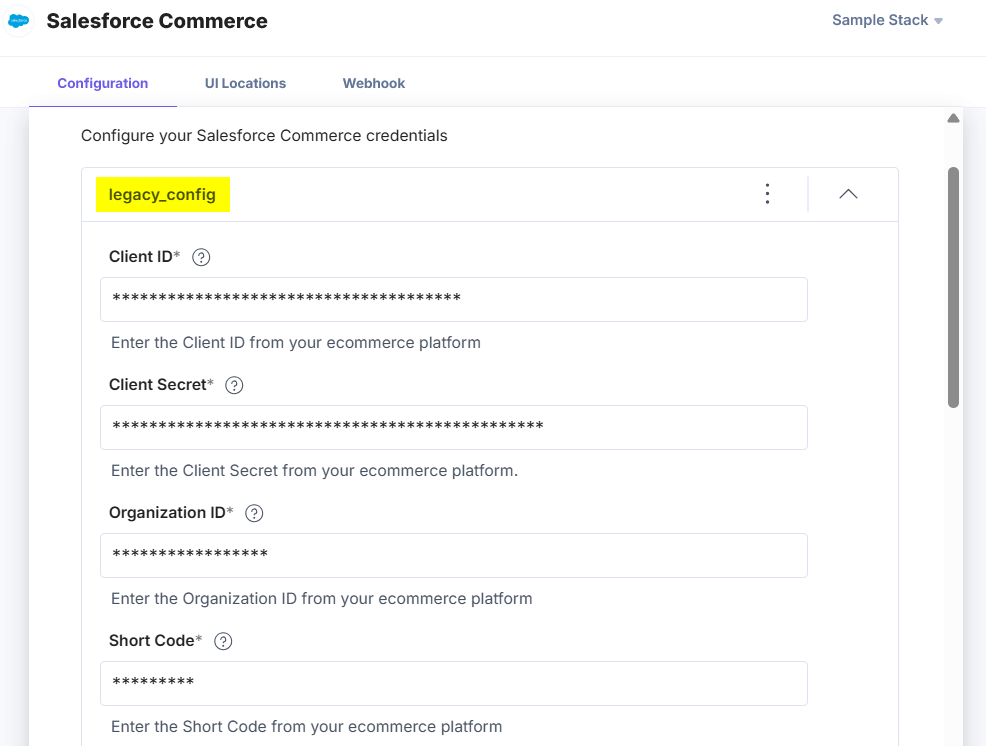
Warning:
- legacy_config is a reserved keyword and you cannot use it in adding new configurations.
- If you delete the legacy_config configuration, data loss may occur and you will not be able to access the products and categories from the related accounts.
- Save in Entry: Choose how to save the data fetched from the Salesforce Commerce account in Contentstack entries.
- If you select the All Fields option, you can select only a limited number of products in the entry
- For Custom Fields, you can search and add specific Salesforce Commerce Fields you want to save in entries.
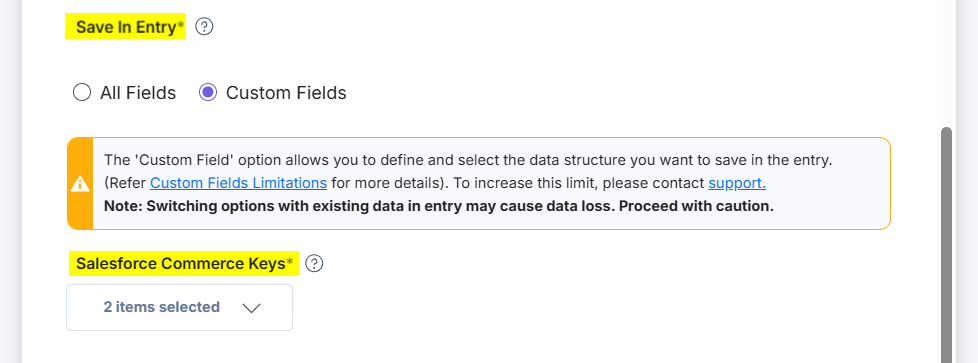
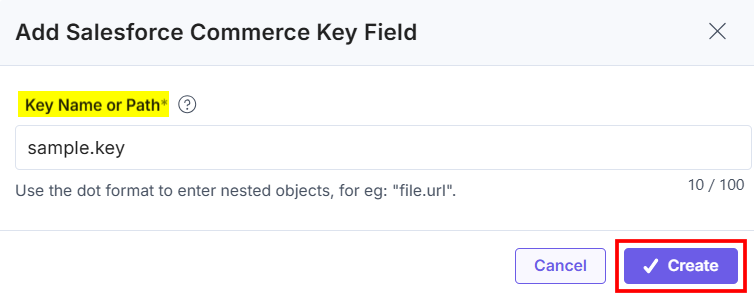
If you select Custom Fields then the Salesforce Commerce Keys drop-down appears. By default, id and name keys are already selected. If you want to create a new key, click the + New Key Field option.

In the Add Salesforce Commerce Key Field modal, enter the Key Name or Path and click the Create button to create a new key.
- Click the + New Configuration button to add new configuration details.
- After adding the configuration details, click the Save button.
- On the UI Locations tab, you can see the predefined app locations. You can use the toggle button corresponding to each UI location to enable or disable it based on your requirements.
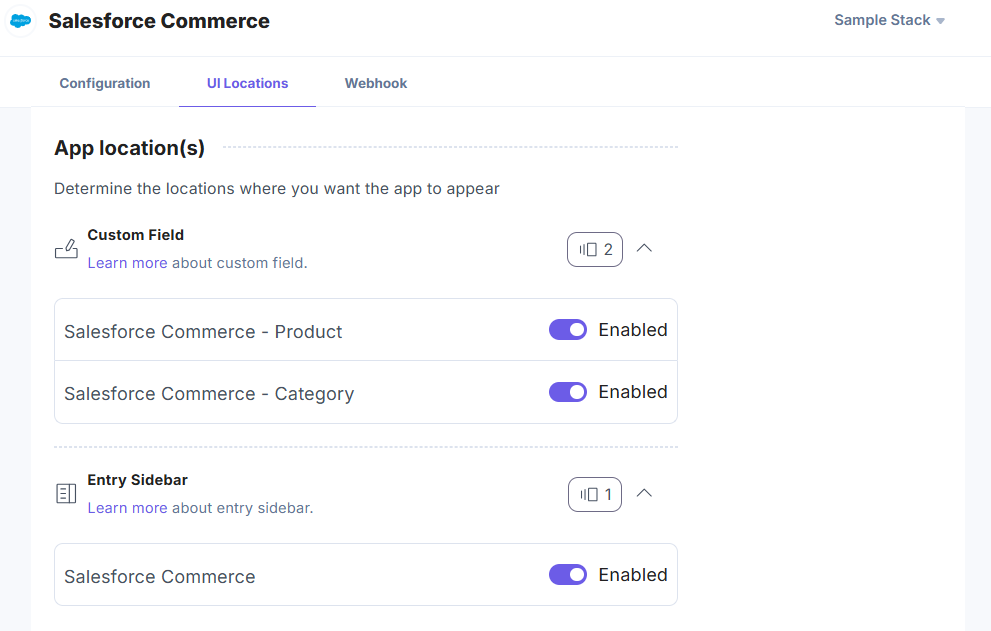
Note: The app requires at least one UI location to be enabled, otherwise you will not be able to save your app configuration settings.
- If the webhook is enabled for your app, you can view the webhook logs under the Webhook tab.
Additional Resource: For more information on UI location and webhooks, please refer to the Installed Apps guide.
- Click Open Stack to start using the Salesforce Commerce app.
- In the left-hand side primary navigation, click the Marketplace icon.
-
Use Salesforce Commerce within your Stack
To use the Salesforce Commerce app within an entry of your stack, follow the steps given below:
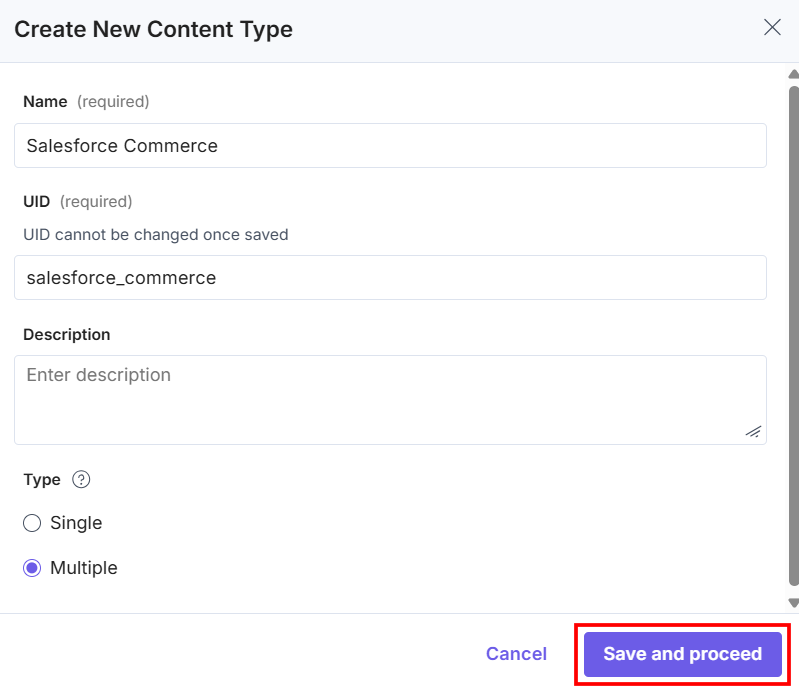
- Go to your stack, click the Content Models icon on the left navigation panel, click the + New Content Type button, and then click the Create New dropdown option.
- Create a content type by entering relevant details as given below:
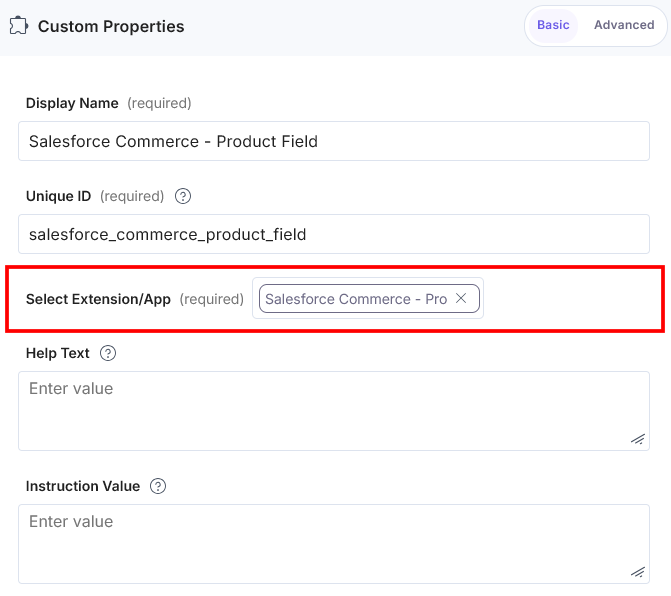
- In the Content Type Builder page, add a Custom field for product in your content type by clicking the Insert a field link represented by a + sign.
- Under Select Extension or App, select Salesforce Commerce - Product and click the Proceed button.
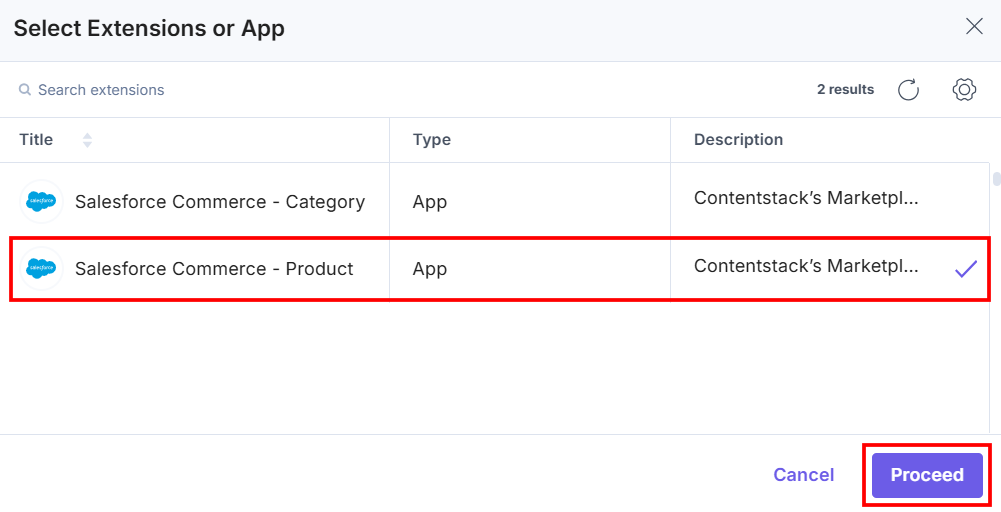
This adds Salesforce Commerce - Product in the custom field.
- Add another Custom field for category in your content type by clicking the Insert a field link represented by a + sign.
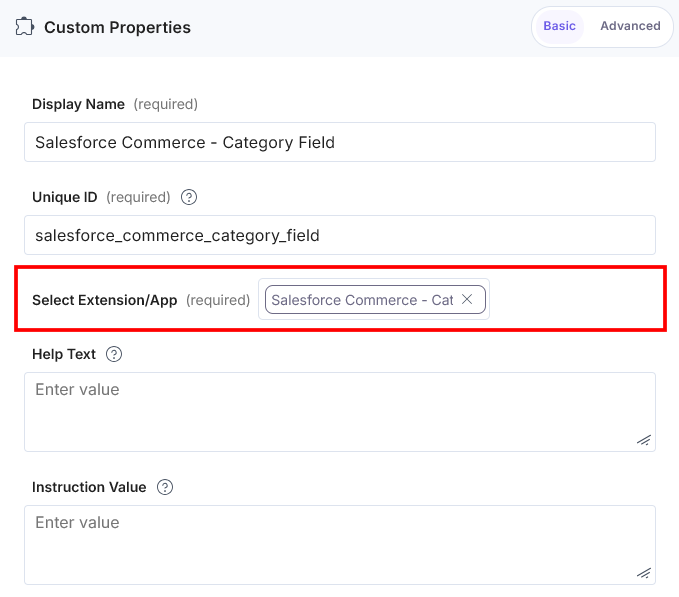
- Under Select Extension or App, select Salesforce Commerce - Category and click the Proceed button.
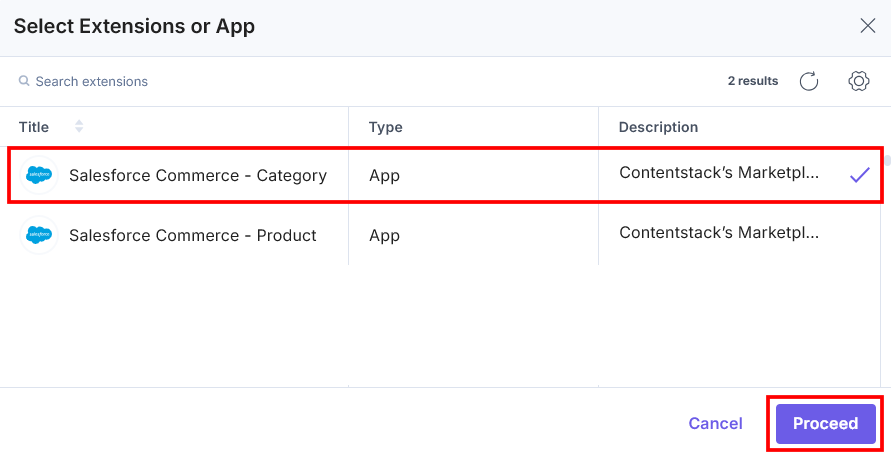
This adds Salesforce Commerce - Category in the custom field.
- Under Advanced properties, you have the option to set the Config Parameter for all entries of a particular content type. If you do so, it overrides the default app configuration you set at the time of app installation on the Configuration screen.
The key:value passed in the configuration object overrides the default app configuration settings.
If you want to use a different Salesforce Commerce configuration for any custom field within the same stack, you need to specify the configuration name in the Config Parameter as follows:
Configuration Object:
{
  "config_label": [
    "Configuration-2"
  ]
}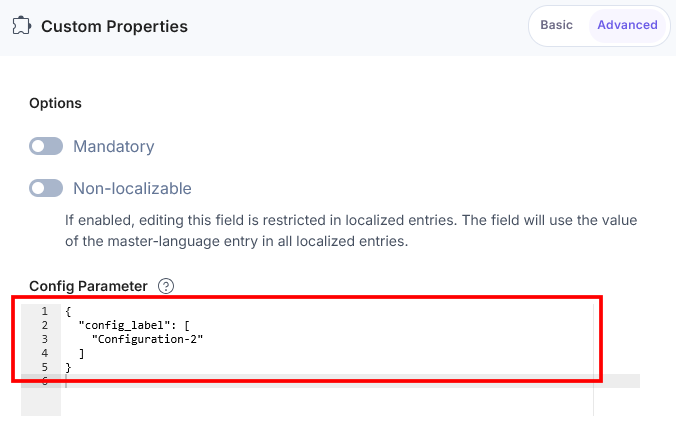
Locale Based Configuration Object: To add a locale-based configuration, add a locale parameter to the additional configuration object which specifies the locale value (for example: en-us) as the object key and the configuration object as the value to the locale.
locale Configuration Object:
{ "config_label": [ "Configuration-1", "Configuration-2" ], "locale": { "en-us": { "config_label": [] }, "en-ZA": { "config_label": [] } } }Note: If any configuration value is not added, or if all the values are empty in the Config Parameter properties settings, the Salesforce Commerce app uses the default credentials configured in the installation in step 2.
- After adding the custom fields for the app, click Save or Save and Close to save your changes.
- To use the Salesforce Commerce app, create an entry for this content type. In the left navigation panel, navigate to the Entries page, click + New Entry to create a new entry for the above content type, and then click Proceed.
You can see the Salesforce Commerce app’s custom fields on your entry page as shown below:
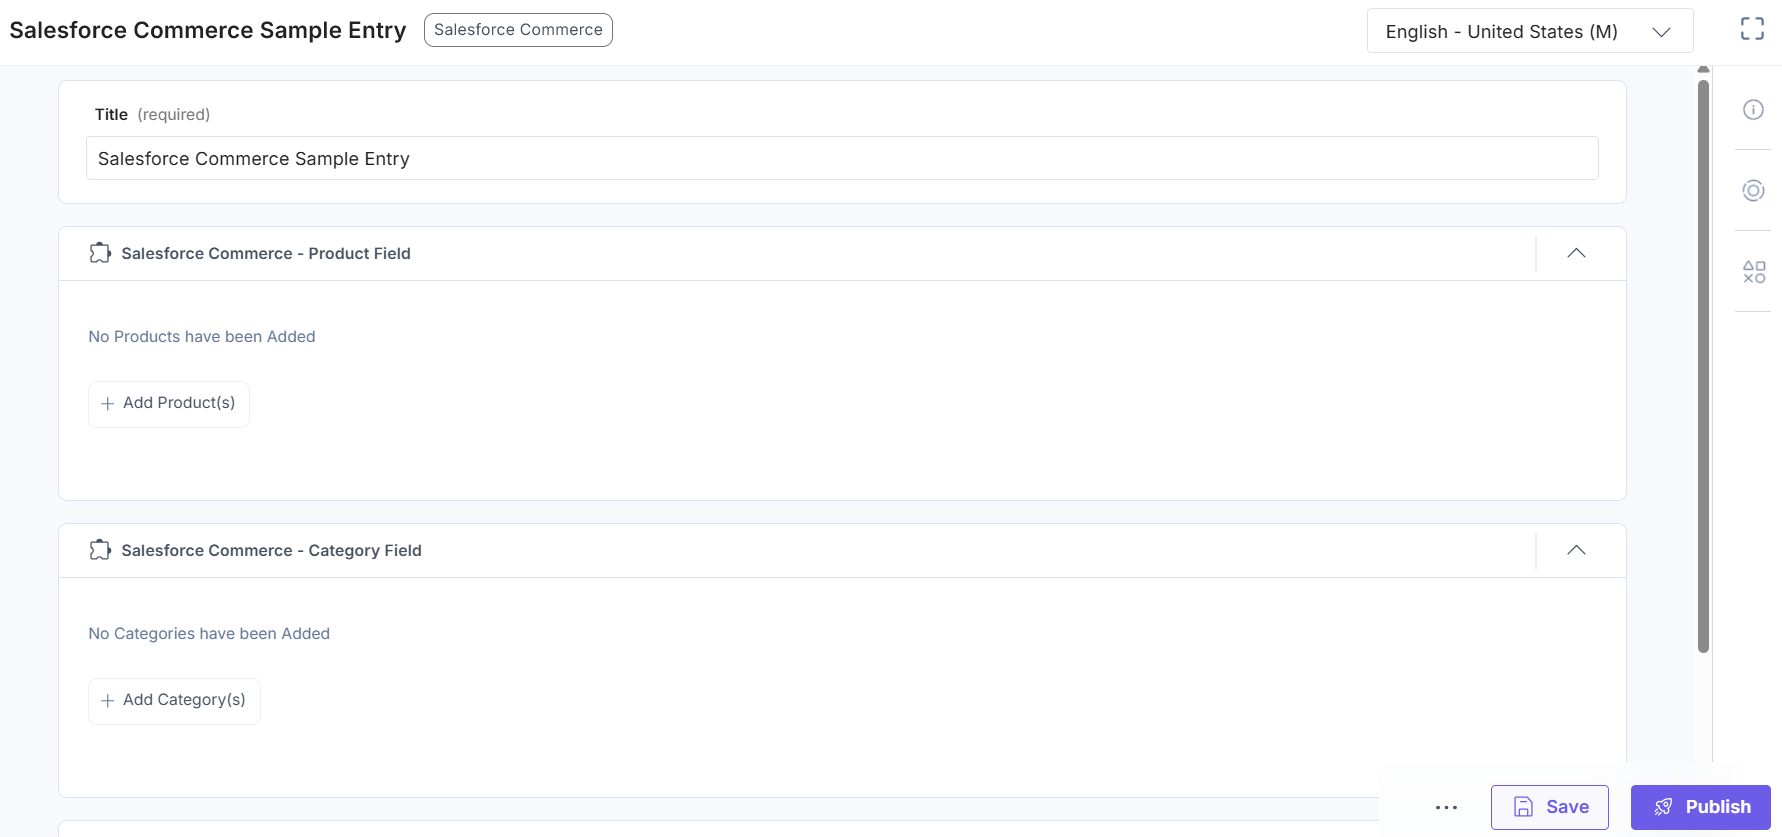
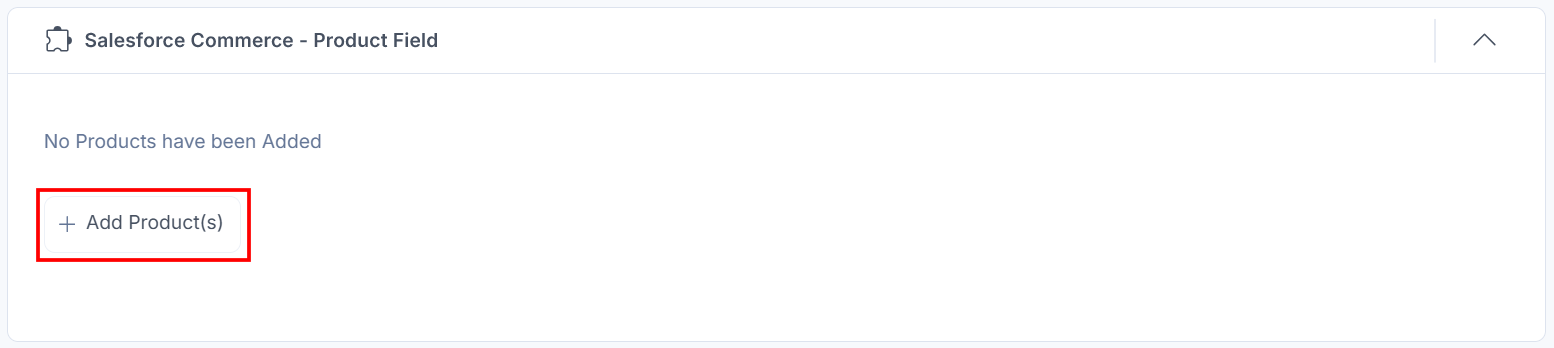
- Click the + Add Product(s) button to choose the product(s).
- Select the products from your Salesforce Commerce store and click the + Add Product(s) button to add them to your entry.
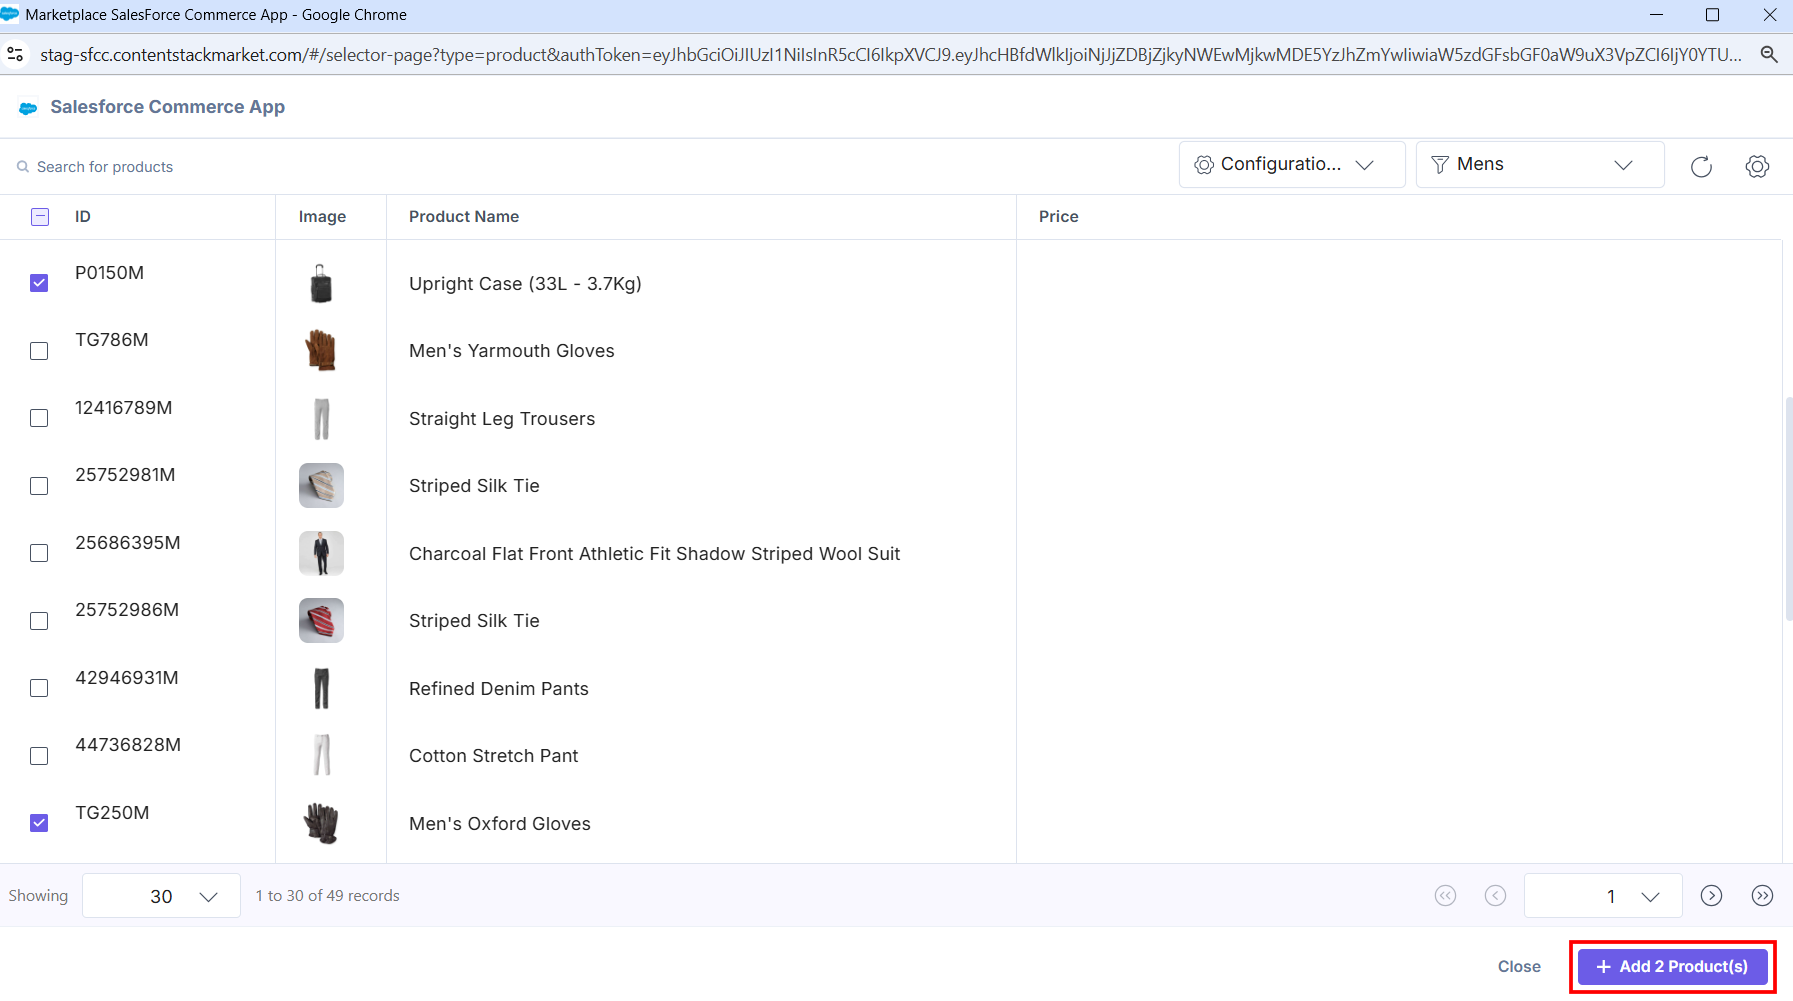
You can select the products from multiple configurations at once using the Configuration drop-down.
You can also search for products in the Salesforce Commerce selector page based on the product name.
Hover over the product on the Salesforce Commerce selector page, and you can see the View in Salesforce Commerce option to go directly to the Salesforce Commerce platform.
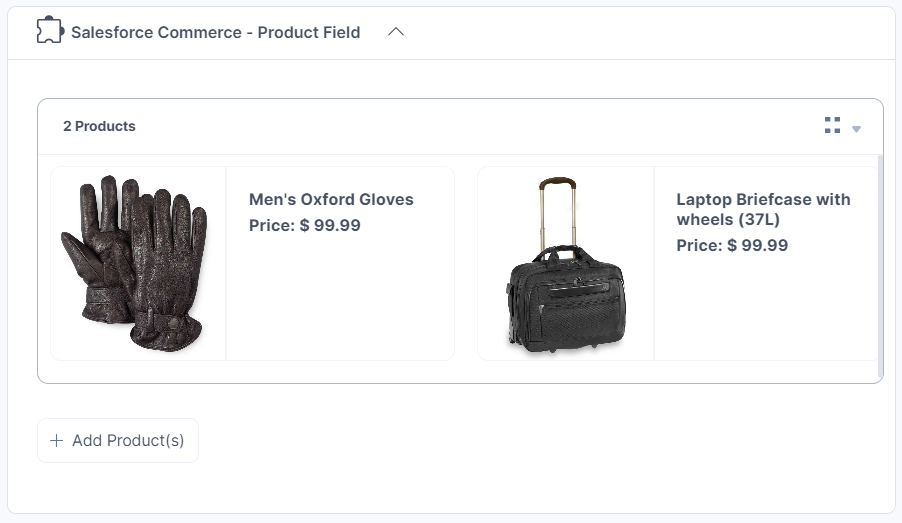
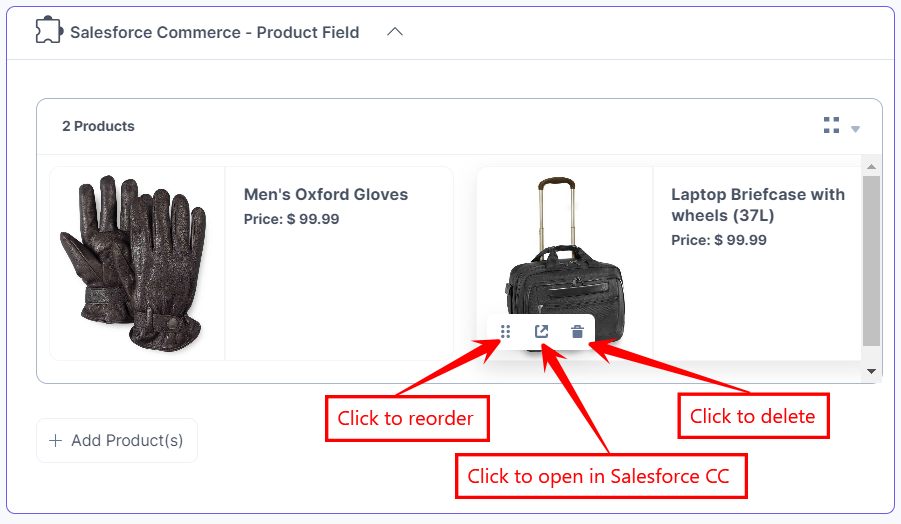
The products you selected are referenced within your entry in the thumbnail view.
 Select the list view option from the dropdown to view the products in the list view.
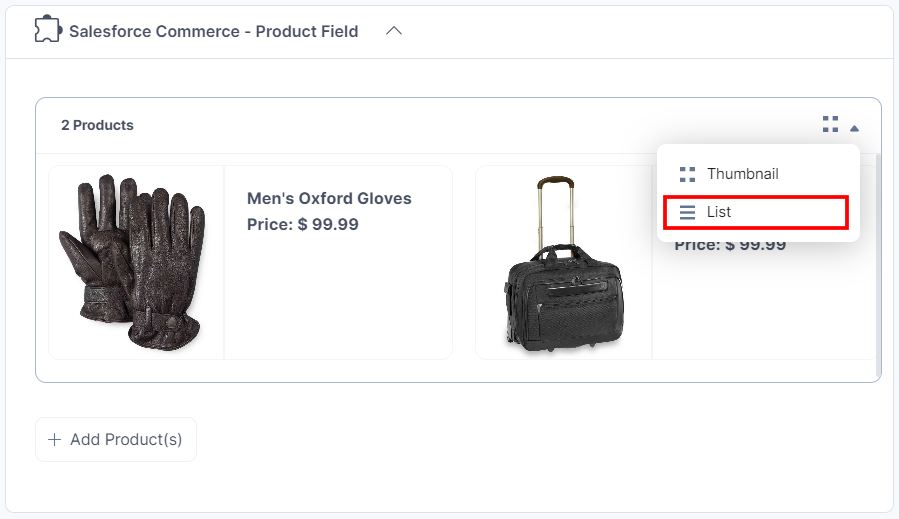
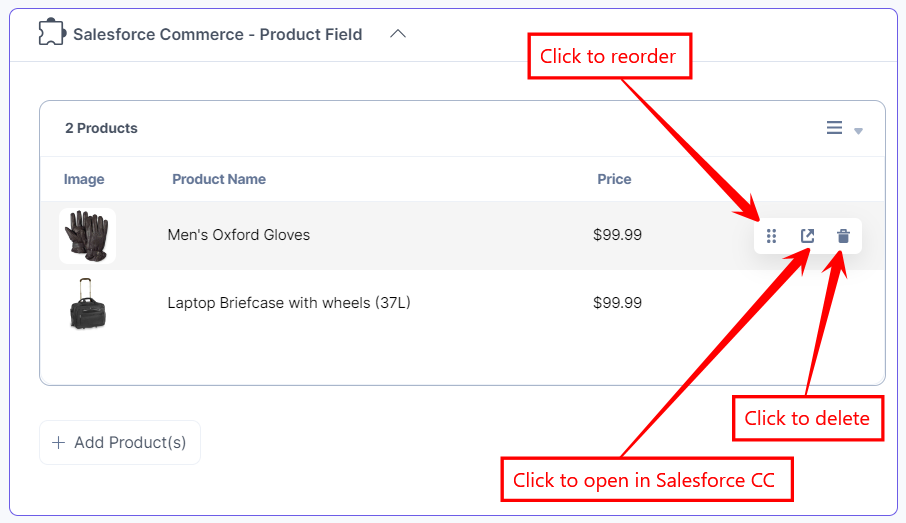
The products you selected are referenced within your entry in the list view.

- To reorder, open in Salesforce Commerce, or delete the selected product, hover over the product to get the available options, then perform the following:
- Click the Drag icon to drag and reorder the product.
- Click the Open in Salesforce Commerce icon to open the product in the Salesforce Commerce app.
- Click the Remove icon to delete the product.
Thumbnail View
List View
- Click the Save button to save your entry.
- You can view more product details in the Sidebar Widget.
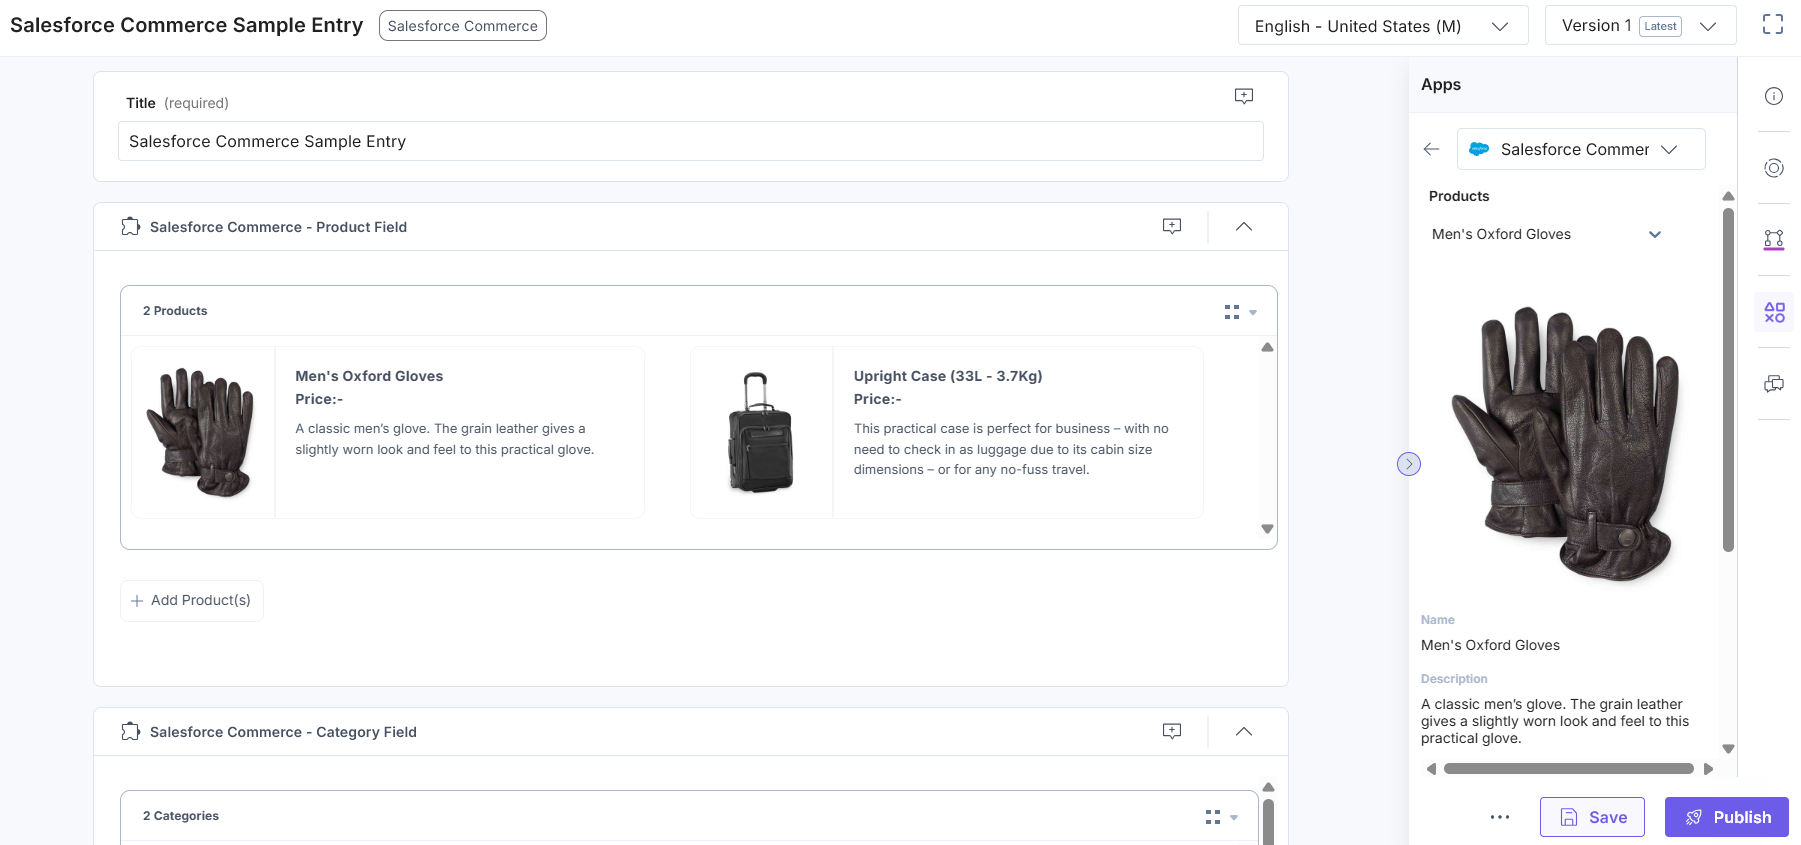
Note: You must save your entry to get the product details in the Sidebar Widget.
- Click the + Add Category(s) button to choose the category(s).
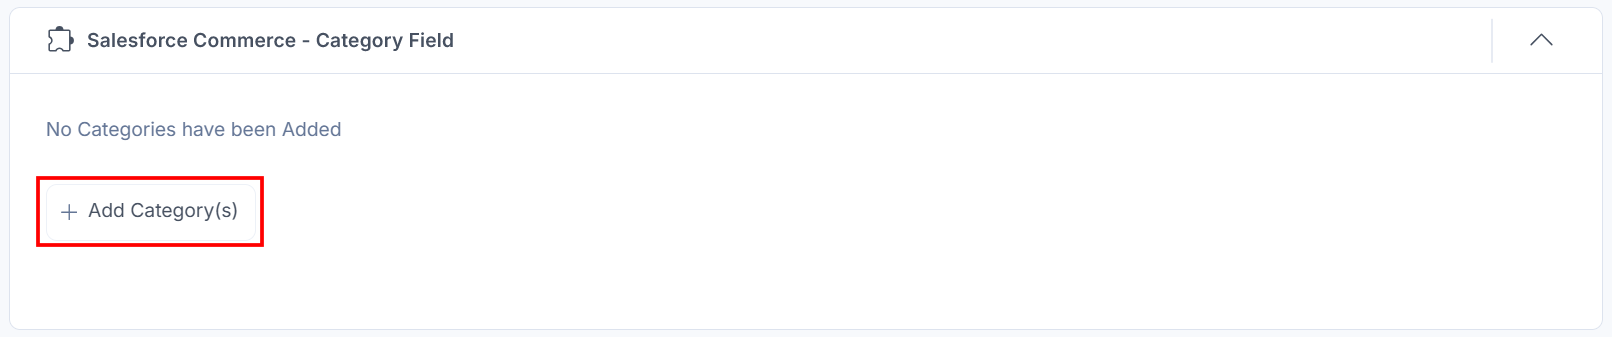
- Select the categories from your Salesforce Commerce selector page and click the + Add Category(s) button to add them to your entry.
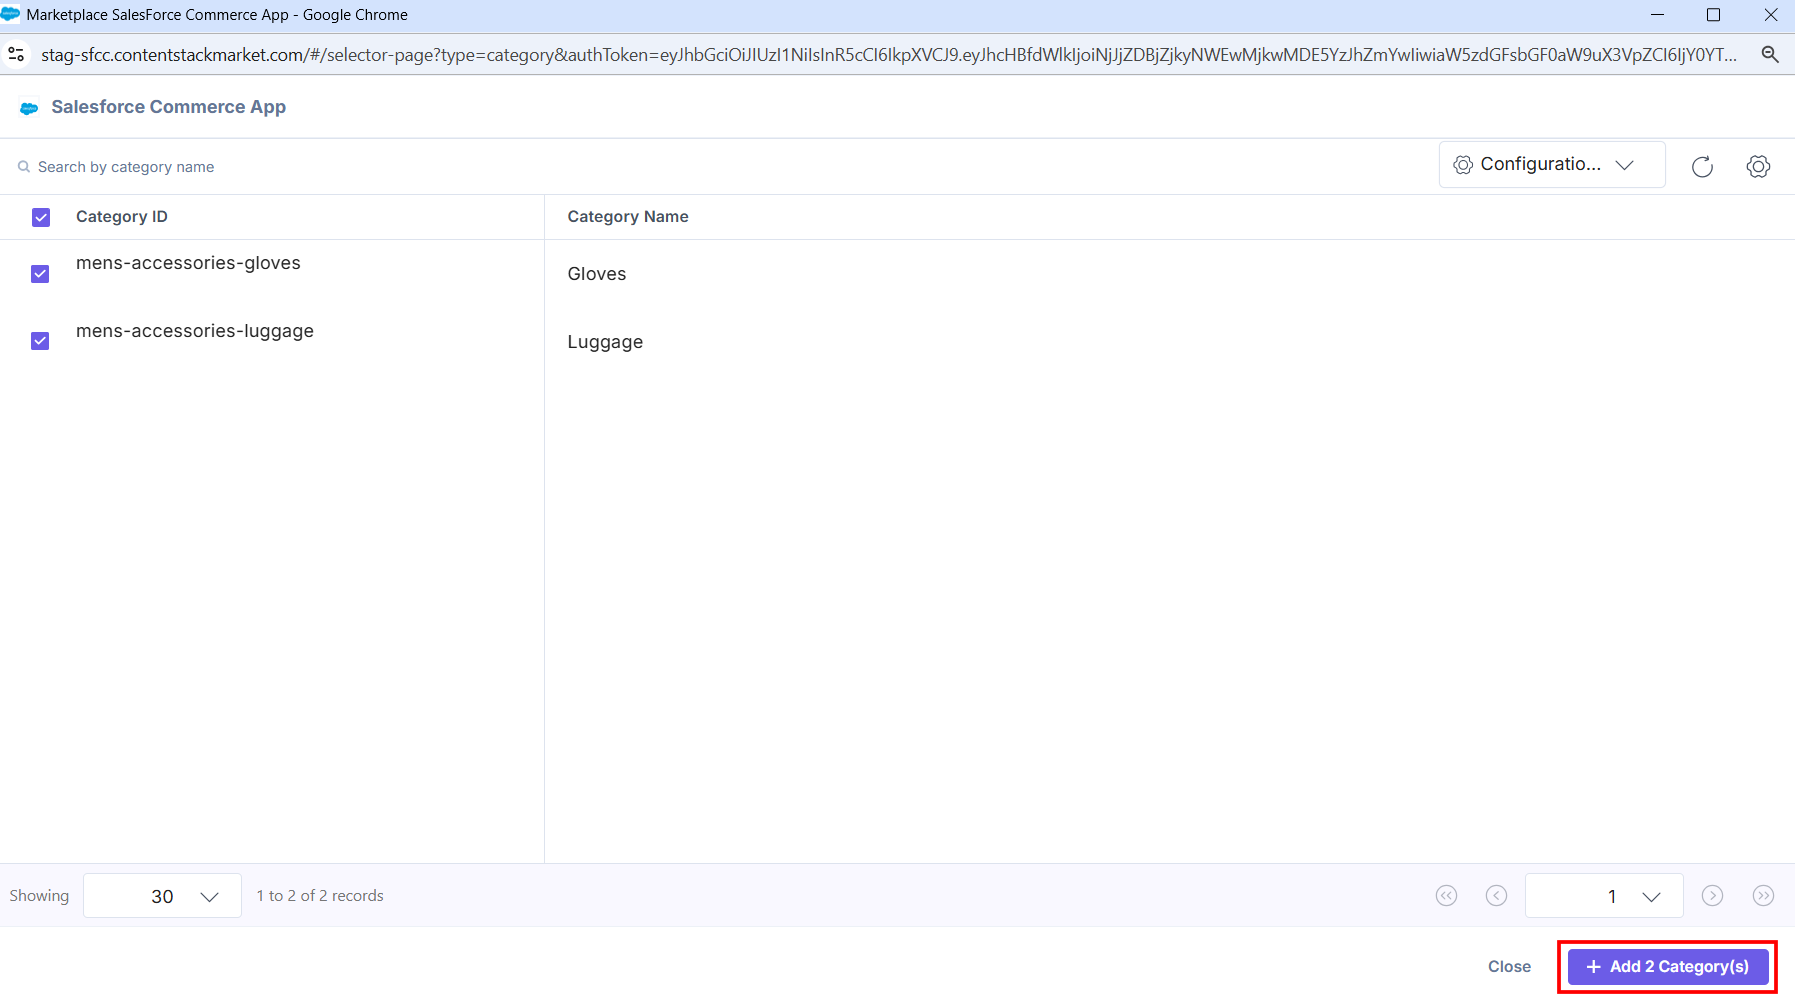
You can select the categories from multiple configurations at once using the Configuration drop-down.
You can also search for categories in the Salesforce Commerce selector page using the Category Name.
Hover over the category on the Salesforce Commerce selector page, and you can see the View in Salesforce Commerce option to go directly to the Salesforce Commerce platform.
The categories you selected are referenced within your entry in the thumbnail view.
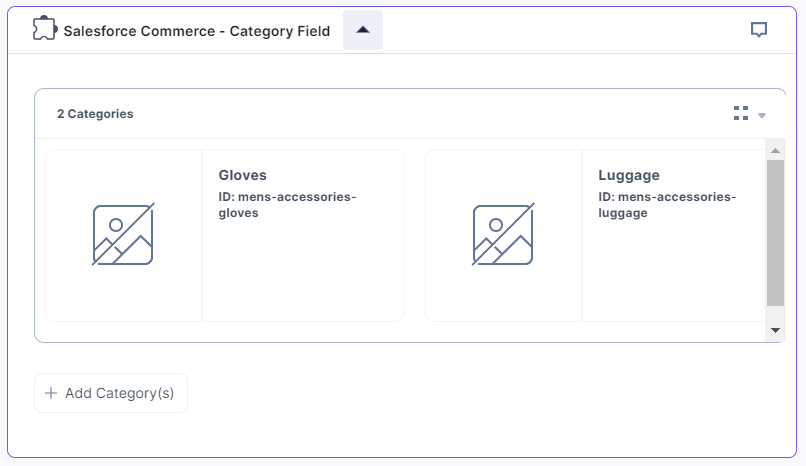
Select the list view option from the dropdown to view the categories in the list view.
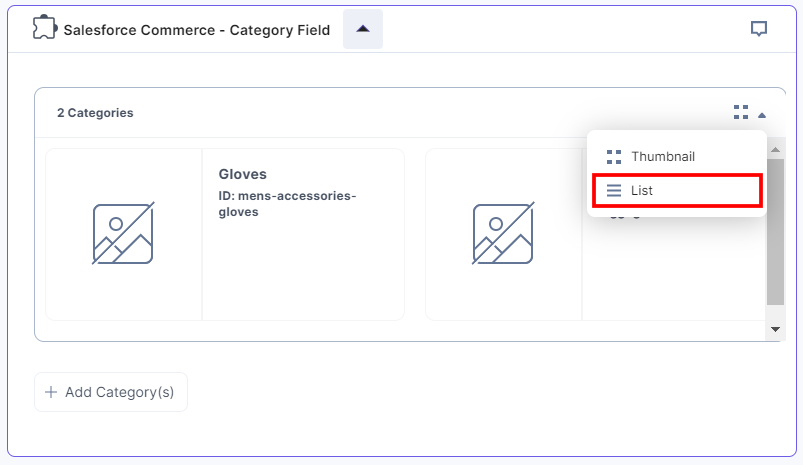
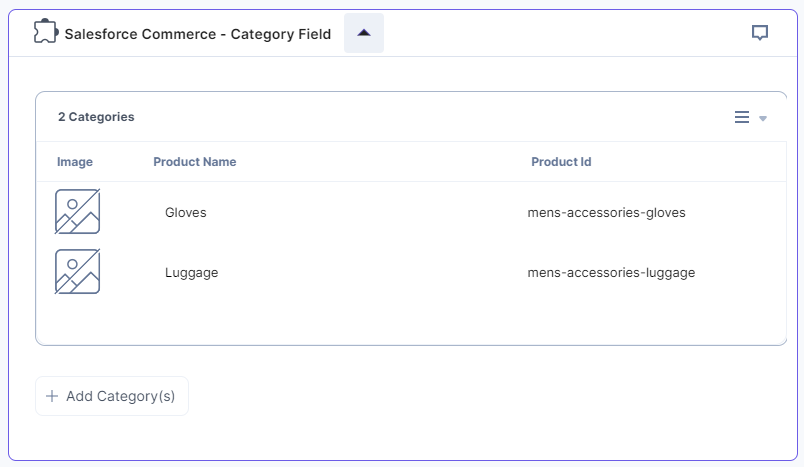
The categories you selected are referenced within your entry in the list view.
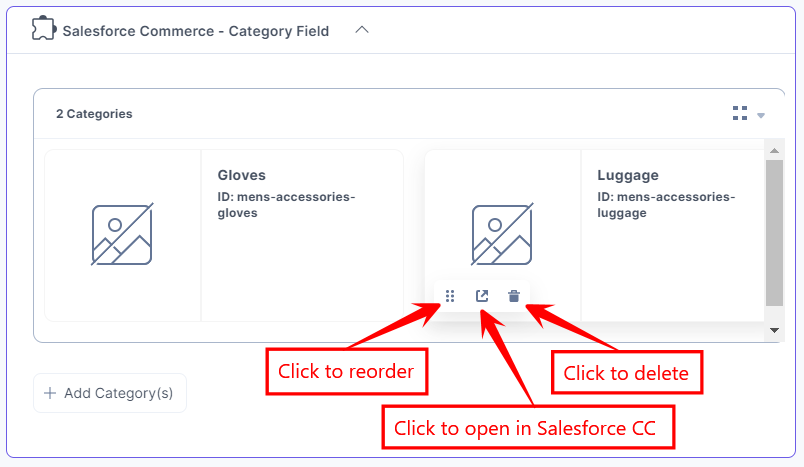
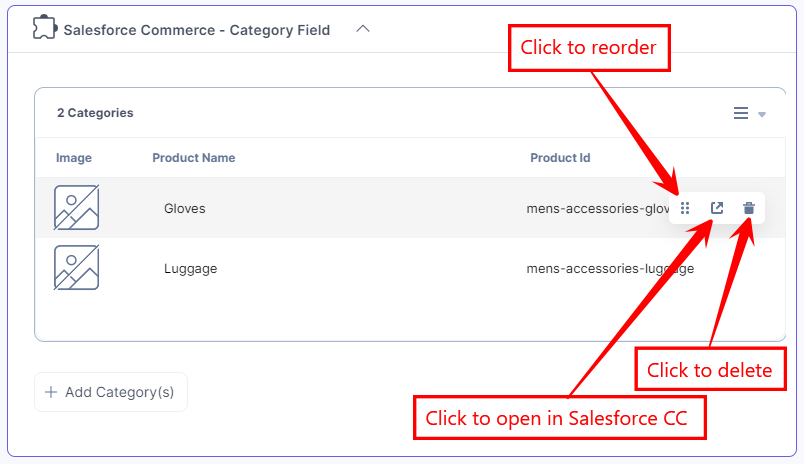
- To reorder, open in Salesforce Commerce, or delete the selected category, hover over the category to get the options available, then perform the following:
- Click the Drag icon to drag and reorder the category.
- Click the Open in Salesforce Commerce icon to open the category in the Salesforce Commerce app.
- Click the Remove icon to delete the category.
Thumbnail View
List View
- Click the Save button to save your entry.
More articles in "Commerce"
