AI Assistant App Installation Guide
AI Assistant is an AI-based natural language processing platform that processes and transforms content. It can modify, generate, and alter your content into a readable format with more accuracy. It is efficient and capable of providing human-like responses for any query, making it even more popular.
Contentstack Marketplace lets you install the AI Assistant application and use it within your entries to transform content. You can add the AI Assistant app in the Field Modifier UI location for different entry fields such as Title, Single Line Textbox, Multi-Line Textbox, HTML-based Rich Text Editor, JSON Rich Text Editor, and Markdown.
You can instantly create high-quality content for an entry field based on another field such as outlines, summaries, headlines, and much more. The AI Assistant app also allows you to provide custom instructions on a particular field to manipulate the content based on your instructions.
Prerequisites
- Contentstack account
- Access to the Contentstack Organization/Stack as the Owner/Admin
This step-by-step guide lets you install the AI Assistant app within your stack.
Steps for Execution
Install AI Assistant in Contentstack Marketplace
Follow the steps to install the AI Assistant application in Contentstack.
- Log in to your Contentstack account.
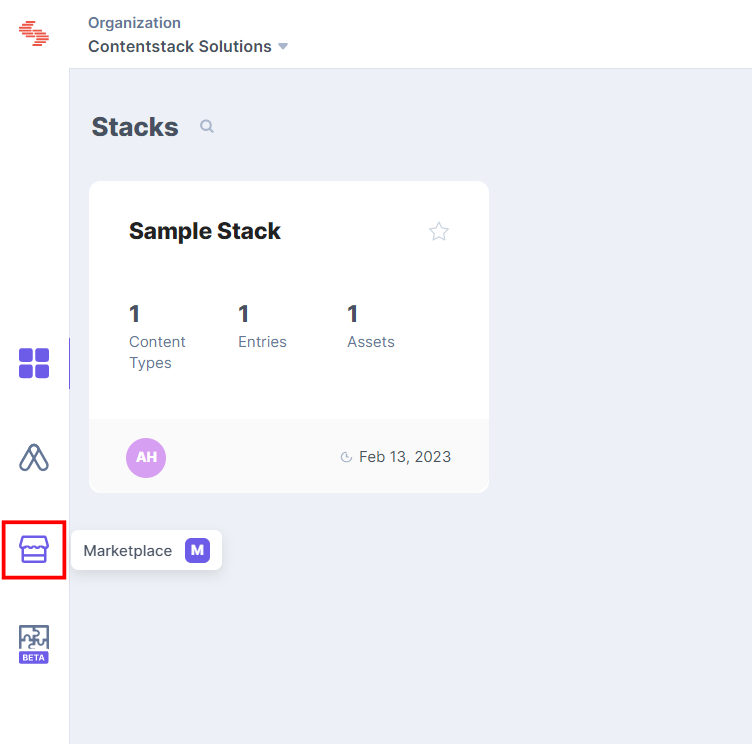
- From the left-hand side primary navigation, click the Marketplace icon to go to the Marketplace.
- Click Apps from the left panel.
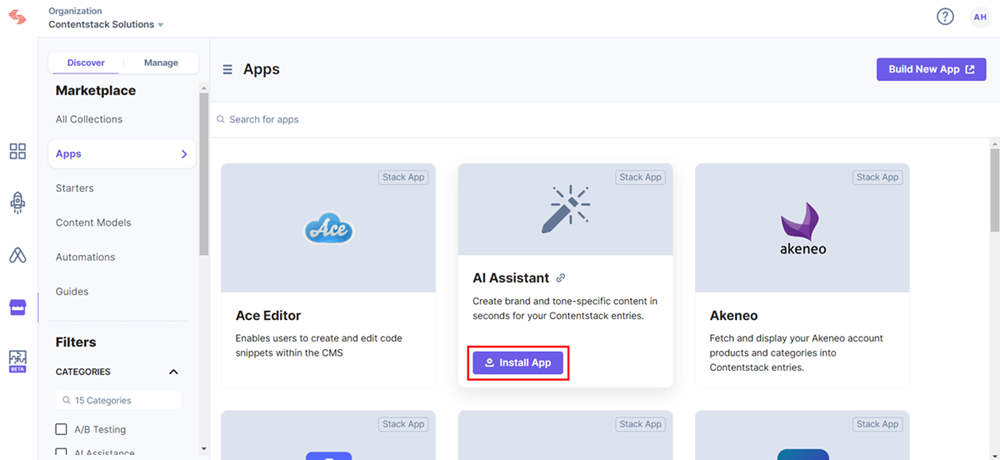
- Within the Marketplace, you can see all the available apps. Hover over the AI Assistant app and click Install App.
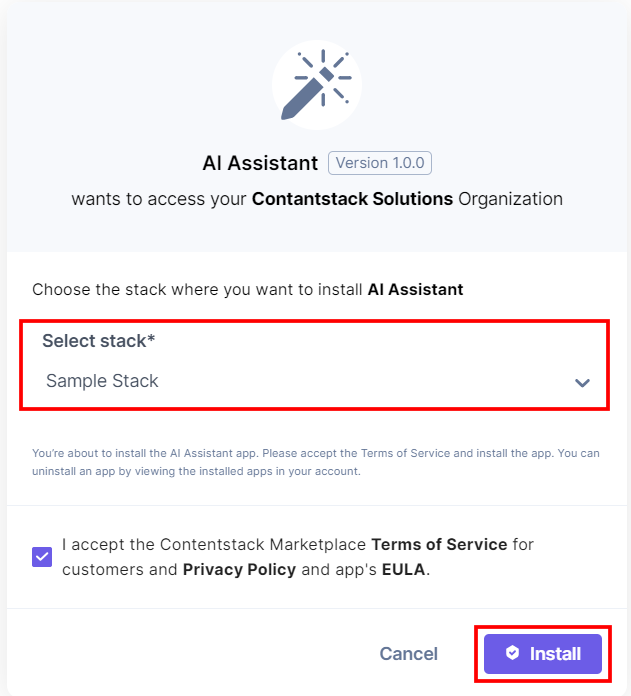
- In the popup window, select the stack where you want to install the AI Assistant app, accept the terms and conditions, and click the Install button.
- On the Configuration page, enter the following details to configure the app:
- Platform Configuration: Select a way to configure the app. Below are the two ways in which you can configure the AI Assistant app.
- Managed by Contentstack: You can configure the app using Contentstack powered API keys.
- Custom Credentials: You can configure the app using third-party API credentials, such as OpenAI, Azure OpenAI Service, AWS Bedrock, or Google Vertex AI.
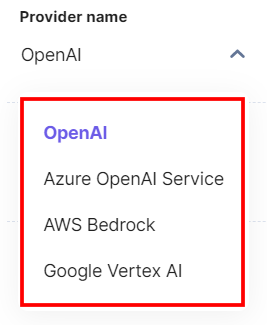
Select the Provider Name (for example, Open AI) and enter the credentials (API Key or the Access Key). In the API Model section, choose either:
- Recommended Models: Displays a list of suggested models.
- All Available Models: Shows all models compatible with the API key you provided earlier.
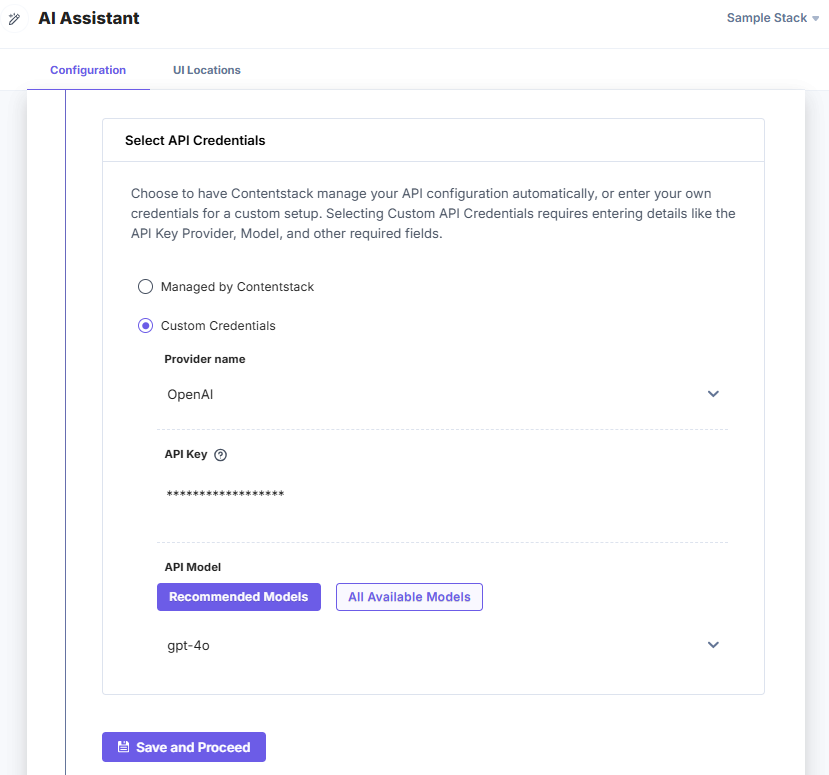
After entering the details, click Save and Proceed to configure the app.
Note: You must enter all the required credentials.
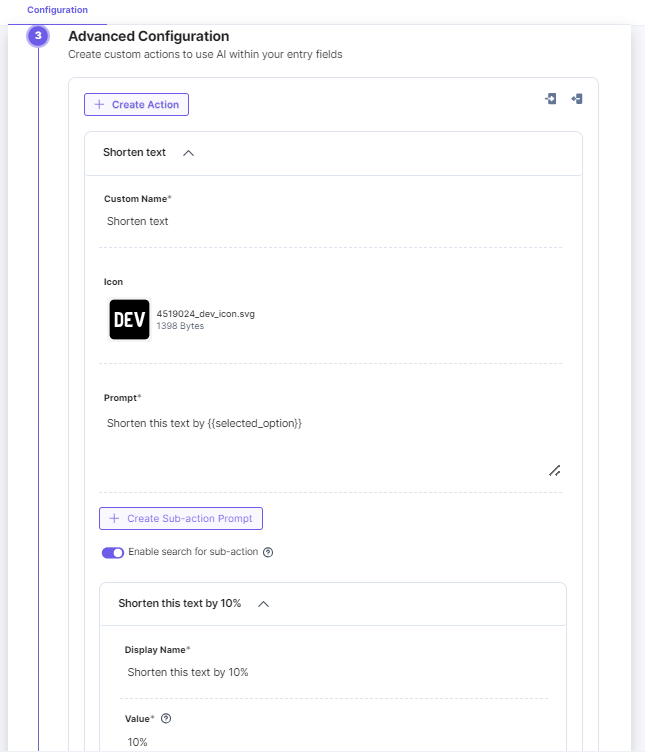
- Advanced Configuration: You can create custom actions to use AI within your entry fields. You can enter a Custom Name for your prompt. You can also select whether to apply the action on the current field or other field.
Select the checkbox(s) to view the app in the entry field or when the field content is selected. If you select the When field content is selected checkbox, you will be able to perform actions only on the selected content in JSON RTE field.
You can group similar prompts together by adding sub-actions for the main prompt.
To add a sub-action, click + Create Sub-action Prompt. Enter a Display Name and a Value for your sub-action. You can also toggle Enable search for sub-action to have a search bar filter for your sub-actions.
For example, your prompt is “Shorten this text by {{selected_option}}”. In the sub-action prompt, you can provide a value that will customize your prompt further. Suppose, you enter 10% in the Value field, then, the final prompt will be "Shorten this text by 10%".Note: {{selected_option}} must be added in the main prompt to add the sub-action(s).
- Platform Configuration: Select a way to configure the app. Below are the two ways in which you can configure the AI Assistant app.
- Click Save or Save and Proceed to save the configurations.
- Once done, Click Save or Open Stack to start using the AI Assistant app.
Additional Resource: You must configure and specify the field type(s) that will work for the Field Modifier UI location to use the AI Assistant app within your stack. Please refer to the Field Modifier UI location documentation to configure the AI Assistant app for the UI location.
Use AI Assistant within your Stack Entry
To use the AI Assistant application within an entry of your stack, follow the steps given below:
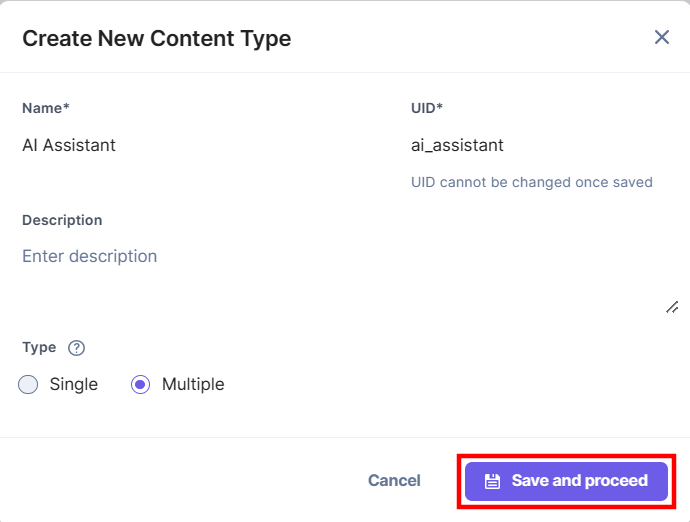
- Go to your stack, click the Content Models icon in the left navigation panel, and click the + New Content Type button.
- Create a content type by adding relevant details as displayed below and click the Save and proceed button.
- To use the AI Assistant app, create an entry for the above content type. In the left navigation panel, navigate to the Entries page, click + New Entry to create a new entry for the above content type, and then click Proceed.
- You can see the AI Assistant app in the Field Modifier location. Provide some content in the configured fields of the entry and start using the app.
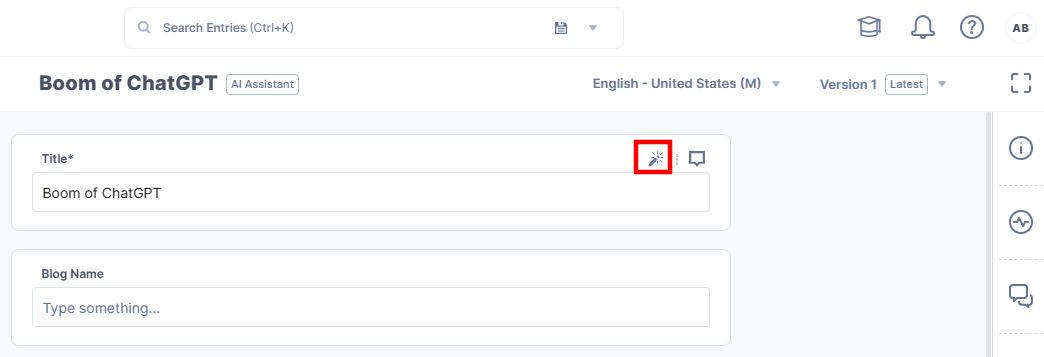
A pop-up appears. You can transform the content for a specific field by choosing the AI Assistant options.
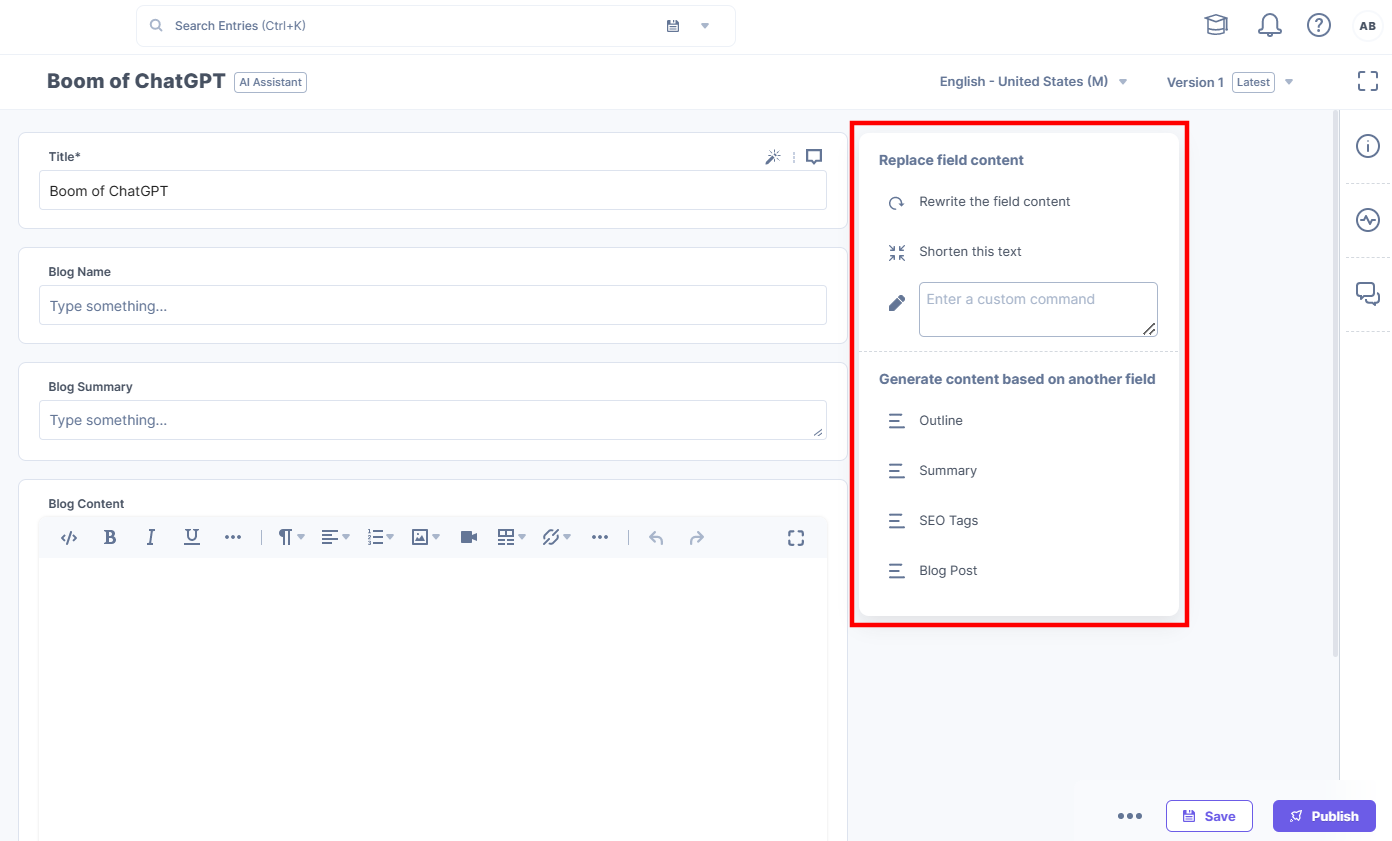
- You will see the custom actions that you configured in the entry field.
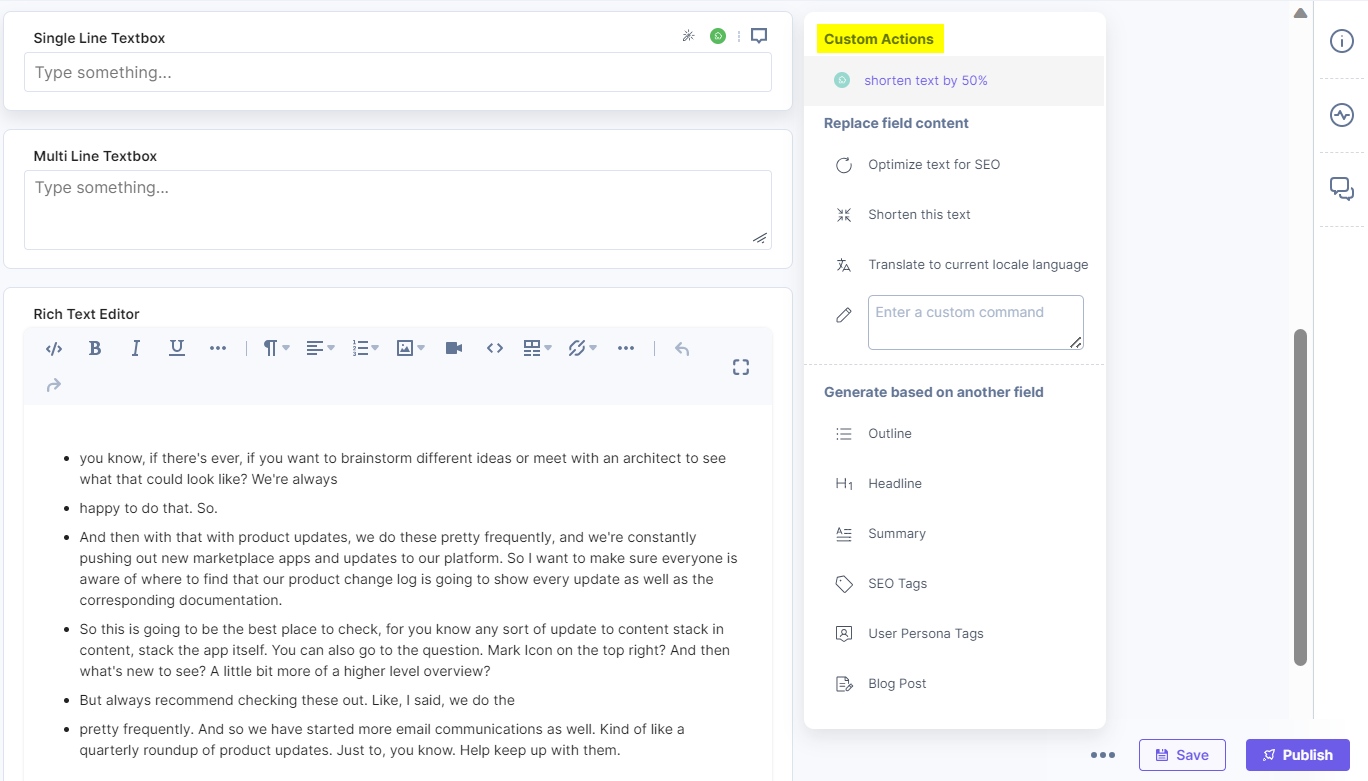
Note: The AI Assistant options in the UI can be changed/edited by the Contentstack authorized team member or an Organization Admin/Owner. In the above screenshot, Optimize text for SEO,User Persona Tags, and Headline have been modified by an authorized admin/owner.
You can transform the content as per the custom action(s) defined in the configuration. You will see an option as below:
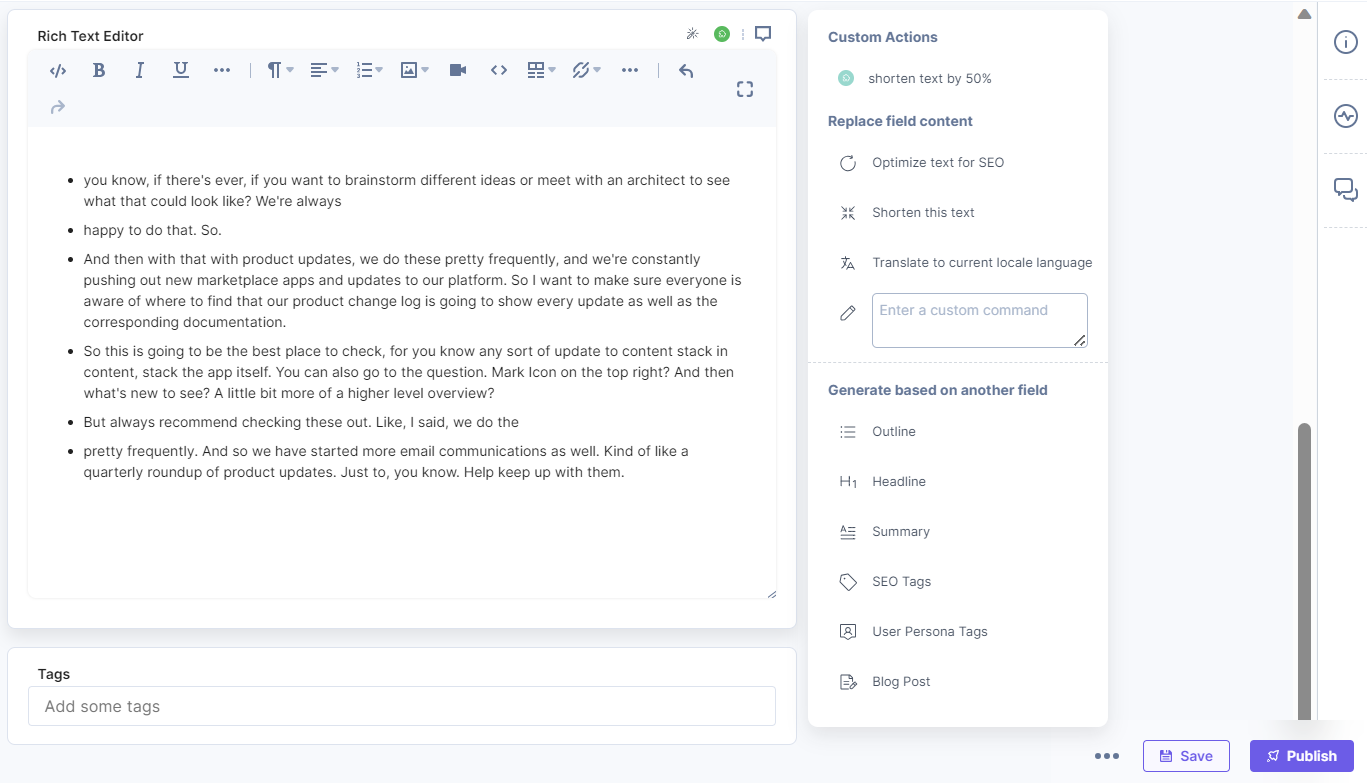
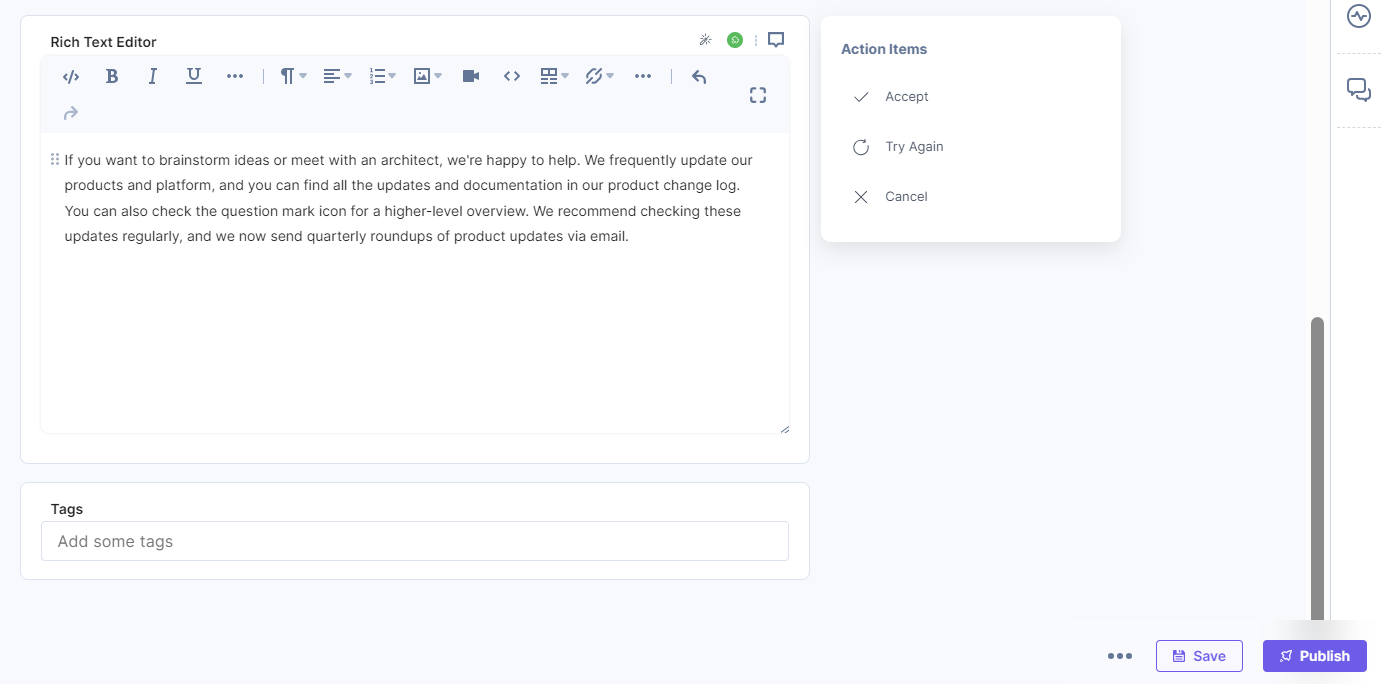
In the above example, there is a custom action to shorten the text by 50%. You will see the output as per the custom action:
If the Custom Action has any sub-action(s), then the sub-action(s) will be displayed in the form of a dropdown when you hover over the custom action.
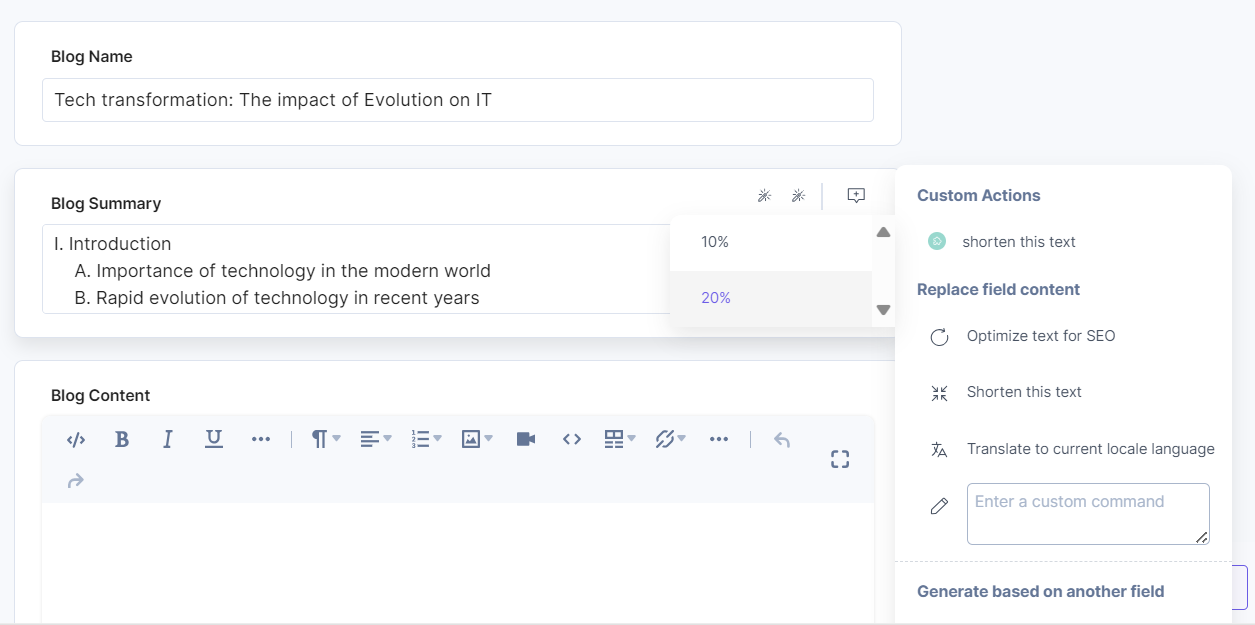
- You get options to transform the content, such as:
- Re-write the field content
- Shorten this text
- You can also provide custom commands for a field
Let’s see each one of them with an example.
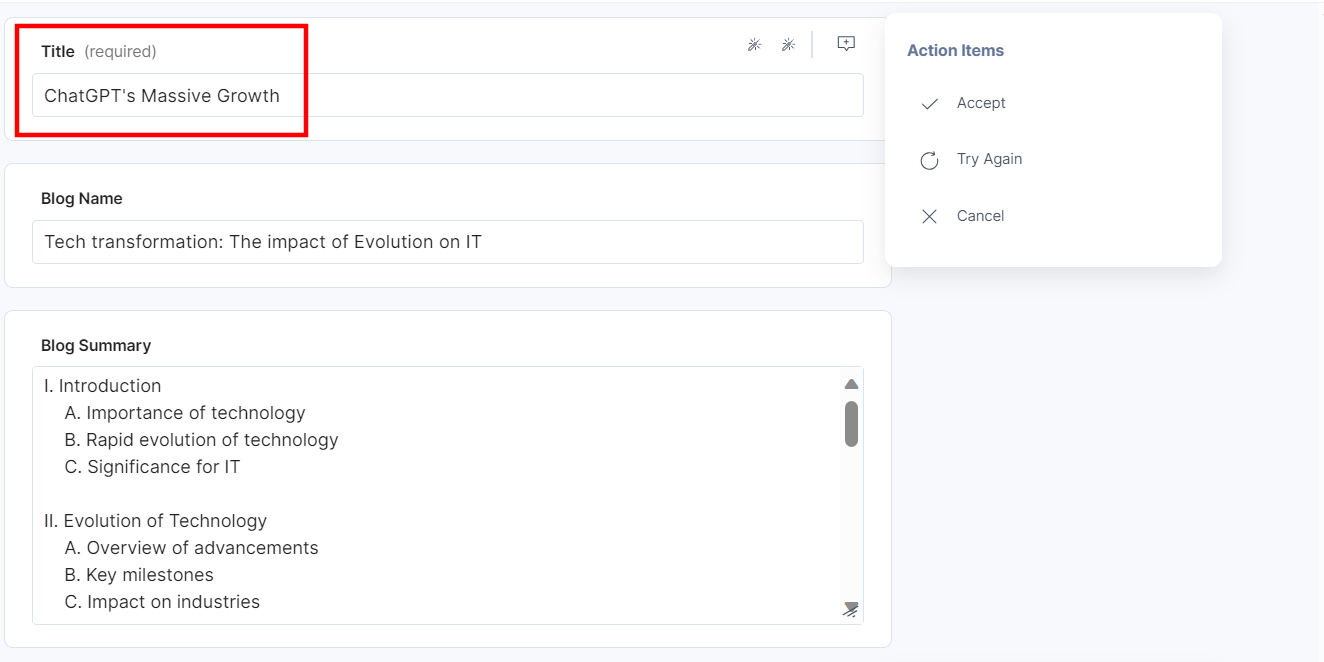
- Navigate to the Title field. Click the AI Assistant app icon and then click Rewrite the field content option. This re-phrases the existing content for better understanding.
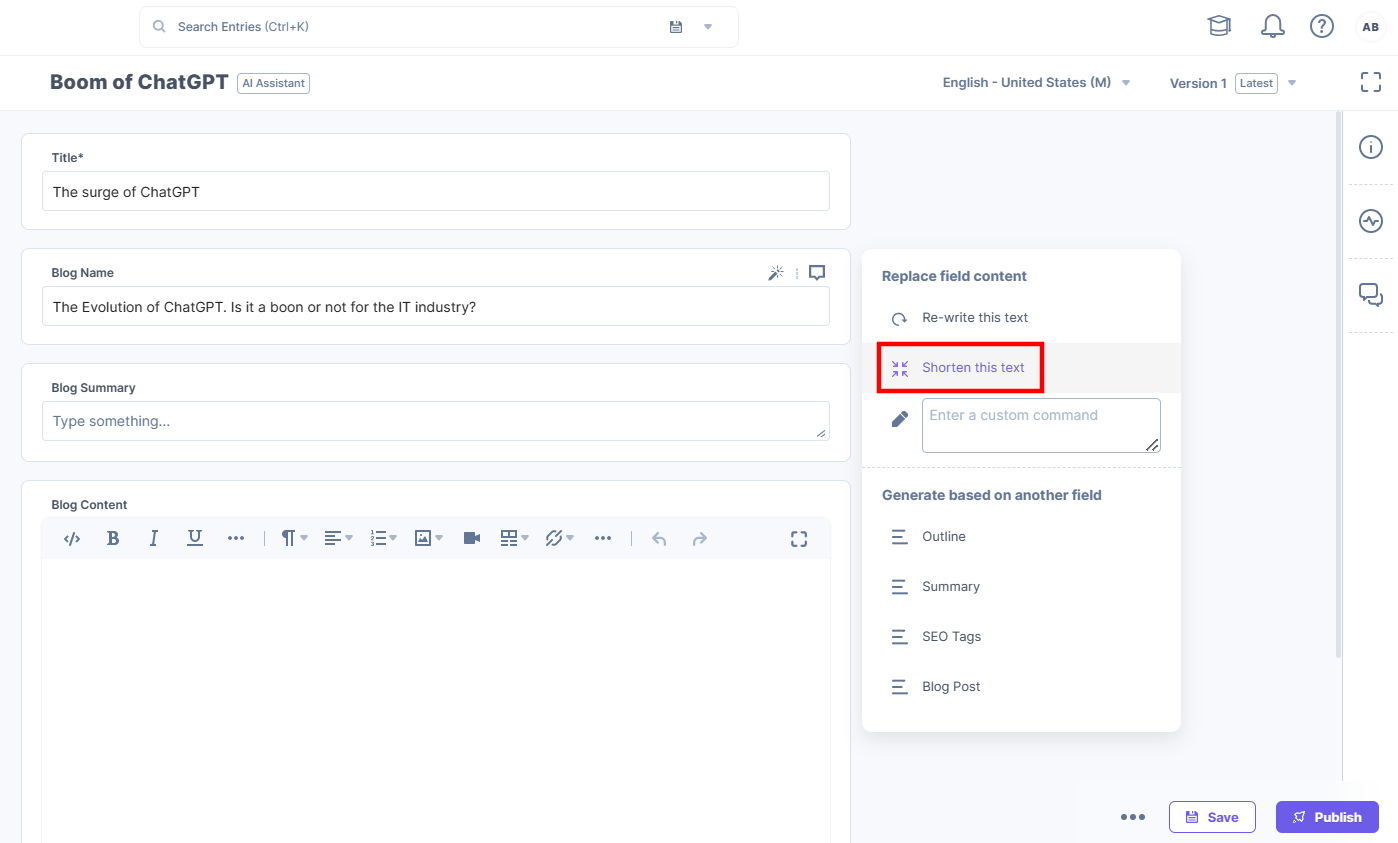
- Navigate to the Blog Name field. Click the AI Assistant app and click shorten this text.
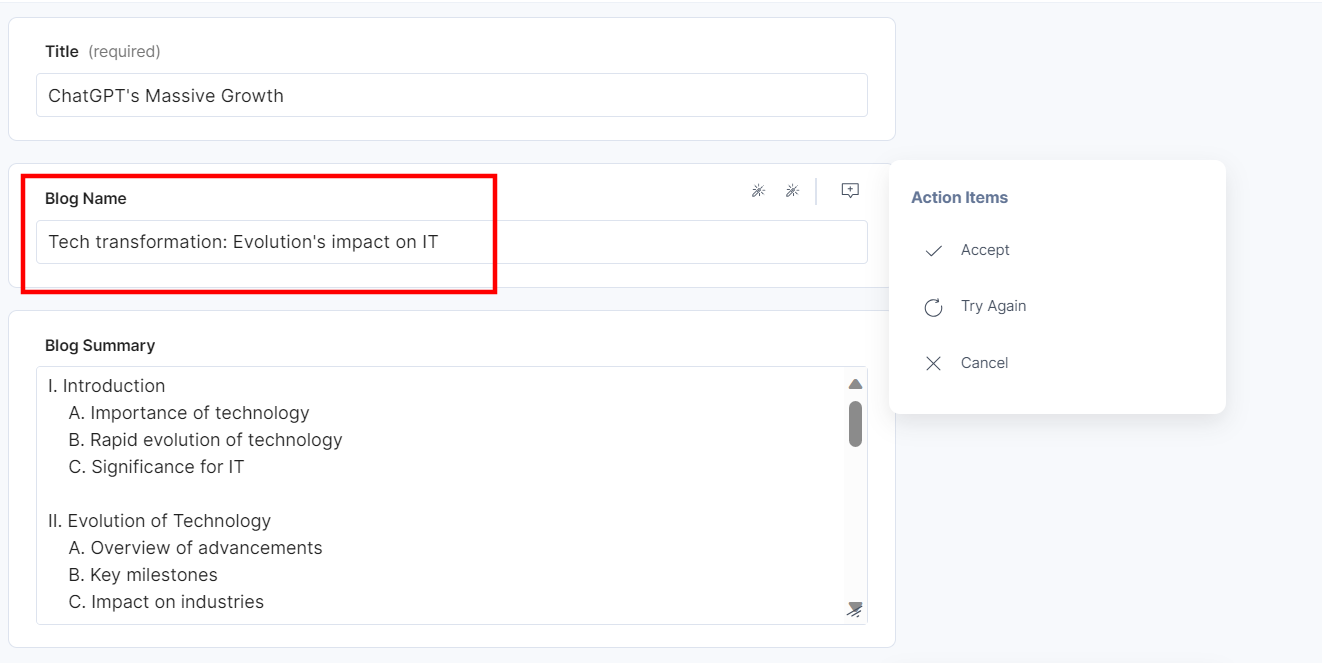
It will shorten the length of your Blog Name content, you can choose to replace the existing content with the generated shortened text.
- You can also enter custom commands to generate content based on the command for the entry field. You can add and use the following variables in the custom command as placeholders for dynamic content.
- {{field_data}}: Use this variable to store the current field content in the custom command box for manipulation. The field_dataplaceholder will hold the value of the current field’s content.
- {{current_locale}}: Use this variable to translate the field content in different locales. The {{current_locale}} placeholder will hold the value for the current locale in which you want to translate the field content.
Field Data:
Suppose you want to rephrase the content in the Blog Name field then you can provide the following command in the custom box and click enter:
Rephrase this text to: {{field_data}} OR
Summarize this text: {{field_data}}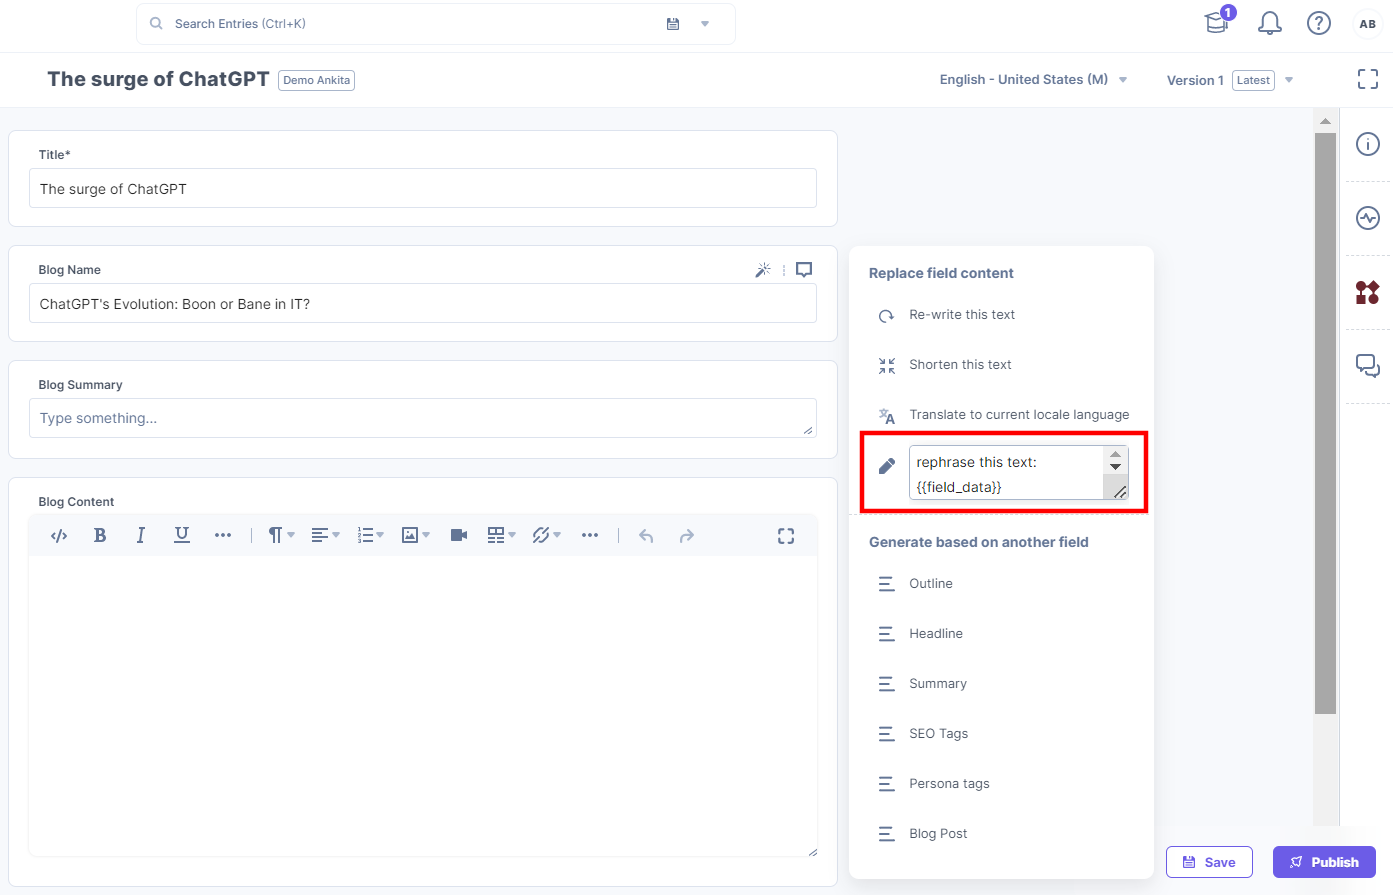
In our example, it will generate new content for the Blog Name field as shown below:
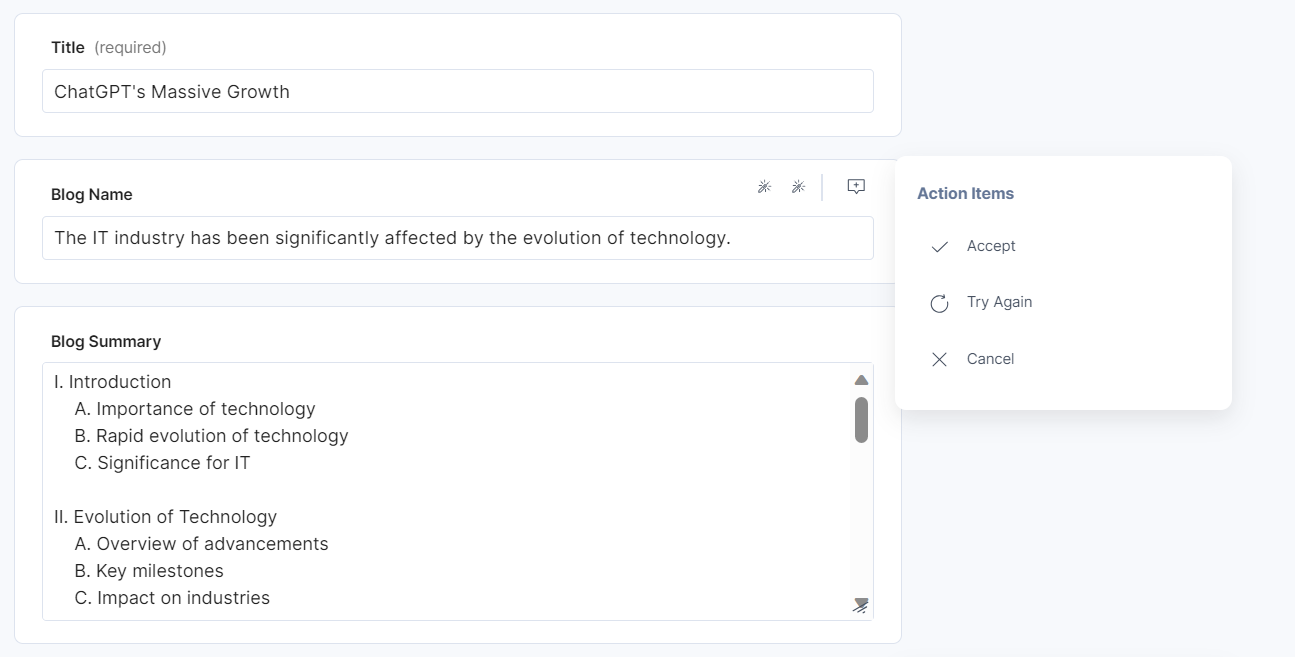
Note: If you do not add the {{field_data}} variable in the custom command, the field content is automatically added at the end of the custom command.
Current Locale:
Suppose you want to rephrase the content in the Blog Name field then you can provide the following command in the custom box.
Translate this text to {{current locale}}: {{field_data}}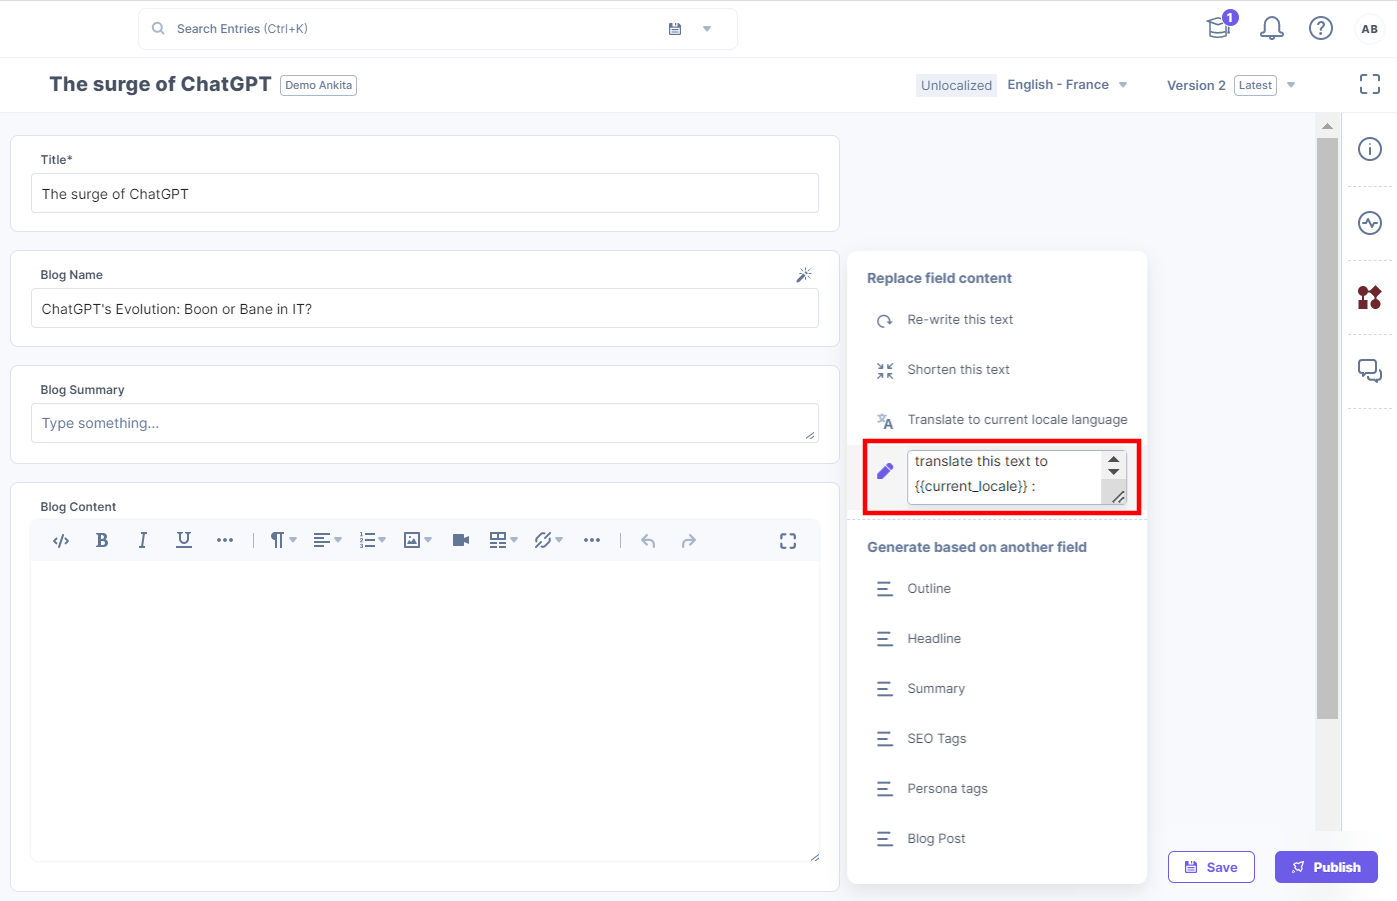
In our example, our locale is English and we are translating it to French locale. This will generate the content in the specified locale for the Blog Name field as shown below:
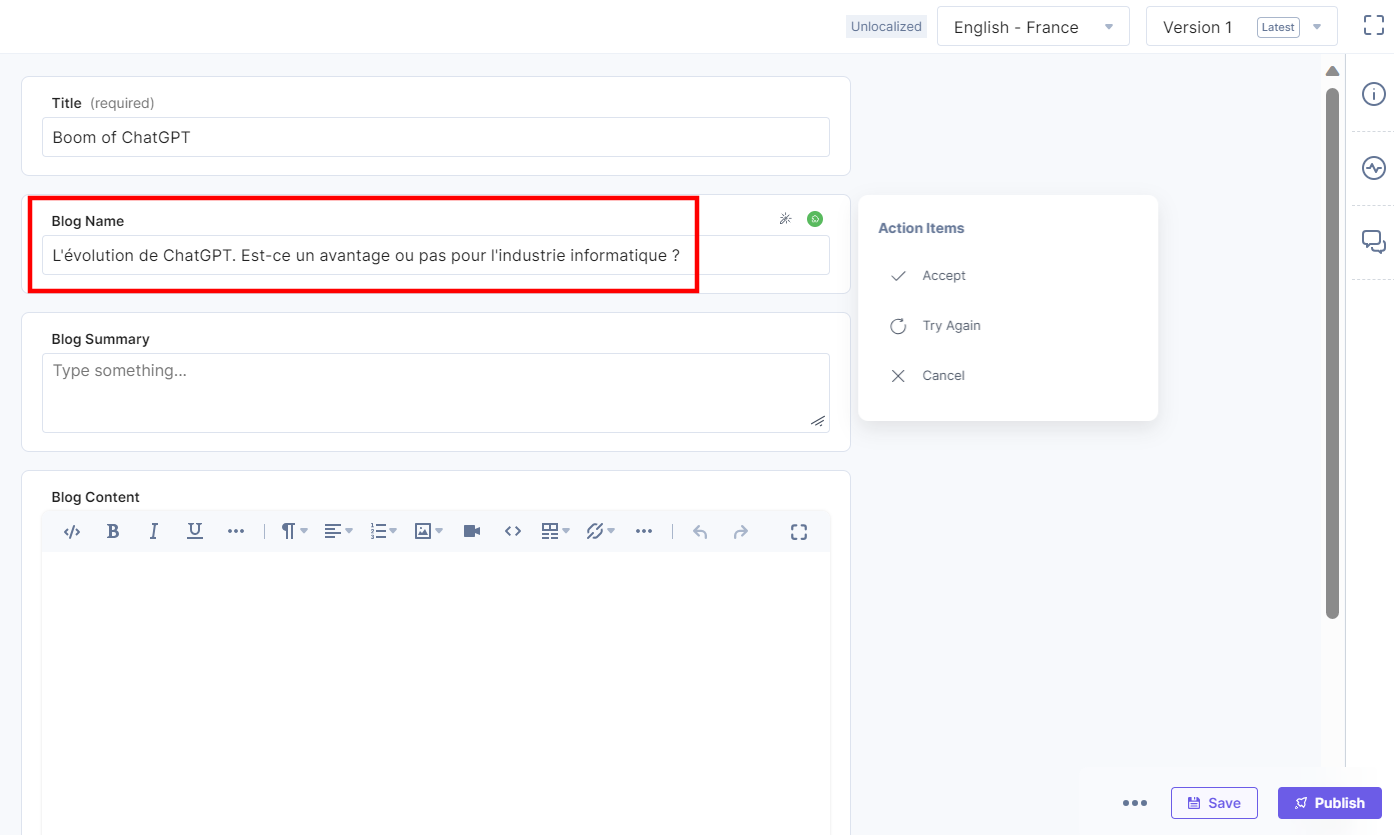
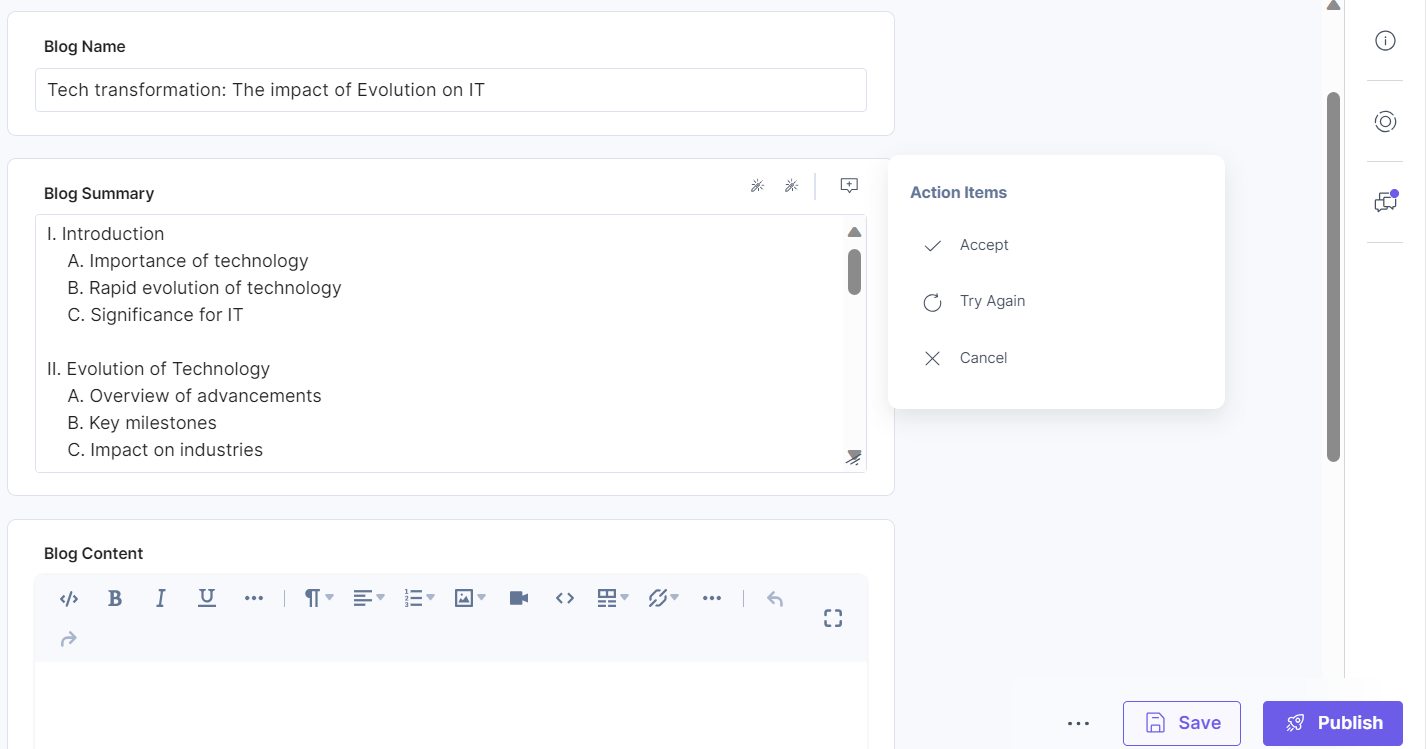
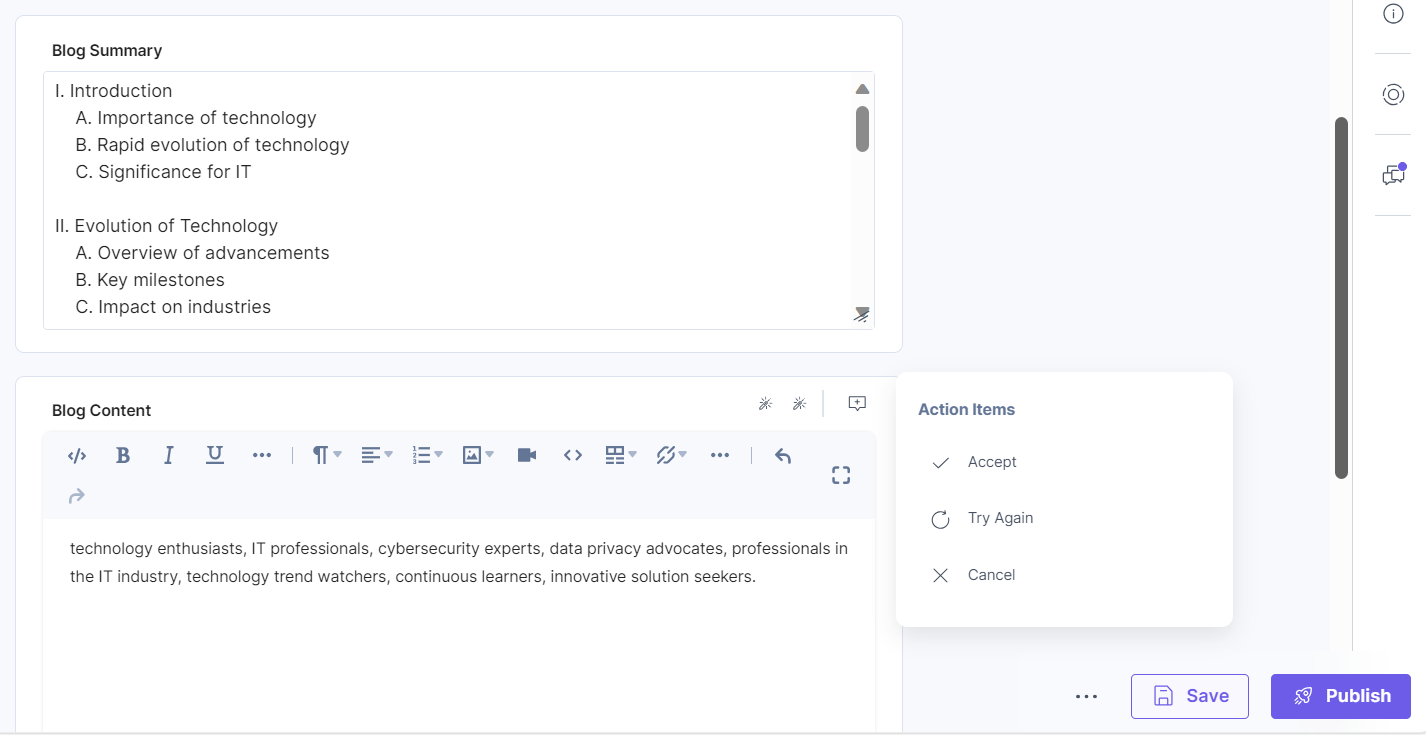
- A pop-up screen appears. Click Accept to accept the current content changes and overwrite the existing content with the newly generated content. To rephrase the content, click Try Again. To undo the change(s) and keep the existing content, click Cancel.
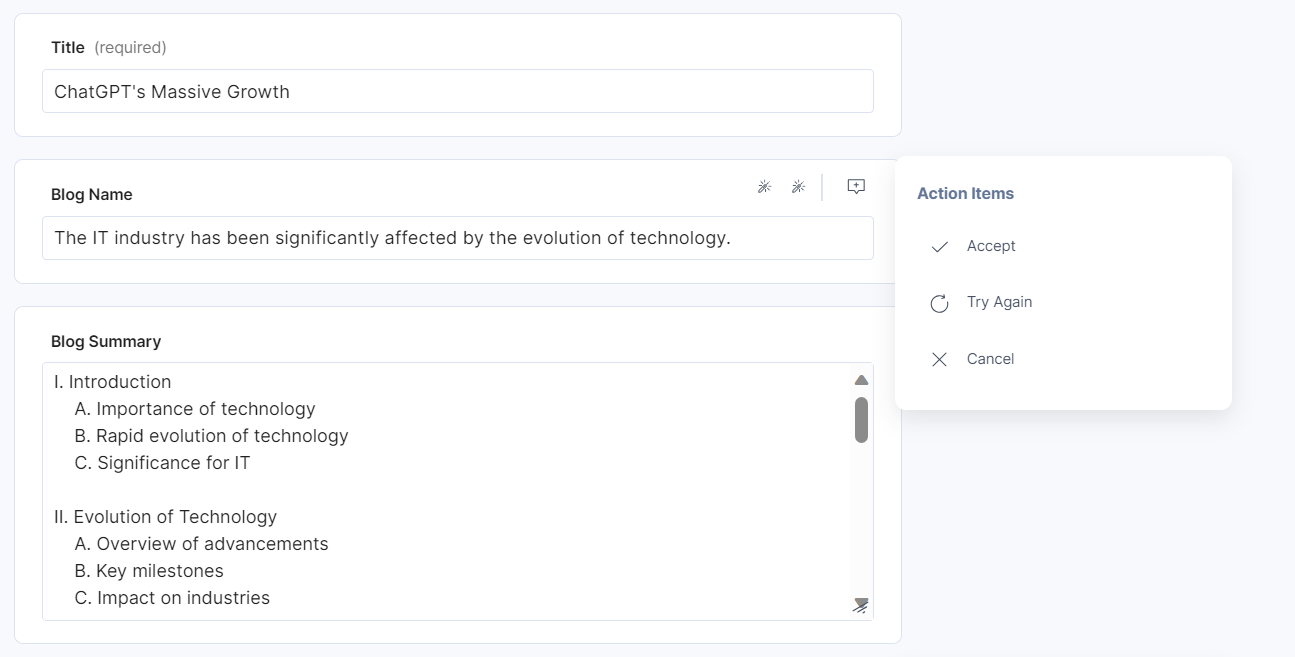
Note: Accepting the current content changes by clicking the Done button will clear all the existing formatting applied to the content.
- You can also generate content for one field based on the content of another field. The AI Assistant app lets you generate the following content based on another entry field:
- Outline
- Summary
- SEO Tags
- Blog Posts
- Headline
- User Persona Tags
Let’s see each of them with some examples as shown below:
Outline
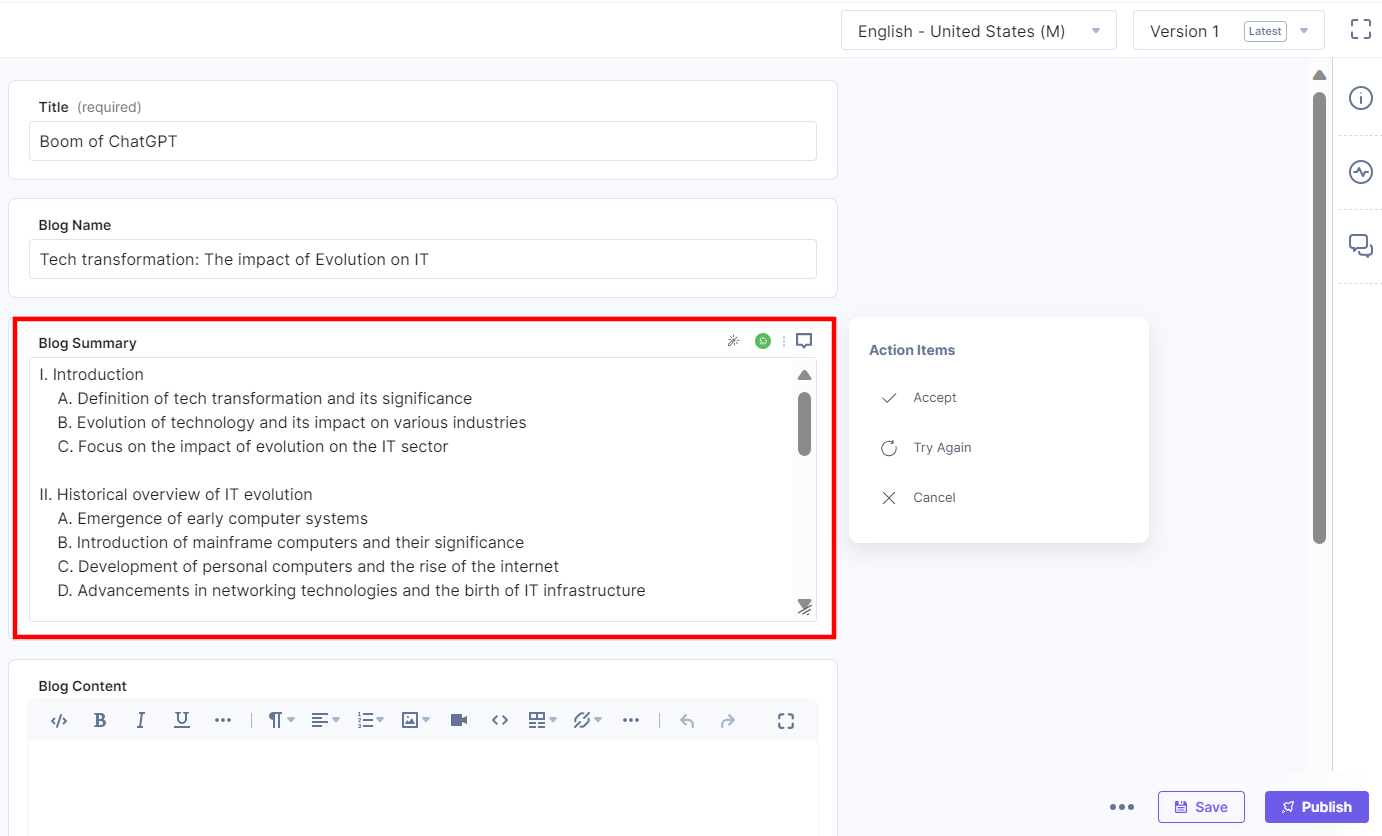
To generate an outline for the Blog Summary field based on the Title of the entry, navigate to the Blog Summary field and follow the steps:
- Click Outline.
- Click the Title field.
Summary
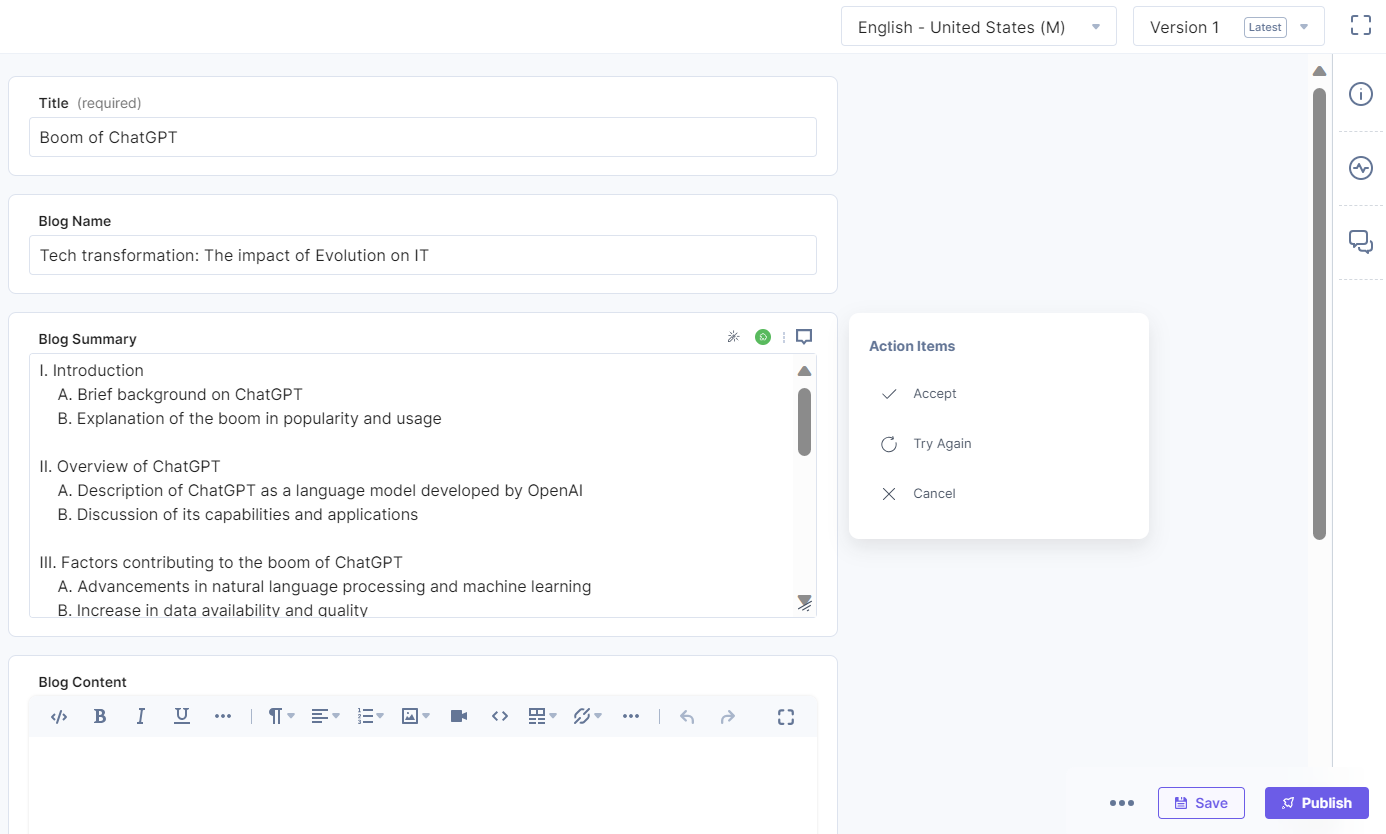
Now, to generate a Summary for the Blog Summary field based on the Blog Name, then navigate to the Blog Summary field and follow the steps:
- Click Summary.
- Click Blog Name.
SEO Tags
To generate SEO Tags for the Tags field based on the Blog Name, navigate to the Tags field and follow the steps:
- Click SEO Tags.
- Click Blog Name.

Blog Posts
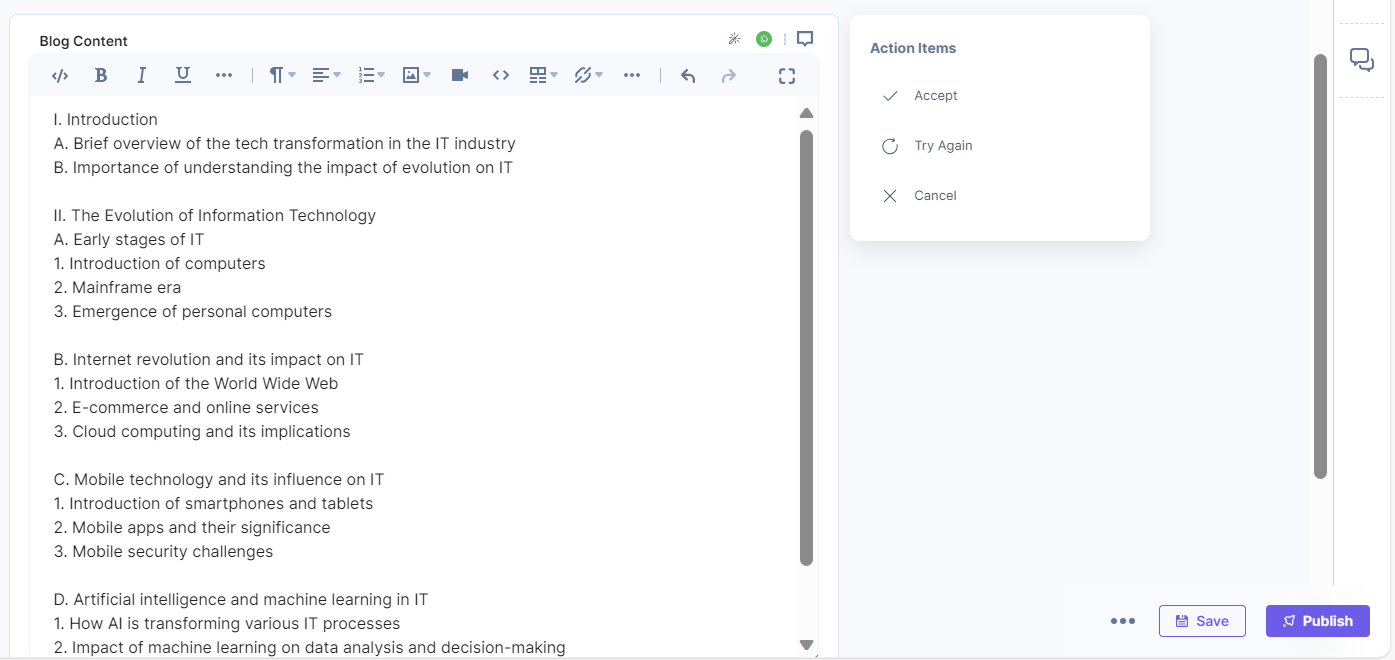
Now, to generate a Blog Post for the Blog Content field based on the Blog Summary field, navigate to the Blog Content field and follow the steps:
- Click Blog Posts.
- Click Blog Summary.
Headline
To generate a headline for the Blog Name field based on the Blog Summary of the entry, navigate to the Blog Name field and follow the steps:
- Click Headline.
- Click the Blog Summary field.
User Persona Tags
To generate a user persona tag for the Blog Content field based on the Blog Summary of the entry, navigate to the Blog Content field and follow the steps:
- Click User Persona Tags.
- Click the Blog Summary field.
Steps to use AI Assistant within the JSON Rich Text Editor field
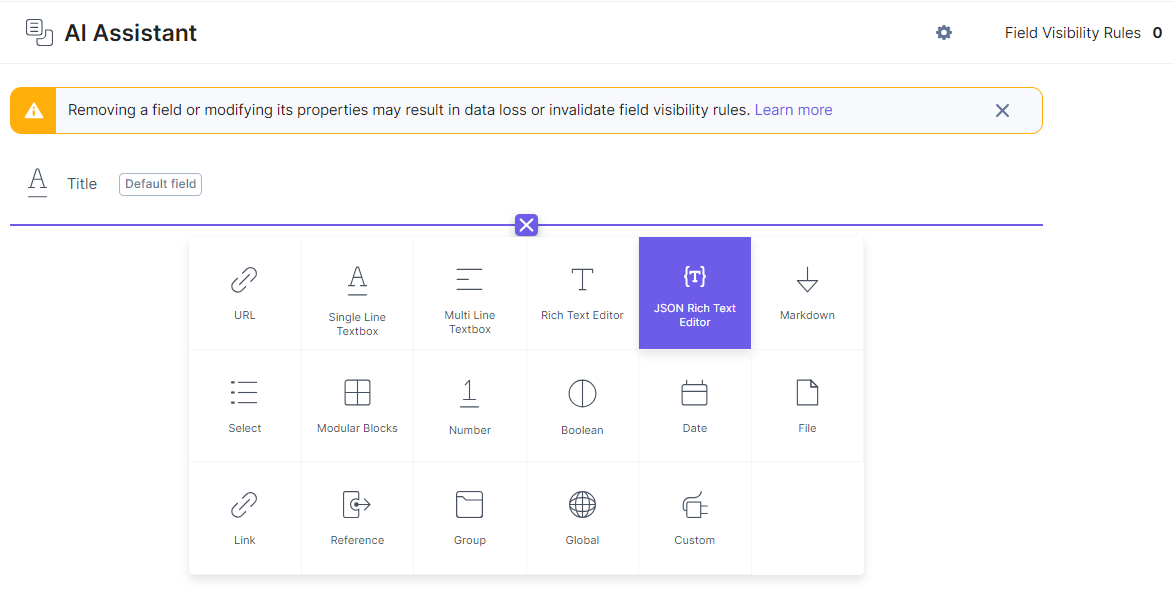
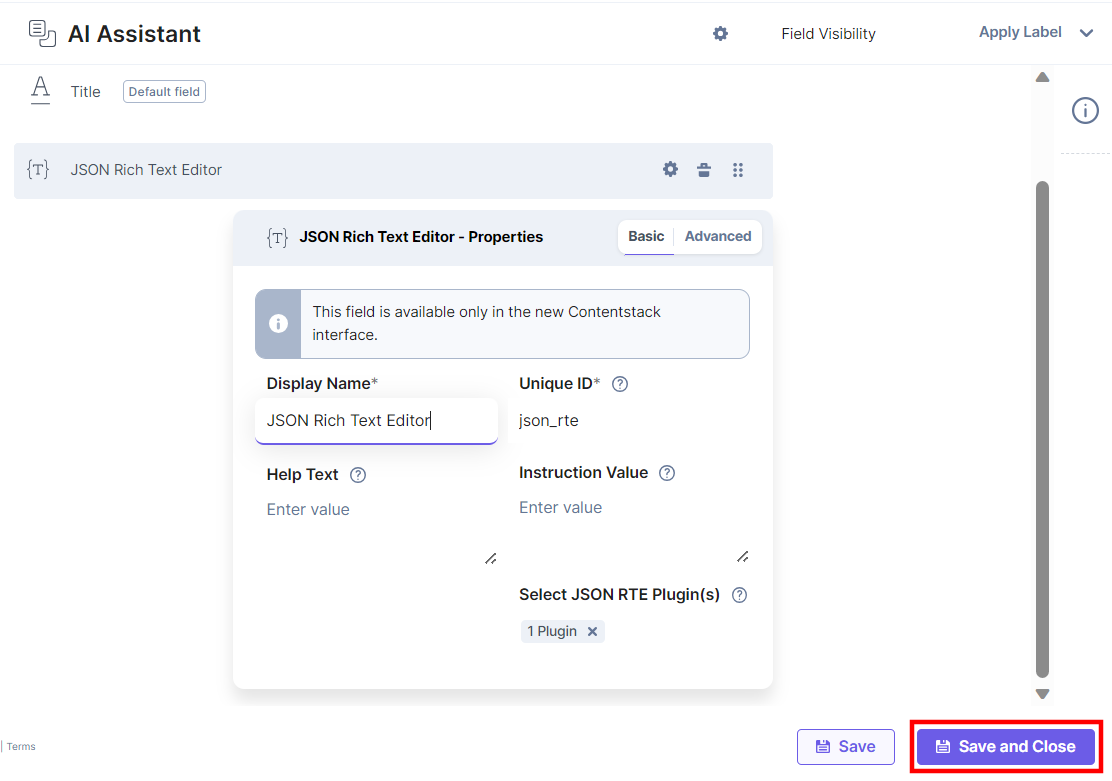
- In the Content Type Builder page, add JSON Rich Text Editor in your content type by clicking the Insert a field link represented by a + sign.
- To add the AI Assistant plugin in JSON RTE, click the Properties icon of JSON RTE, and under Select JSON RTE Plugin(s), choose the AI Assistant app, and then click the Add Plugin(s) button.
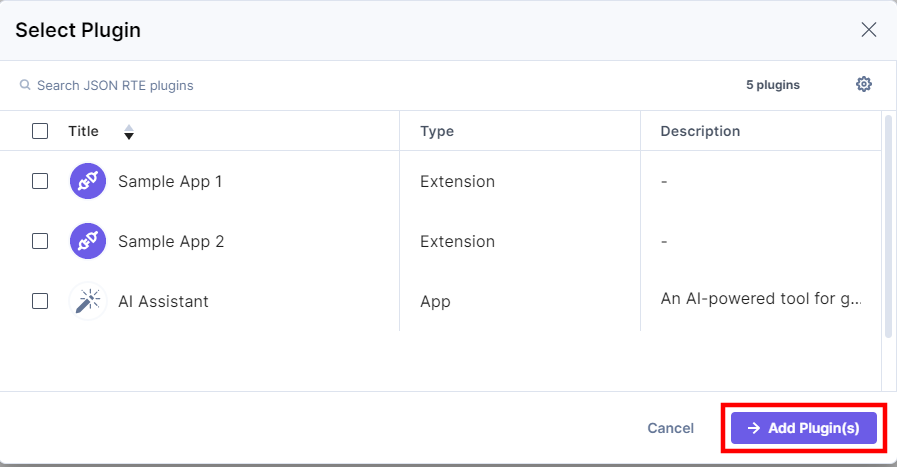
- After adding the plugin, click Save or Save and Close to save your changes.
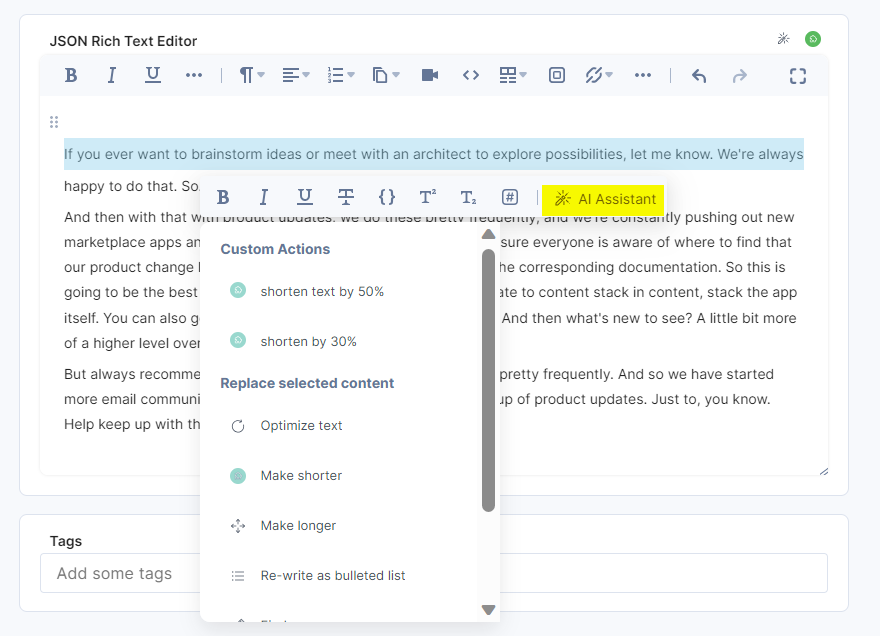
- To use the AI Assistant app as a JSON RTE plugin, create an entry for this content type, and you can see the AI Assistant app icon in the JSON RTE field on your entry page as shown below. You can select the entire JSON RTE field content or a specific content to use AI.


.svg?format=pjpg&auto=webp)
.svg?format=pjpg&auto=webp)
.png?format=pjpg&auto=webp)


.png?format=pjpg&auto=webp)