Setting up a Translation System Using Contentstack Webhooks, AWS Lambda, and XTM Machine Translation
XTM is a cloud-based content translation management solution. With its integrated CAT tool, it helps organizations to streamline complex localization processes and maximize translation reuse.
Its scalable and flexible architecture allows it to integrate with apps such as Contentstack seamlessly. In this guide, we will go through the steps required to set up a language translation system using Contentstack Webhooks, AWS Lambda, and XTM machine translation.
Process overview: We will first set up the essentials in Contentstack, such as creating a stack and adding a few languages (locales). We will then create a workflow and add four stages to it. We will add a template in XTM, configure it for machine translation, and then set up our lambda function to help us create the bridge between Contenstack and XTM for translation.
We'll also set up a webhook such that when the workflow stage in an entry changes (let's say from Draft to Send for Translation), the webhook will issue a trigger to our lambda function. It will initiate the translation process with XTM by creating a JSON file of our entry and uploading it to the XTM project.
The content will get translated and our lambda function will update the entry with the translated content and change its workflow stage to “Review.”
Prerequisites
- AWS account and access to AWS Lambda, AWS API Gateway, and AWS IAM
- Contentstack account
- XTM Project Manager account
- Working knowledge of AWS Lambda and API Gateways
Note: For this example, we assume that you already have a Project Manager and a Linguist account in XTM that will help you create projects and translations in XTM. If not, please sign up and get your account created. You will receive all the details required to log in to XTM such as URL, username, password, and so on.
Steps for Execution
Here are the steps required to set up this translation system:
- Set up and configure your project template in XTM
- Set up the essentials in Contentstack
- Set up the workflow for translation in Contentstack
- Set up the AWS lambda functions for translation
- Trigger a webhook to initiate translation
- Try out the steps
Let's get started!
-
Set up and Configure Your Project Template in XTM
For this exercise, you need a project manager (or an admin) account with XTM so that you can create templates in the XTM app. You can sign up with one of their plans and get started with setting up your account.
Activate Machine Translation in XTM
Assuming that you have a project manager account in XTM and have logged in the app, the first thing that you need to do is to activate machine translation in XTM. To do this, follow the steps given below:
-
Once you log in to the XTM app, you will be on the Projects page. Click on the Settings gear icon as shown below:

- On the page that opens, click on the Settings option.
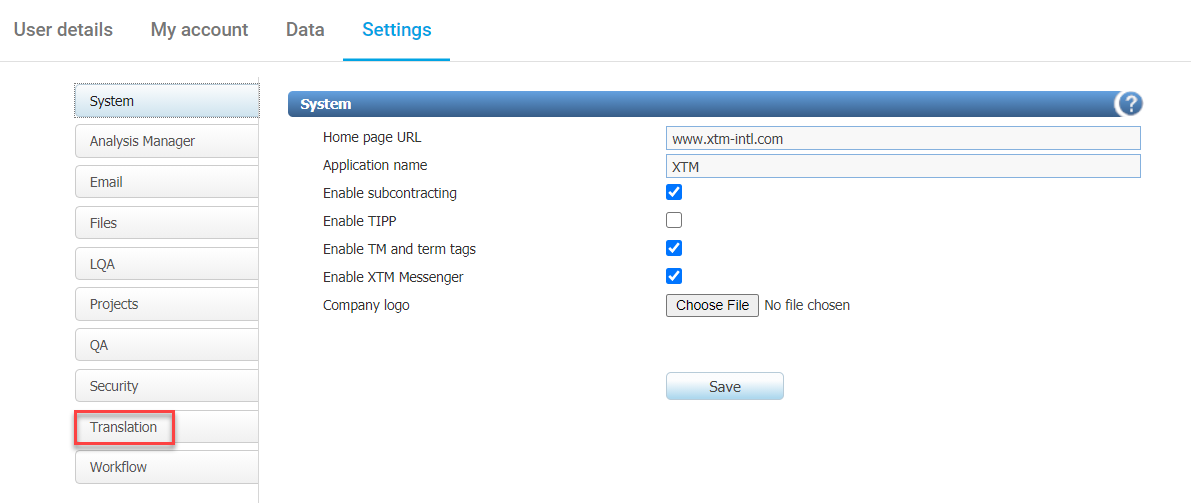
- From the left navigation panel, click on Translation as shown below:
-
Then, select the Machine translation option from the menu and select your preferred MT engines. For our example, we have used Amazon Translate as shown below:
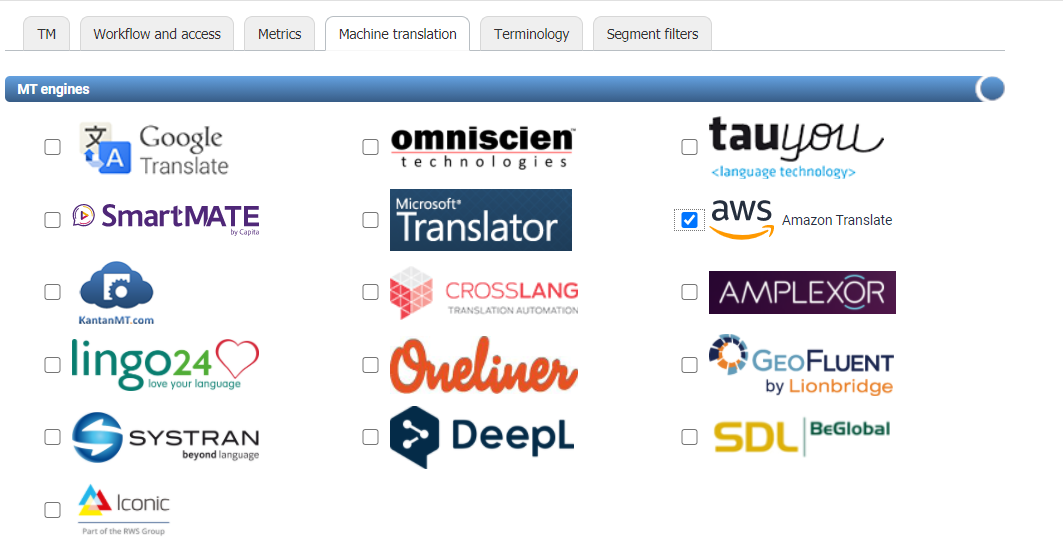
Note: You can select the MT engine you like but ensure you have the necessary keys for using that engine. You will need to enter those keys in the next step.
- Leave the default options under the General options section untouched.
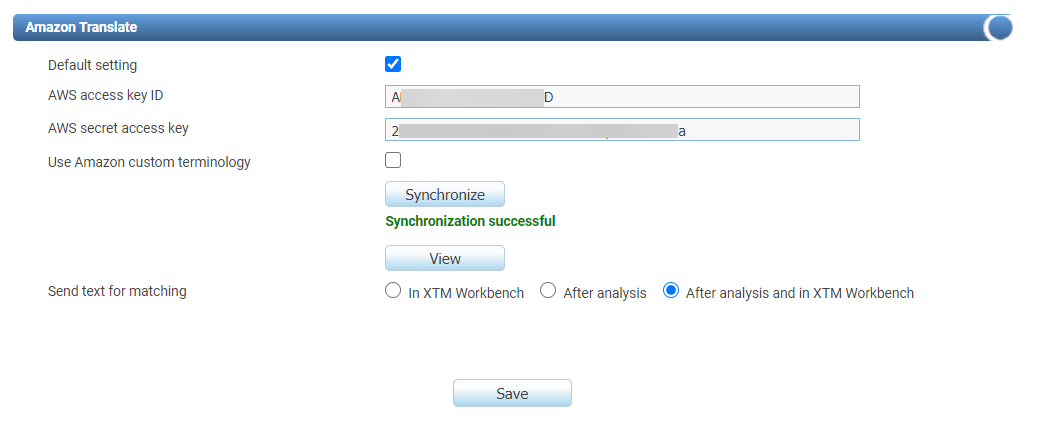
- Scroll down to the Amazon Translate section (because we selected AWS Translate, if you select a different provider such as Google Translate, this section will change to Google Translate and you need to provide the necessary details specific to Google Translate), and keep the Default setting option checked.
- Provide AWS access key ID, AWS secret access key, and click on Synchronize. You will get a message when it synchronizes successfully as shown below. Click on Save.
We have now activated the machine translation. Let's now go ahead and create a project in XTM.
Create a Project Template in XTM
To create the project template in XTM, follow the steps given below:
-
From the top menu, click on the Projects tab and then Add project as shown below:

- On the page that opens, under the General information section, the Customer name is auto-populated. You can provide a new name if you want and leave the remaining options blank.
- Under the Translation section, provide the Source language (English USA in our example) and Target languages [Chinese (simplified), French (France) in our example]. You can add more languages if you like and leave the other options unchanged.
- Leave the options Inside the Workflow and Settings sections to their default value.
-
Inside the Machine translation section, check the Use Amazon machine translation option, to enable machine translation of your content.
Leave other options to their default values and click on the Save as template button.
-
The Create template modal will open. Provide a Name to your template and an optional Description. You can leave the default Customer specific option selected for Type as shown below:
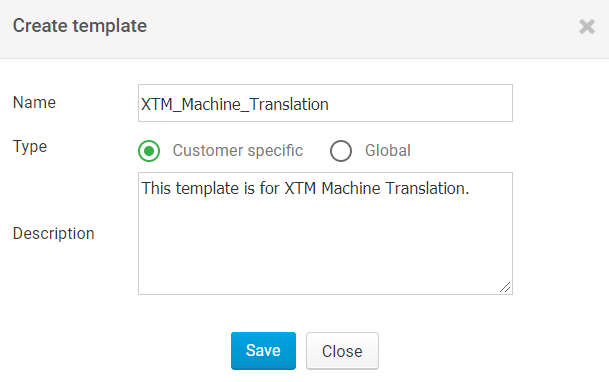
- Click on the Save button and you will get a success message upon creation. Click on Close to close the Create template modal.
- Your template is now ready. Go to the Templates option, next to Project list, and you will see the template that you just created listed.
-
Now hover over the "i" icon to the right corresponding to your template and you should be able to view the template ID. Make a note of it.
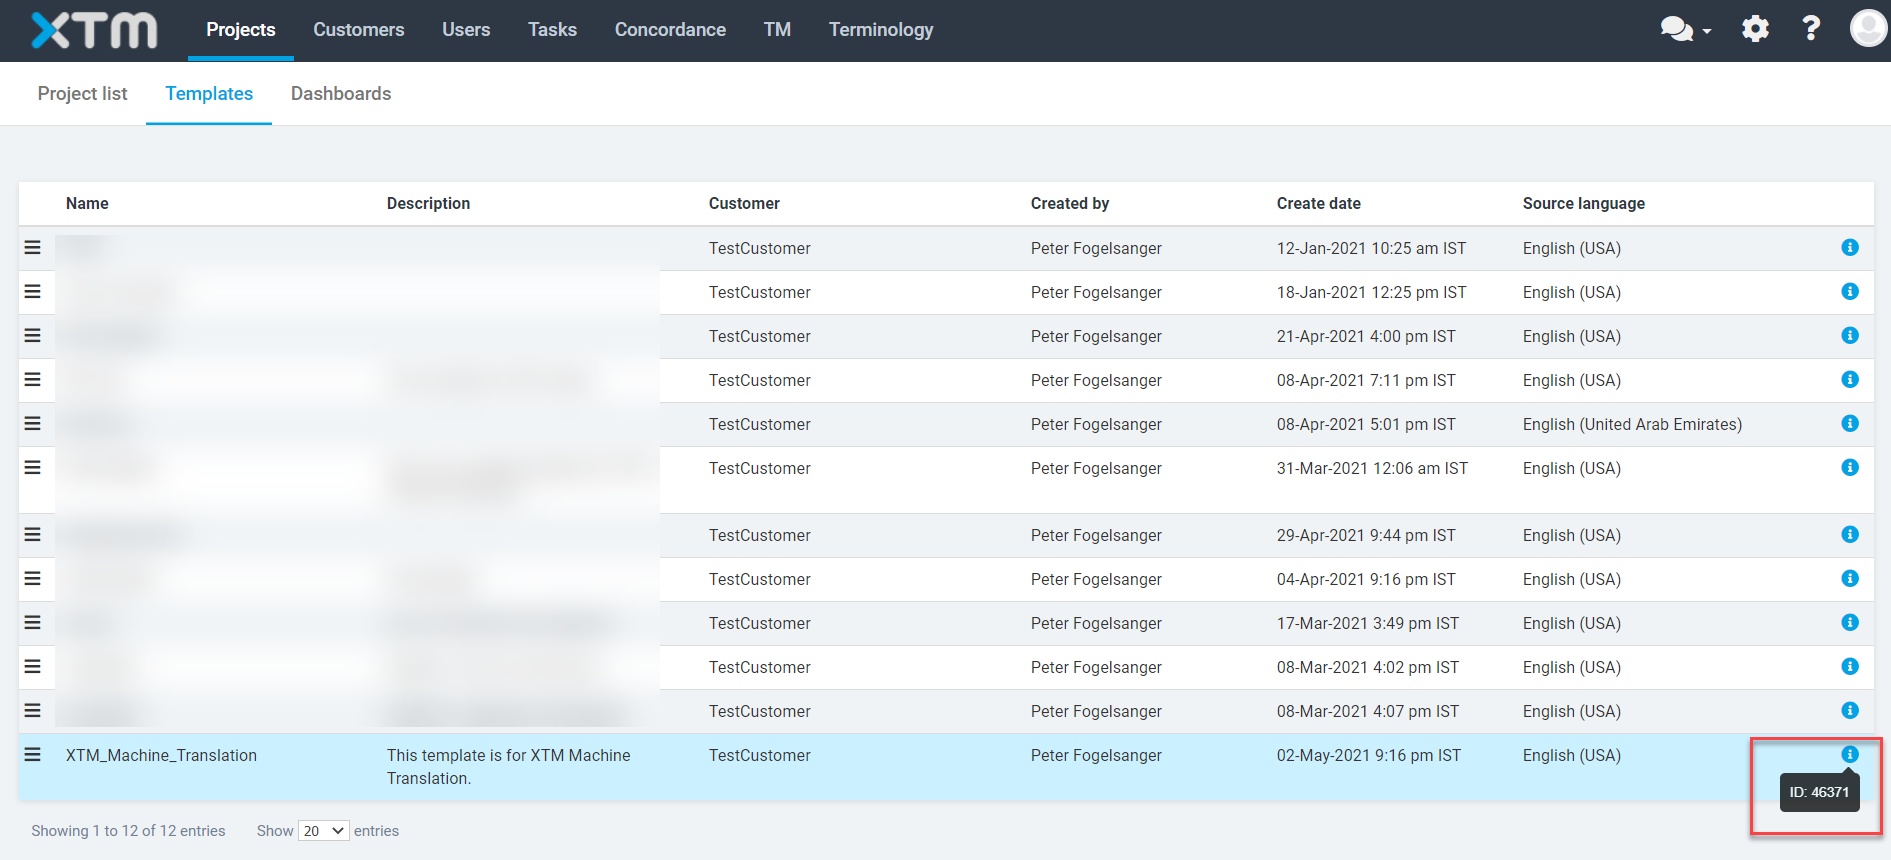
The XTM template is now ready. Similarly, you can create multiple templates for your project. We have created a couple of templates for the purpose of this exercise. We will require the template IDs while creating a content type in Contentstack.
Let's move ahead and set up the essentials in Contentstack.
-
Once you log in to the XTM app, you will be on the Projects page. Click on the Settings gear icon as shown below:
-
Set up the Essentials in Contentstack
To set up the essentials, log in to your Contentstack account and follow the steps given below:
-
Create a stack, add a content type (for our exercise, we have created a Single Content Type named XTM).
In our example, we have used “title,” “url,” “single_line (named Heading),” “rich_text_editor (named Body)”, and Select fields. We will translate the content of these fields. Content of special fields such as File, Boolean, Reference, Select will not be translated.
The Select field that we have added (named XTM Project Templates in the above screenshot) is where you will add the template IDs you created in the above step. Ensure that the ID of this select field is the same shown in the screenshot below (xtm_project_templates).
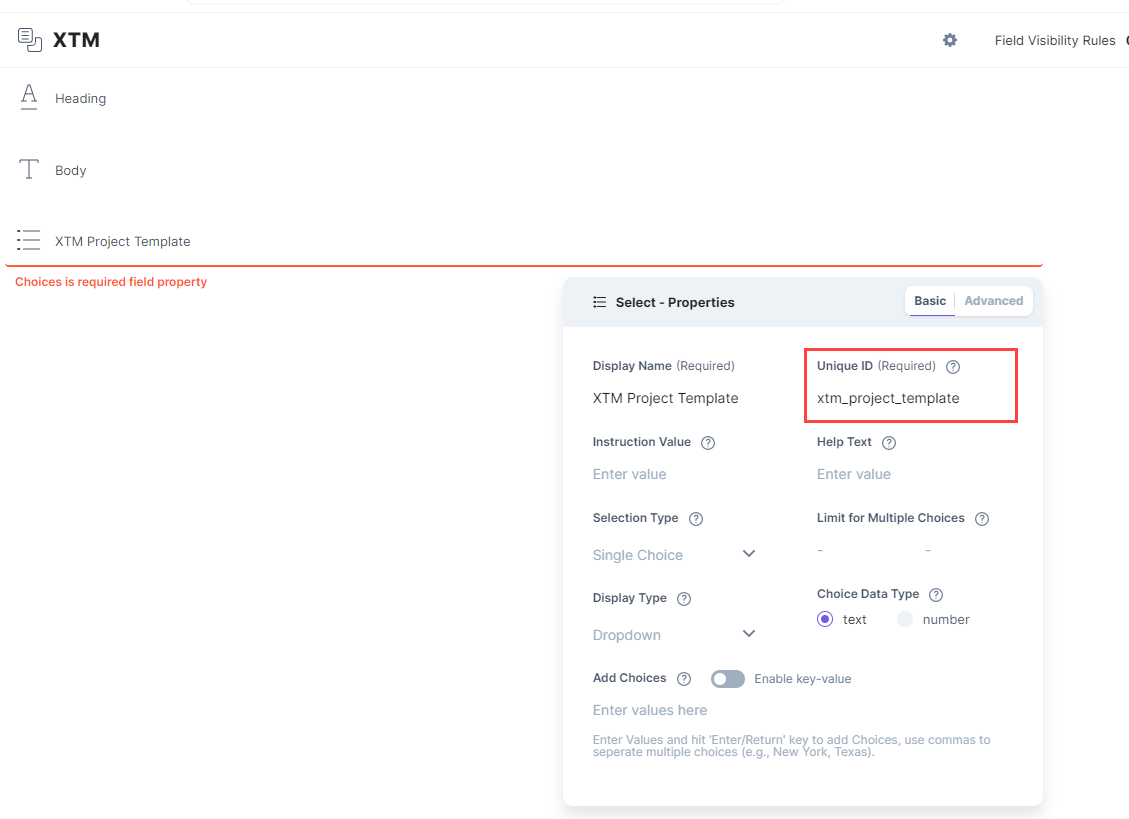
If you are using our code example, ensure that the format of adding the IDs is similar to the one shown below:
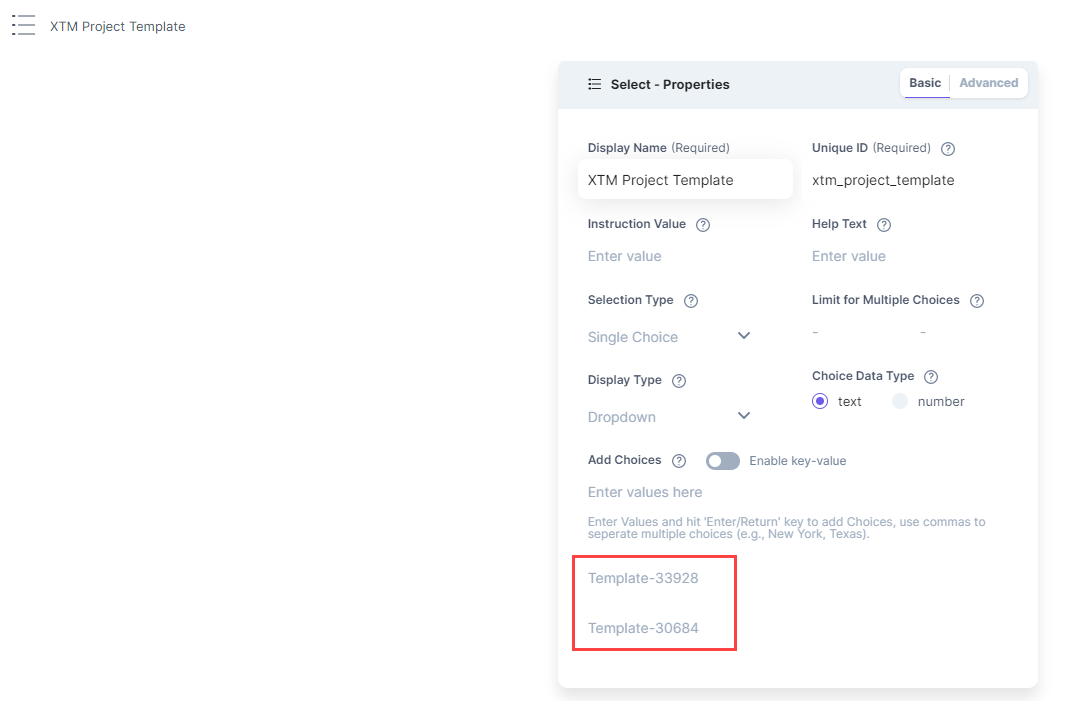
Note: You can add Template-33928, Template-30684, and so on so that it's easier for you to identify and select the required template in the entry. We will use the ID separated by a hyphen for identifying them in the entry page.
- Create a management token for your stack which we will use later while setting up the lambda function.
-
Next, create languages (locales) in your content type (XTM). In our example, we have added a few languages:
English [en-us] which is the source and our master language
Chinese - China [zh-cn] is another language
French - France [fr-fr] which will be our target language
Note: Ensure that the languages you add are supported by XTM. Also, the language code for the target languages that you add should be the same in Contentstack and XTM.
With these steps, we have set up the essentials in Contentstack. Let's now move ahead with creating a workflow.
-
Create a stack, add a content type (for our exercise, we have created a Single Content Type named XTM).
-
Set up the Workflow for Translation in Contentstack
To set up workflows for the translation process, perform the following steps:
- Hover over the Settings gear icon and click on Workflows.
- On the Workflow Settings page, click on + ADD WORKFLOW.
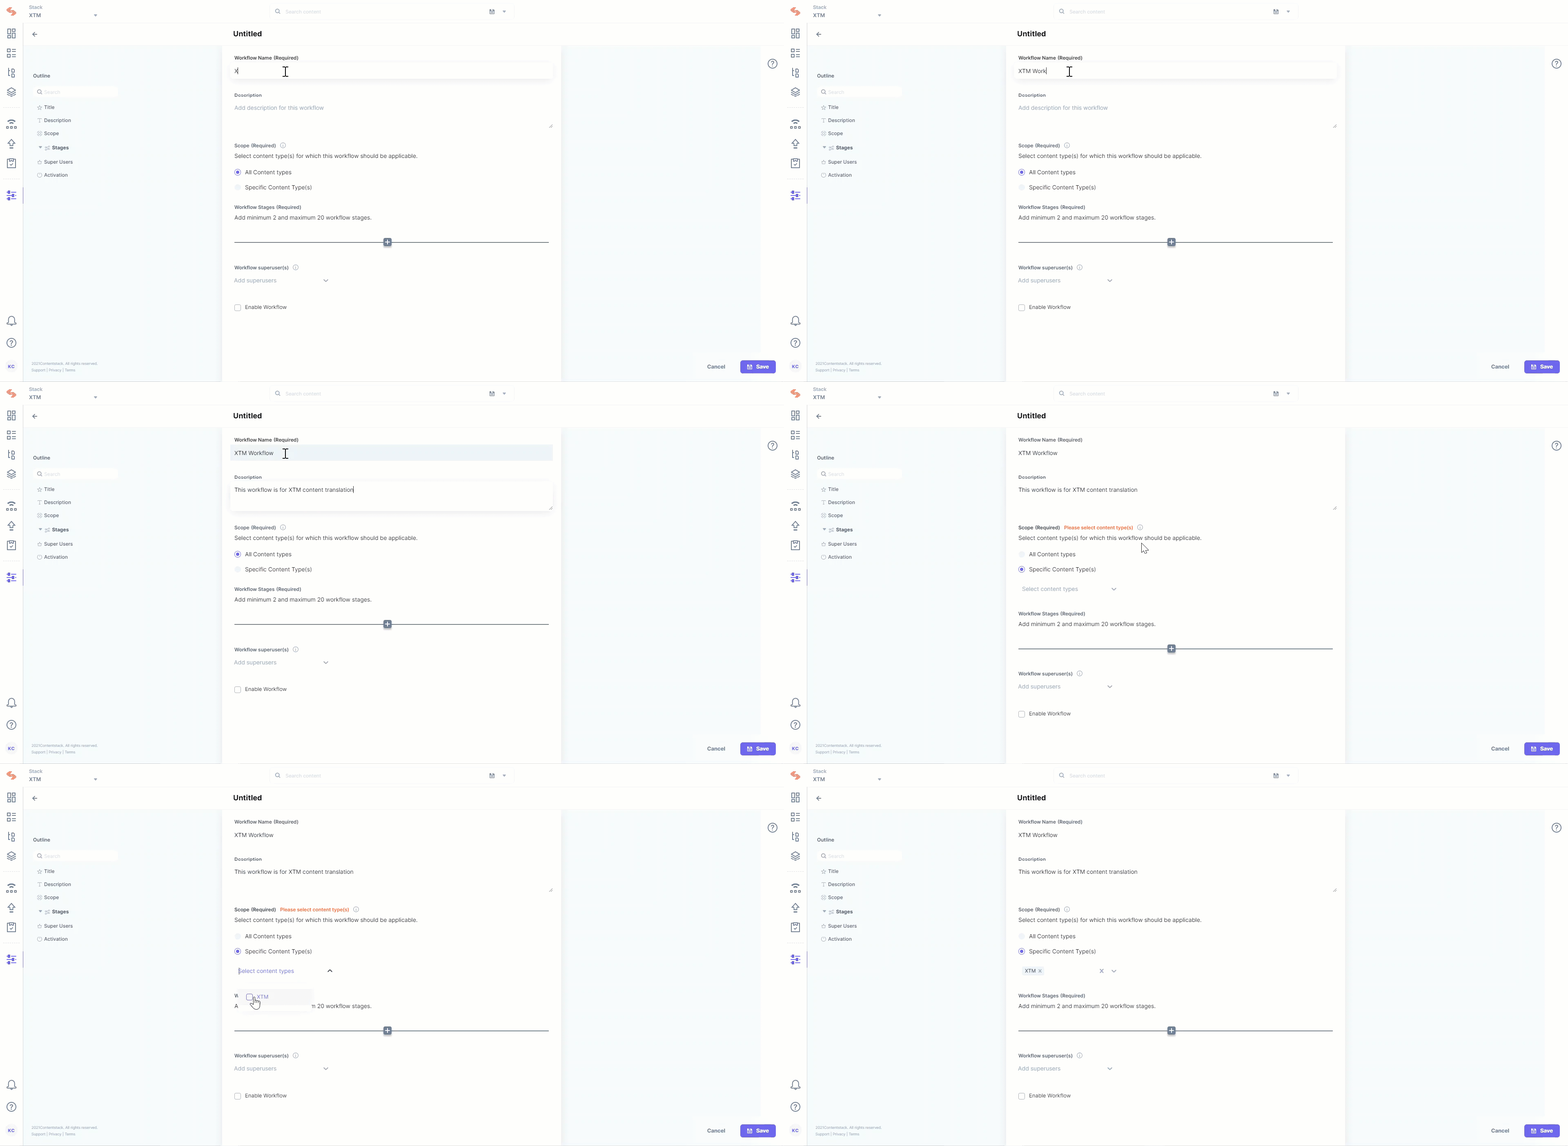
- Provide a suitable name to your workflow and an optional description.
-
Under the Scope option, select if this workflow should be applied to All Content Types or Specific Content Type(s). For our example, we will select the Specific Content Types(s) option and then select our content type, XTM, and then click on Add as shown below:
-
Inside the WORKFLOW STAGES option, add four stages (for example, Draft, Send for Translation, Review, and Completed).
Additional resource: Learn more about workflow and its stages, refer to the set up workflows guide.
- Lastly, click on the Enable Workflow checkbox and then on the Save button.
With these steps, our workflow is ready. When the editor changes the workflow stage from “Draft” to “Send for Translation,” the webhook will be triggered and call the lambda function (we will set these up later in the guide).
Now go back to the Workflow Settings page and note down the WORKFLOW ID as shown below (we will need this ID later when we setup our lambda function):
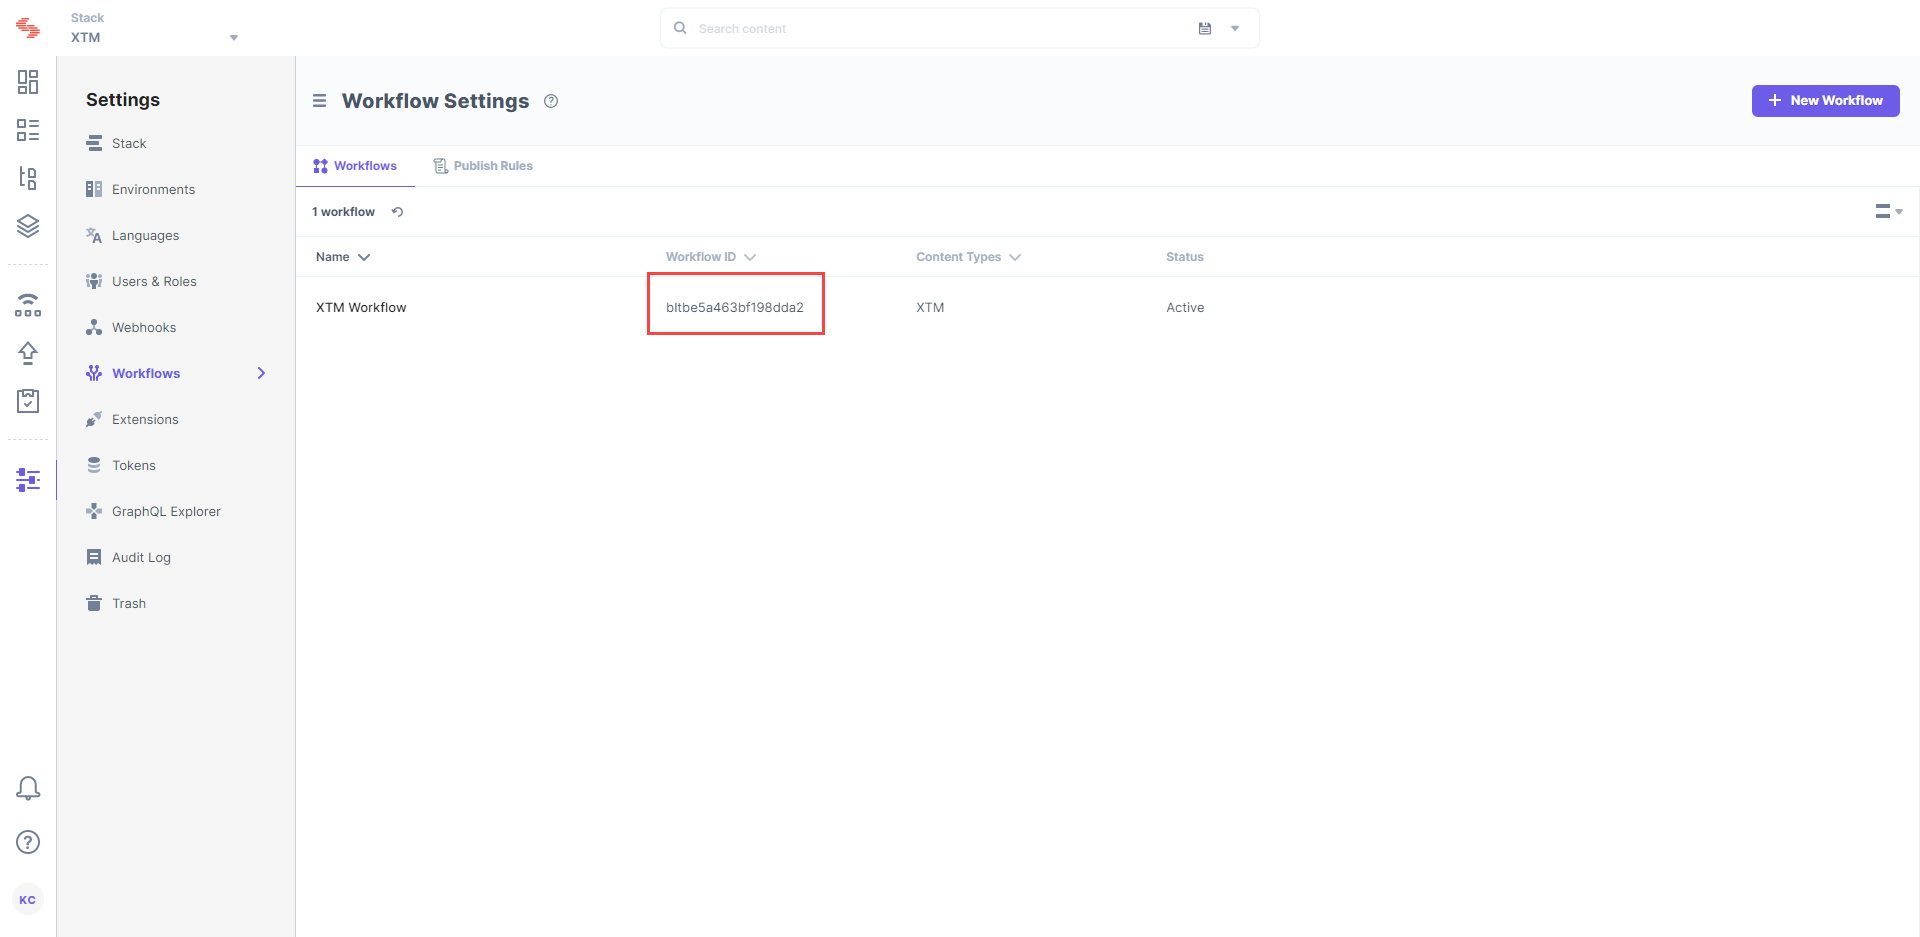
With these steps, we have created our workflow. Let's now move ahead and set up lambda functions.
-
Set up the AWS Lambda Function
The job of the lambda function is to take the content of the entry and send it to the XTM for translation. Once the translated content is ready in the required language, it updates the locale in the entry along with changing the workflow stage to "Review".
To create this function, follow the steps given below:
- Log in to your AWS Management Console, select Lambda from the Services list.
- Click on the Create function button and then the Author from Scratch option.
- Provide a name to your lambda function inside the Function name field, select Node.js 14.x as your Runtime language, and click on the Create function button.
- You will get a success message on creation of the lambda function. For this exercise, we have created the sample code for the lambda functions. If Extensions are part of your plan, contact our Support team to get the code for the extension.
-
Once you get the code, open command prompt and move inside the folder named contentstack-XTM-integration.
-
Then, install the required dependencies by running the following command:
npm install
-
Now, run the following command to create a zip file:
npm run build
-
With the above command, you will get a zipped file named xtm-mt.zip. We will be uploading this file to our Lambda function.
Note: The npm run build command we discussed above will work for Mac and Linux users. If you are on Windows, the npm build command may not work. In that case, after installing the dependencies, you will have to manually zip the code file, name it xtm-mt.zip, and upload it to your Lambda function.
-
Then, install the required dependencies by running the following command:
- Now in your AWS console, inside the Code source section, click on the Upload from dropdown and select .zip file.
- In the Upload a .zip file modal, click on the Upload button, move to the folder where you have placed the zipped above (discussed above), and select the zip file named xtm-mt.zip. Then, click on Save.
- In the Runtime settings option, keep Handler as index.handler.
- Scroll up and select the Configuration tab. Inside the General configuration section, increase the function timeout duration to 30 seconds by clicking on Edit.
-
Staying inside the Configuration tab, click on the Environment variable option on the left and add the following variables inside it by clicking on Edit and then Add environment:
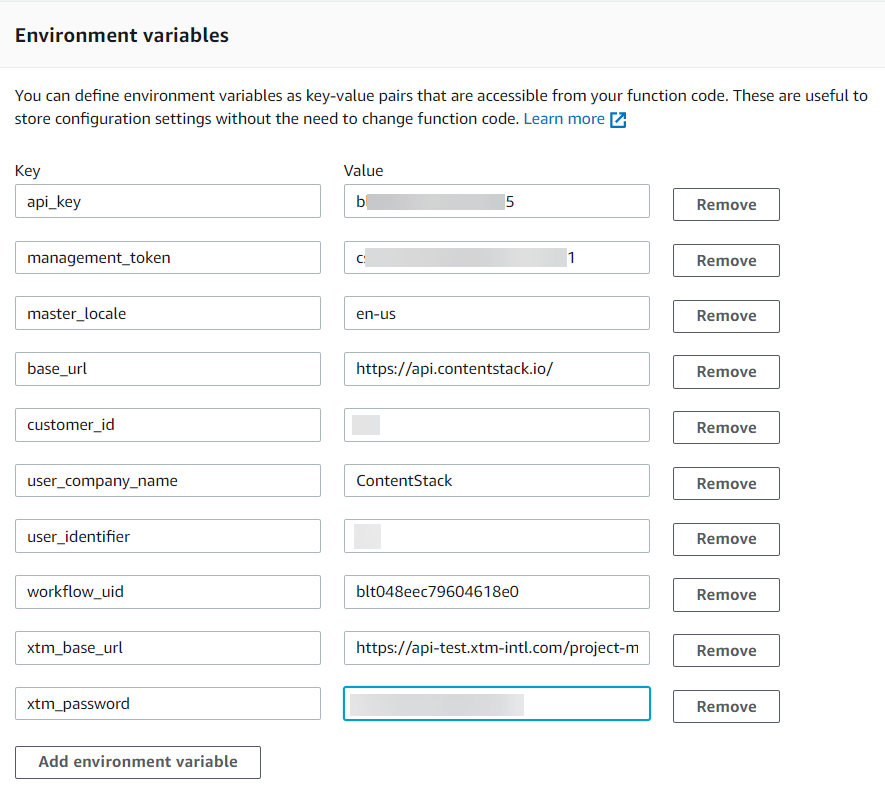
api_key: <<Stack API Key>>
management_token: <<Stack Management Token>>
master_locale: en-us
base_url: https://api.contentstack.io/v3/ (for Europe region, enter base_url: https://eu-api.contentstack.com/v3/. Similarly, for Azure NA region, enter base_url value as: https://azure-na-api.contentstack.com/v3/, and for Azure EU region, enter base_url value as: https://azure-eu-api.contentstack.com/v3/)
customer_id: 23
user_company_name: <<XTM User company that you created while setting up the account>>
user_identifier: 20
workflow_uid: <<Your workflow UID generated above>>
xtm_base_url: https://api-test.xtm-intl.com//project-manager-api-rest/
xtm_password: <<Your XTM password you use for login>>
Note: To get the customer_id, click on the Customers tab at the top (next to Projects) in XTM. Then, hover over the "i" icon at the right to get it. Similarly, to get the user_identifier key, click on the Users tab at the top and then hover over the "i" icon and note down the ID.
- Once you have added the variables, click on Save.
- Within Configuration, click on General configuration and increase the timeout value (by clicking on Edit) from 3 to 30 seconds and then save it.
- Your lambda function is now ready. Let's add a trigger (API Gateway) for this lambda function. To do this, scroll up to the Function overview section and click on + Add trigger.
- On the Trigger configuration screen, select API Gateway from the Select a trigger dropdown.
-
From the API dropdown, select Create an API. Then, select REST API inside the API type block. Select Open from the Security dropdown and click on Add.
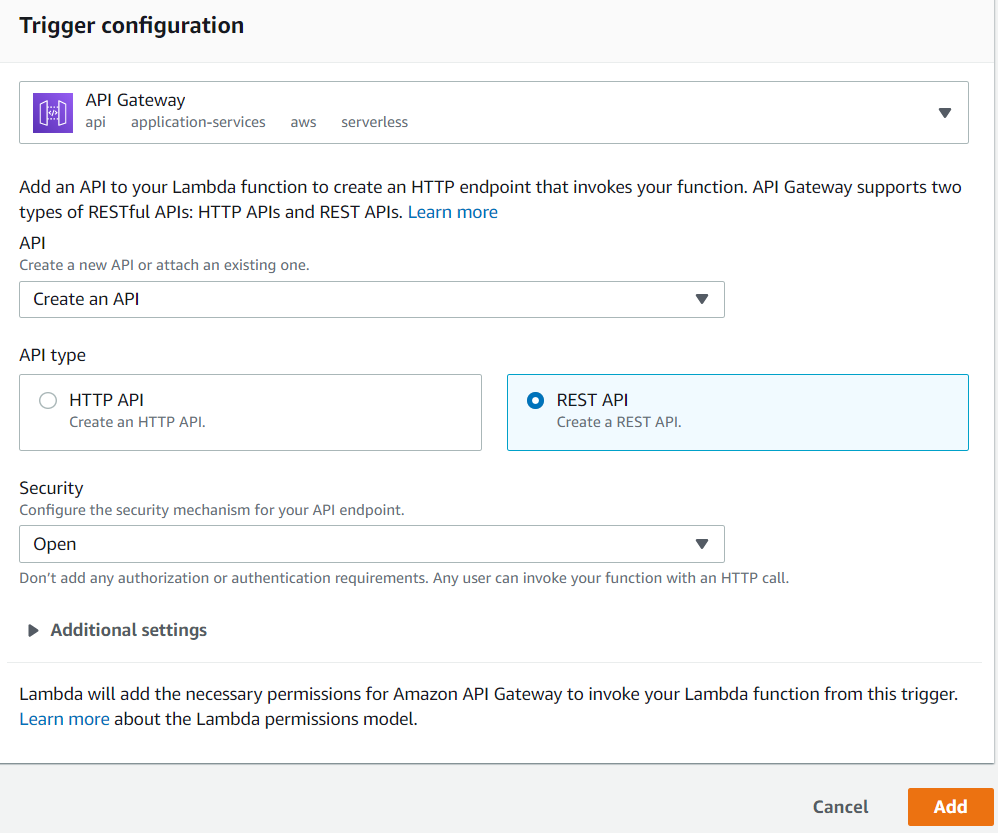
- An API for your lambda function is now created. Inside the Triggers section, you will see the Details link. Click on it and you will find your API endpoint. Make a note of it as we will need it while setting up our webhook in Contentstack.

Let's now move ahead and create a webhook that will invoke the lambda function once the workflow stage changes to Send for Translation.
-
Trigger a Webhook to Initiate Translation
To create and set up a webhook in Contentstack, log in to your Contentstack account and perform the following steps:
- Hover over the Settings gear icon, click on Webhooks, and on the Webhooks page, click on + New Webhook.
- On the Create Webhook page, fill up the Name field (for example, XTM Translation).
- In the URL to notify field, enter the URL (the API endpoint of the first lambda function) that you generated in the previous step.
- Scroll down to the When section for creating a trigger for the webhook as shown below:

- Ensure to check the Enable Webhook option and click on the Save button to save your settings.
With these steps, we have completed the entire set up and now we are ready to try it out.
-
Try out the Steps
We are now ready to test the setup.
-
Create an entry inside the content type (in the en-us locale). Select the XTM template and after you have added the details in other fields, change the workflow stage by selecting Send for Translation from the WORKFLOW DETAILS section on the right side.
Note: You can send content from your master locale only to XTM for translation. If you send the data from other locales, it will not be translated and the webhook will throw an error.
- This will trigger the webhook and it will invoke the lambda function. The lambda function will generate the JSON file of the entry and place it in the XTM account for translation.
- Now go to your entry in Contentstack and select the target locale from the dropdown (French [France] in our example). You will see the translated content and the workflow stage change to Review.
-
Create an entry inside the content type (in the en-us locale). Select the XTM template and after you have added the details in other fields, change the workflow stage by selecting Send for Translation from the WORKFLOW DETAILS section on the right side.


.svg?format=pjpg&auto=webp)
.svg?format=pjpg&auto=webp)
.png?format=pjpg&auto=webp)


.png?format=pjpg&auto=webp)