Set up a notification System with Contentstack Webhooks, AWS, Lambda, and AWS SNS
Notifications help systems to communicate with each other by notifying each other about any event happening that happens in real-time. In Contentstack, notifications can be triggered, via webhooks, when you perform actions such as content publishing, unpublishing, updation, and so on.
In this guide, we will set up a notification system by using Contentstack Webhooks, AWS SNS, and AWS Lambda function. This will help us send notifications to an endpoint of our choice when any event occurs in Contentstack.
Overview of the process: We will set up a system that whenever someone updates an entry in Contentstack, a webhook will get triggered and connect with the AWS lambda function. This Lambda function then notifies AWS SNS about such an event. Then, you’ll receive an email notification, which contains a JSON payload of that specific entry.
Prerequisites
To proceed with the procedure, the following is required:
- Basic knowledge of AWS SNS
- Working knowledge of AWS API Gateways
- Access to the AWS environment
- Contentstack account
Steps for Execution
Here are the steps to set up a notification system:
- Create AWS SNS topic and subscription
- Create AWS Lambda Function
- Set up API Gateway
- Deploy API
- Set up Webhook in Contentstack
- Try out the Setup
Create AWS SNS topic and subscription
First, you’ll need to create an SNS topic to set up a communication channel. Here you can define via which channel (for example SQS, text message, email, etc) you want to send notifications.
To create an AWS SNS topic, perform the following steps:
- Log in to your AWS Management Console and select Simple Notification Service from the Services dropdown menu.
- Next, go to the Topics section from the left navigation panel. This will open the Topics page.
- Click on the Create topic button.
- On the Create topic page, inside the Details section, provide the following details:
- Type: Choose the topic type as per your requirements. For this tutorial, we’ll select Standard as we are targeting to push notifications via emails.
- Name: Enter a name for your topic.
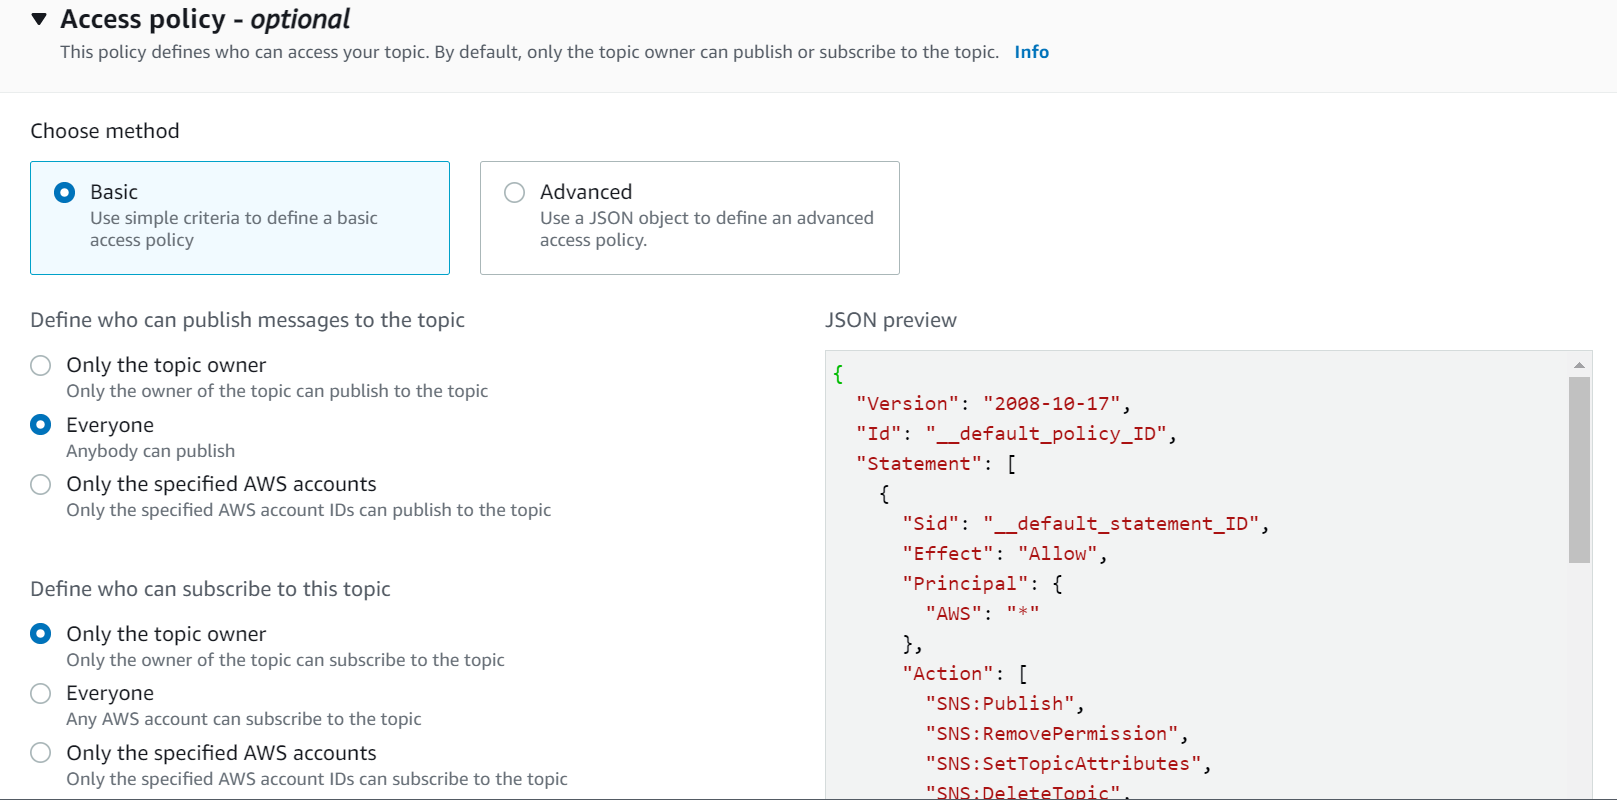
- Scroll down to the Access policy - optional section, click to expand it, and choose values for the following options:
- Choose method: Select Basic
- Define who can publish messages to the topic: Select Everybody to let Lambda function initiate the notification process.
- Define who can subscribe to this topic: By default, Only the topic owner option is selected. You can however choose another option if required.
- Click on the Create topic button.
- You’ll be directed to your topic’s screen. Make note of the ARN displayed in the Details section as you’ll need it in the next step.
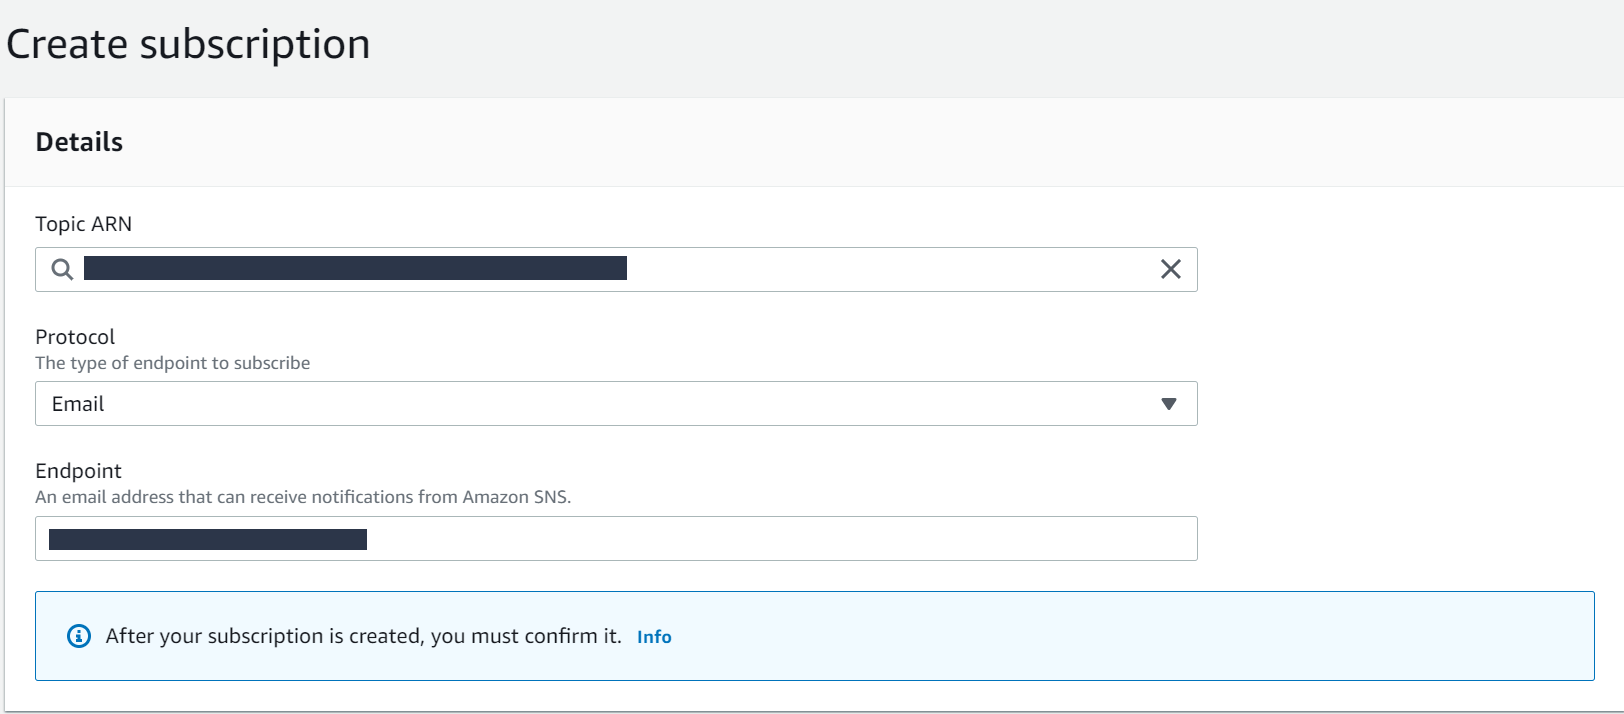
- On your topic’s page, scroll down to the Subscriptions tab, and click the Create subscription button. This will open the Create subscription screen.
- In the Details section, select Email from the Protocols dropdown menu, and enter the email address where you want to send email notifications in the Endpoint field.
- Finally, click on the Create subscription button.
Create an AWS Lambda Function
Let's now create an AWS Lambda function that sends the data (received from Contentstack via webhooks) to AWS SNS.
- From the Services dropdown list, select Lambda.
- On the Functions page, click on the Create function button.
- On the Create Function page, select Author from Scratch.
- In the Basic Information section below, provide a name for your function, choose any available version of Node.js, and click on the Create function button.
You’ll be redirected to your lambda function’s page. Let’s proceed to configure this function. - AWS Lambda offers an inline code editor where you can write your lambda code. Another option is to write the lambda code on your machine and then load it in the code editor.
To write your own code, scroll down to the Code source section, located inside the Code tab, and open the index.js file, which is preloaded with a default basic code. - Replace the default code in the index.js file with the code given below:
console.log("Loading function");
var AWS  = require("aws-sdk");
const topicArn = "<arn_received_in_step_1>";
const emailSubject = "Contentstack Webhook - Entry Updated";
exports.handler = function(event, context){
    var eventText = JSON.stringify(event, null, 2);
    console.log("Received event");
    var sns = new AWS.SNS();
    var params = {
         Message: eventText,
         Subject: emailSubject,
         TopicArn: topicArn
         };
        sns.publish(params, context.done);
};
Provide the ARN, received in Step 1, for the topicArn variable.
In the Runtime settings section, make sure the Handler is set to index.handler.
Now that you have configured your lambda, let's move on and configure the AWS API Gateways.
Set up API Gateway
For your Lambda to be accessible publicly through an HTTP POST, you need to configure the AWS API Gateway using your function as the backend for the API as shown below:
- Select API Gateway from the Services dropdown list and click on the Getting started or Create API button (depending on whether you have already an API configured or not).
- On the Choose an API type page, from the available options, scroll down to the REST API card and click Build.
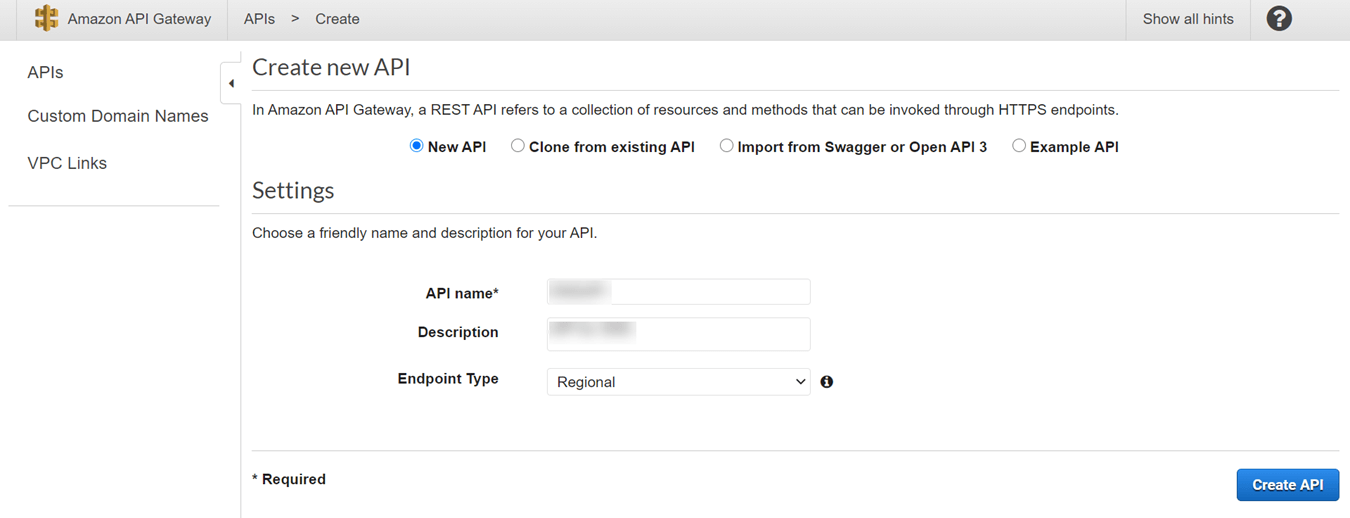
- On the Create new API page, select New API, enter the name and description of your API, keep Endpoint Type as Regional, and click the Create API button.
- Click on Actions in the Resources column, and select Create Method.
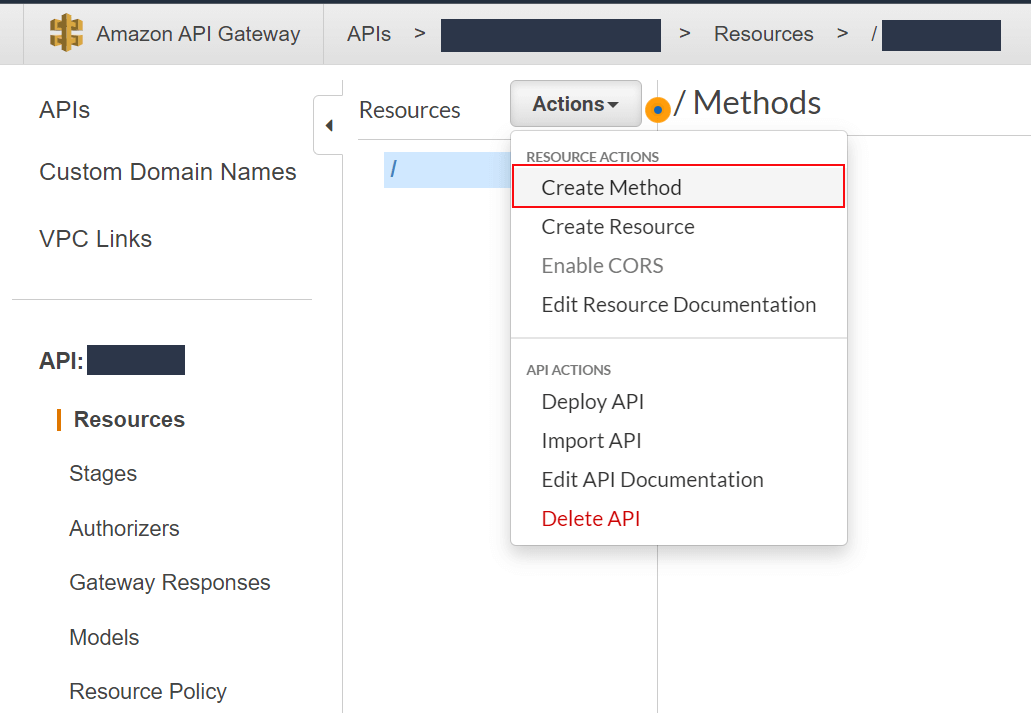
- From the resultant dropdown, Select POST and click on the checkmark.
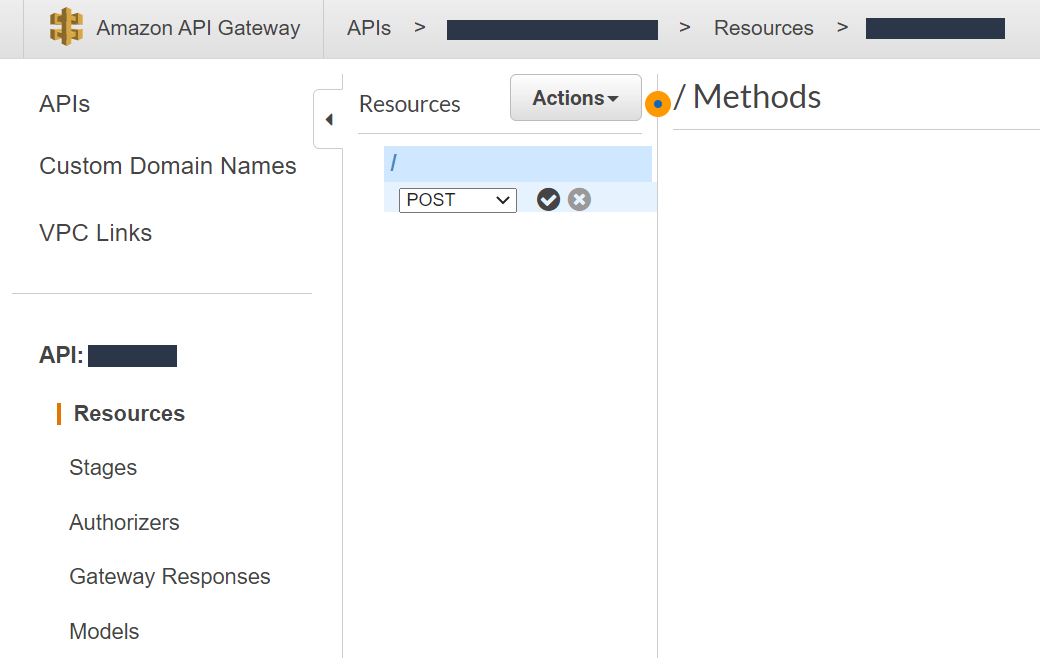
- Select Lambda Function as the integration type for this endpoint.
- Select the Lambda Region, and then type in the name of your Lambda Function.
Note: The region into which your Lambda is deployed isn’t easily identifiable when you’re deploying your Lambda, so you might have to do a little hunting.
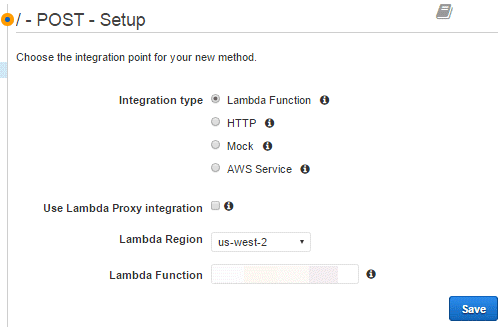
- Click on the Save button. You’ll get a popup window that asks you to confirm that this API will be granted permission to invoke your Lambda function.
- Click OK to grant the permission.
Deploy API
To make your API ready to use, you need to deploy your API.
- From the Actions drop-down. select Deploy API.
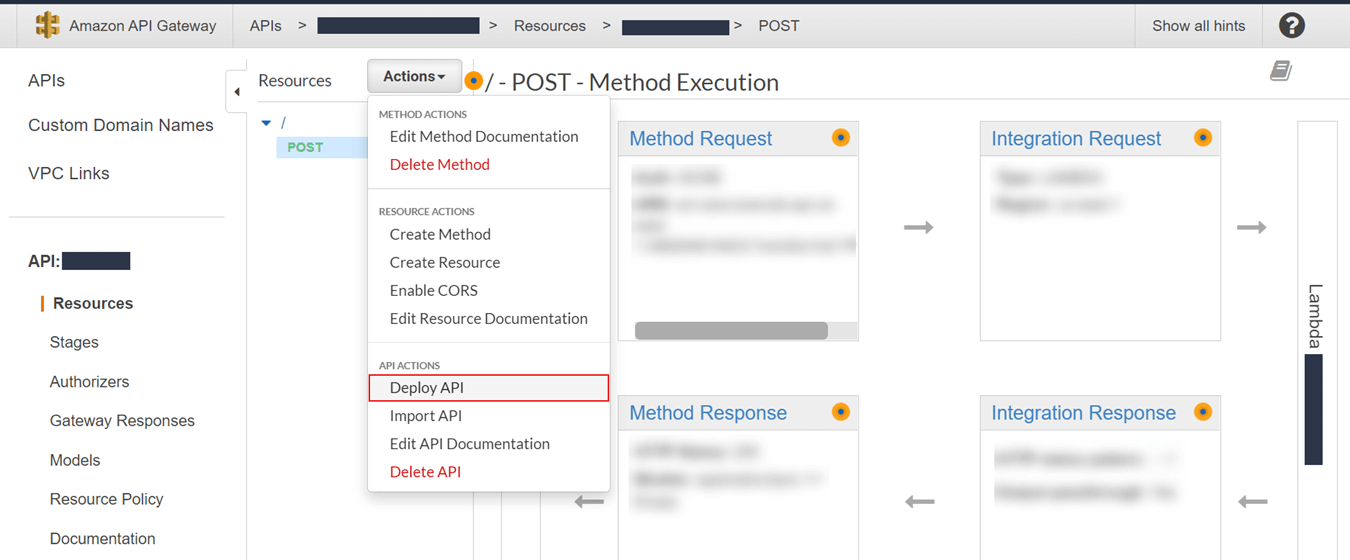
You’ll get the Deploy API popup window. - Select [New Stage] in the Deployment stage option and enter prod (or anything you like to identify this stage) in the Stage name option.
- Click on the Deploy button.
- From the Actions drop-down. select Deploy API.
Set up Webhook in Contentstack
To trigger the event on any update on the entry, you will have to set up a Webhook in Contentstack. To do this, log in to your Contentstack account and perform the following steps:
- Go to your stack, click the “Settings” icon on the left navigation panel and click on Webhook. You can also use the shortcut keys “alt + W” for Windows OS users, and “option + W” for Mac OS users to access webhooks.
- On the Webhook page, click on + New Webhook.
- Enter the name for your Webhook, for example, “AWS-Webhook Listener”
- In the URL to notify field, enter the Endpoint URL received in the Deploy API step.
- Scroll down to the When section for creating a trigger for the webhook as shown below:

- Select the Enable Webhook checkbox and Save your webhook settings.
- Go to your stack, click the “Settings” icon on the left navigation panel and click on Webhook. You can also use the shortcut keys “alt + W” for Windows OS users, and “option + W” for Mac OS users to access webhooks.
Try out the Setup
Go to any entry and update it. You’ll receive an email notification that contains details about the entry.
More Resources
You can refer to our guides on how you can use Contentstack Webhooks with AWS Lambda to automate several content management tasks.


.svg?format=pjpg&auto=webp)
.svg?format=pjpg&auto=webp)
.png?format=pjpg&auto=webp)


.png?format=pjpg&auto=webp)