Set Up a Content Delivery Network for Contentstack-powered Websites
To ensure blazing fast content delivery, Contentstack has set up a CDN for its APIs. So, if you are using Contentstack, fast content delivery comes by default. Contentstack has its CDN endpoints to deliver content.
Additional Resource: Refer to our documentation about What CDN is and How it Works to learn more.
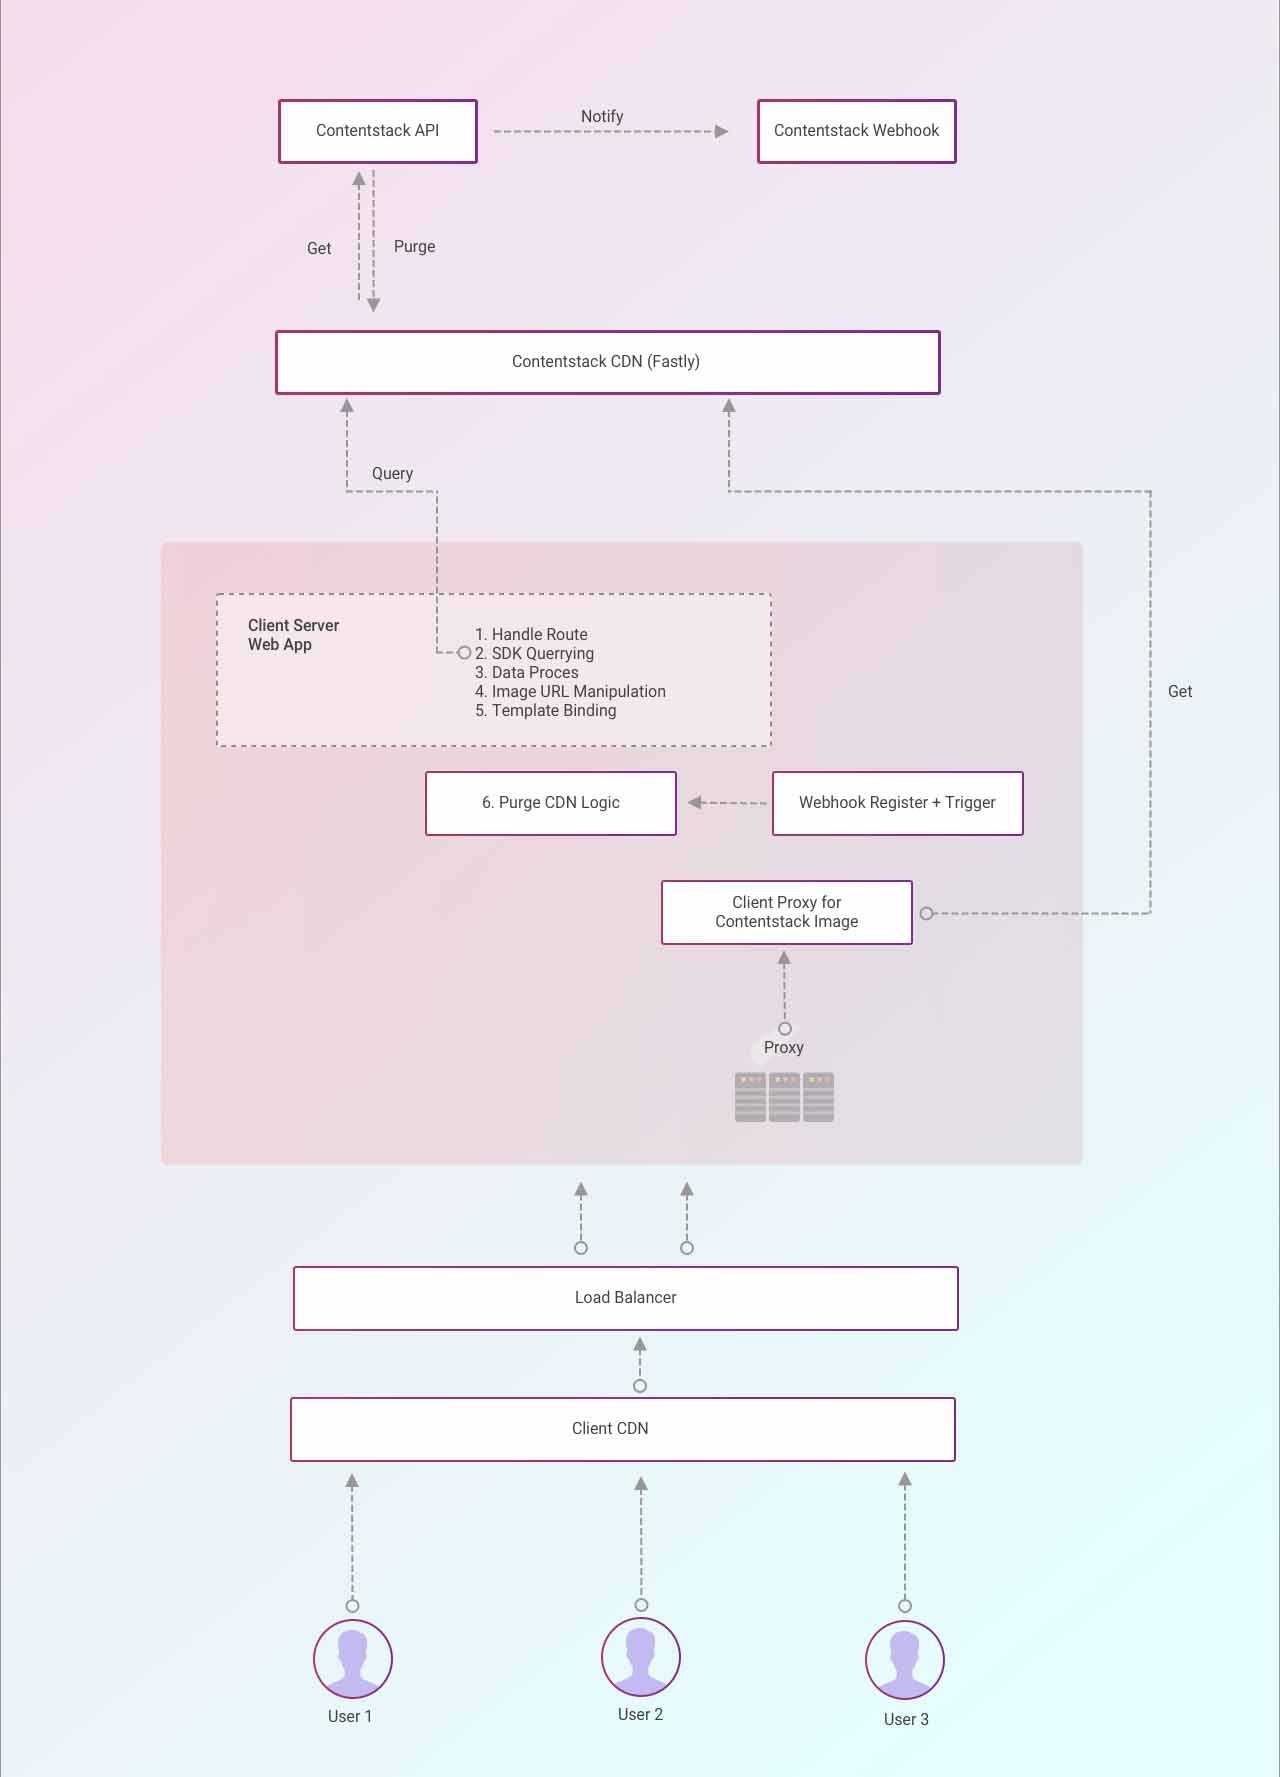
If you want to accelerate the pace of delivery further and gain even more control over your digital properties, you can set a separate CDN for your project. This CDN ensures that a cache system is available between your web server and the browser. So, page requests come directly from the cache instead of the web server or the Contentstack server.

Here’s what happens when you set up your CDN:
- When a new page request is received, it checks if the requested content is available in your site CDN. If available, the CDN delivers the content immediately.
- If the content is not available in your CDN, your web server contacts the Contentstack’s CDN for the requested data.
- If the data is available in the Contentstack's CDN, the content is delivered. It also caches that data in your CDN for future requests.
- If the requested data is not available in Contentstack's CDN, the request goes to Contentstack’s "origin" server.
From the above, it is evident that having multiple CDNs in place ensures fast delivery of content and reduces the number of calls to the Contentstack server.
Let’s look at the steps involved in setting up a CDN for your site.
- Choose a CDN provider
- Prepare your website
- Connect your CDN to your website
- Set cache data purging rules
Choose your CDN provider
The first step is to choose the right CDN provider. Before you choose one of the numerous options available, evaluate the solutions carefully.
A excellent way to do this is:
- Consider a web hosting provider that has integrated support for CDN. In this approach, you need to make specific changes in your account to ensure CDN is enabled for your website.
- Alternatively, you can choose a third-party CDN solution and set it up manually for your website. There are numerous options to choose from, both free and premium. Amazon CloudFront, Fastly, Akamai, and CloudFare are some of the popular ones.
Once you have selected and registered your website with the CDN, you can move onto setting it up on your website.
Prepare your Website
If you don't have your website ready, create one and install the required plugins to enable communication between your website and CDN.
Additional Resource: To create a website on your own, refer to our Getting Started guides that will help you to start from scratch.
Connect your CDN to your Website
Connecting your website to the selected CDN depends on which one you have chosen. Check with your CDN provider if there are any required activation steps. Some CDN providers, such as CloudFlare, have clear instructions and offer a custom plugin for ensuring the smooth syncing of your files with their CDN server and nodes.
Set Cache Data Purging Rules
Data Purging refers to the flushing of the data from the CDN cache. You need to balance when and why data is purged from the cache to ensure users receive up-to-date content while keeping costs down and performance high.
You can choose to clear all cache data from the CDN whenever new content is published or any existing content is updated. The other option is to purge the cached data of only the content that has been updated. You can also schedule your purges as desired. So, for example, you can purge data every X minutes when the content is updated in Contentstack.
If you get stuck, you can contact their support team. After your files have synced with the CDN provider, set up your website to ensure it creates a communication channel with the CDN so that content gets cached in your CDN correctly.
You can use Contentstack Webhooks to trigger that the cache is no longer valid and the CDN should purge the cache according to the rules you have set up.
Note: The above steps may vary depending upon the CDN service provider you choose.


.svg?format=pjpg&auto=webp)
.svg?format=pjpg&auto=webp)
.png?format=pjpg&auto=webp)


.png?format=pjpg&auto=webp)