ChatGPT
The ChatGPT connector enables you to generate content through chat responses and prompt responses using the OpenAI platform. The ChatGPT connector currently contains six actions: Chat, Chat with Vision, DALL-E 3 Image Generator, Function Calling, Function Calling Response, Prompt, and Translate an Entry.
Note: The gpt-4-vision-preview model is an Experimental Model with limited support. If deprecated, it may give errors, hence it cannot be used for production.
Details of each action are covered in their respective sections.
Prerequisites
To use the ChatGPT connector, you first need to add your ChatGPT account and authorize it with a valid API Key and Organization ID.
Generate API Key and Get Organization ID from the OpenAI platform
To generate an API Key and Organization ID in your OpenAI platform account, follow the steps given below:
- Log into your OpenAI platform account.
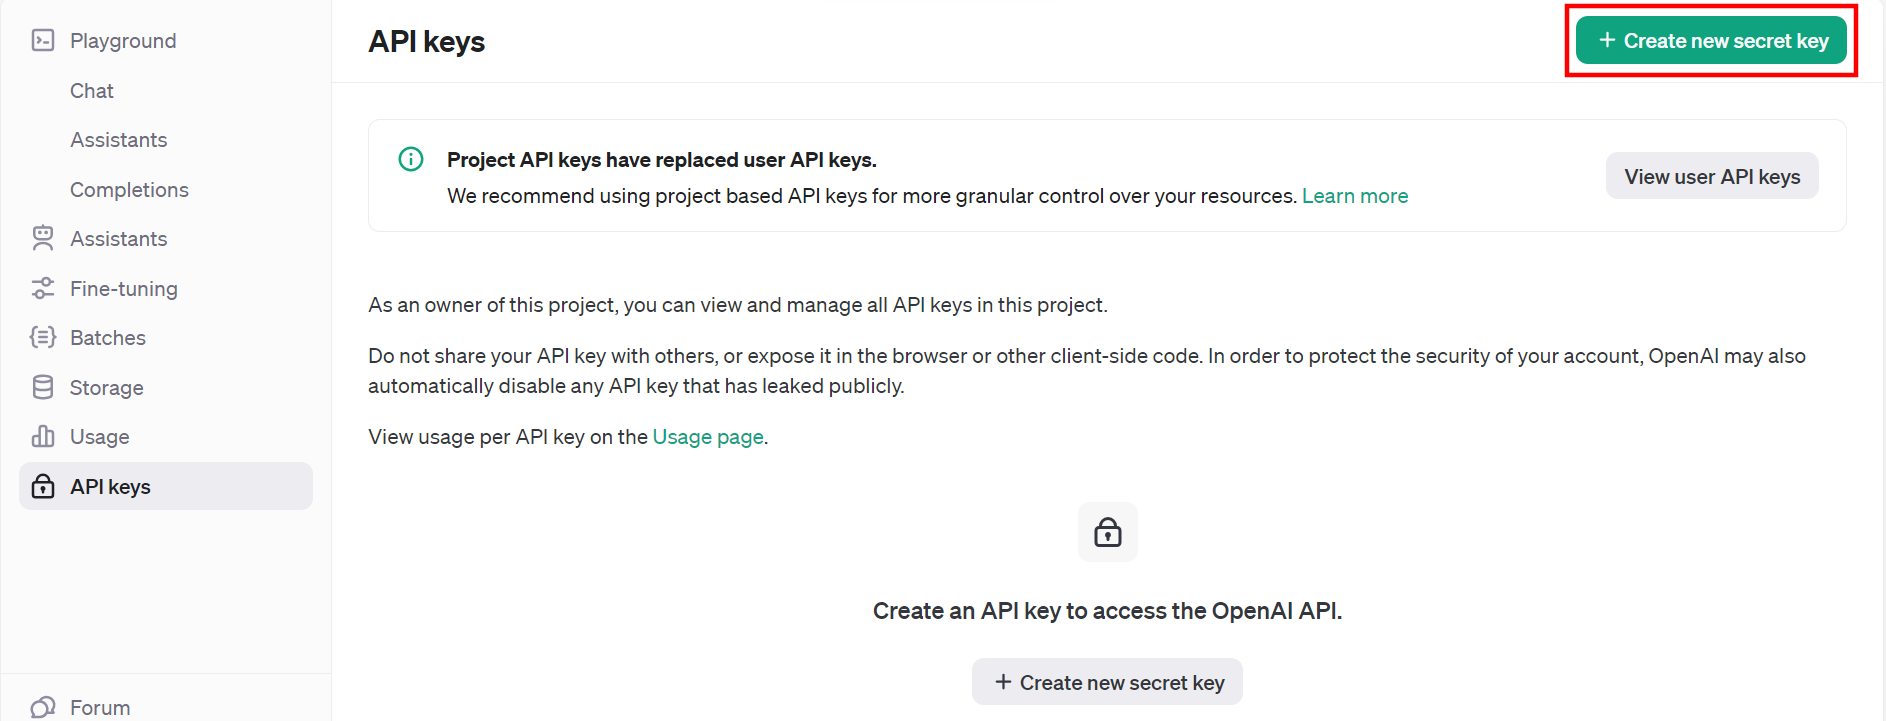
- Once you log in, you will be navigated to the API keys section as shown below. Click the + Create new secret key button to generate a new API Key.
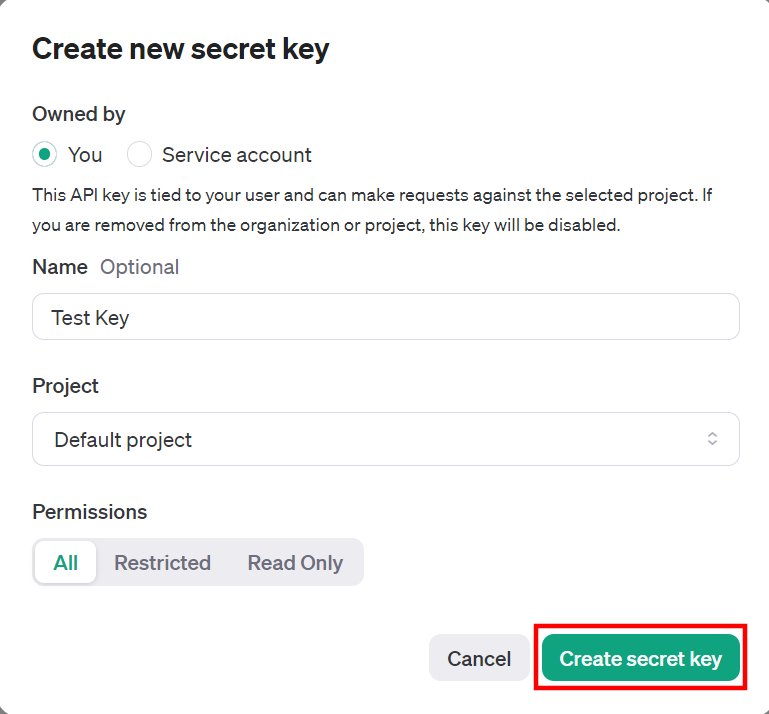
- On the Create new secret key modal, enter a Name (Optional) and select the appropriate Permissions. Click the Create secret key button to generate a new secret key.
An API Key gets generated. Copy it to your clipboard and click the Done button to close the pop-up box.
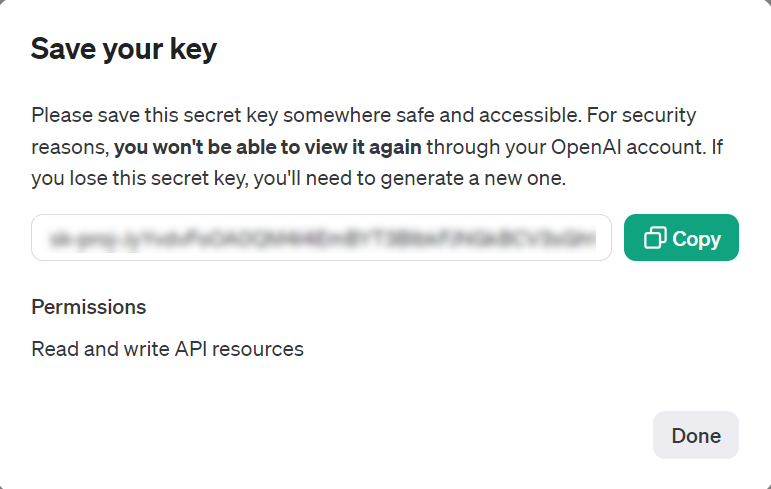
Note: Since the API Key is confidential, it is displayed only once. In case you do not copy it to your clipboard, you will need to create a new secret key.
- We will now see how to get the Organization ID. So from the top-right corner, click Settings, and you will get the Organization ID.
Copy the organization ID to your clipboard and paste it in the Organization ID field.
Note: Make sure you save the API Key and Organization ID to your clipboard, as these will be used to connect your ChatGPT account to Automate in the next step.
Connect your ChatGPT Account to Automate
Let’s take a look at how to add your ChatGPT account using the Organization ID and API Key generated above. To do so, follow the steps given below:
- Click Configure Action Step from the left navigation panel.
- Click Action Step to configure third-party services.
- Within the Configure Action Step, click the ChatGPT connector.
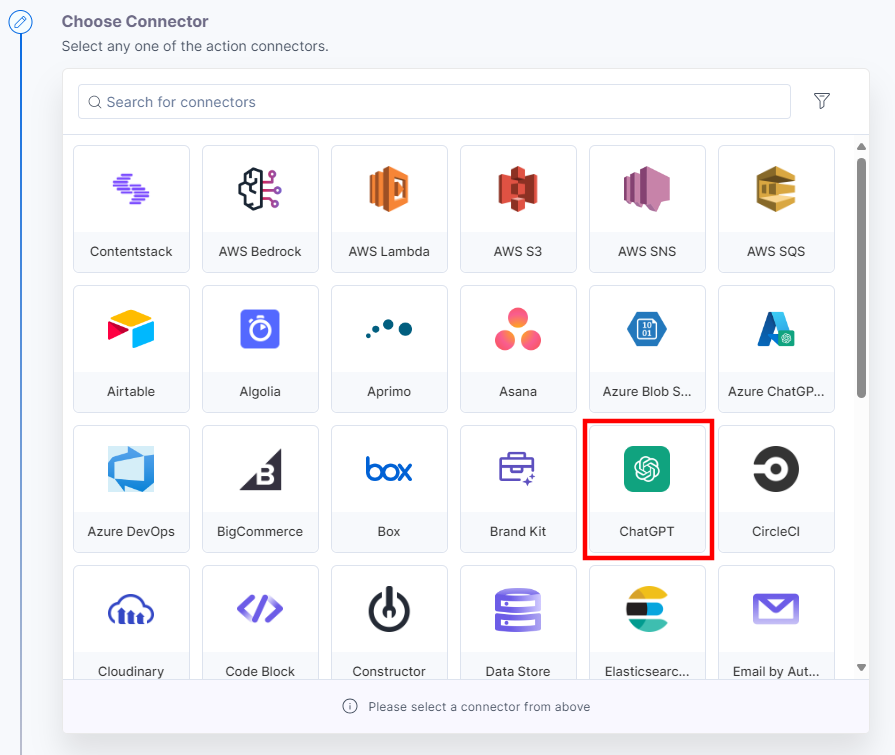
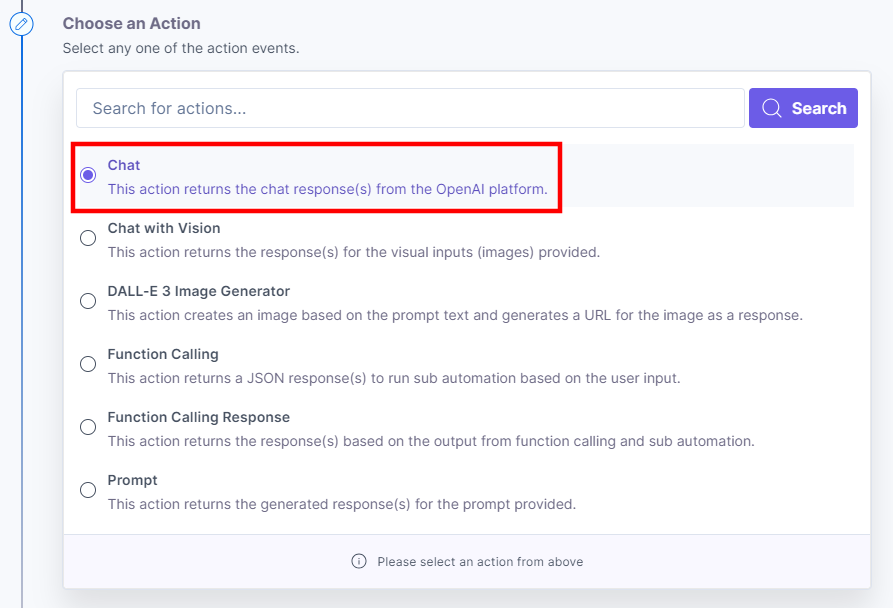
- Under Choose an Action tab, select any one action from the list. Here we are selecting the Chat action.
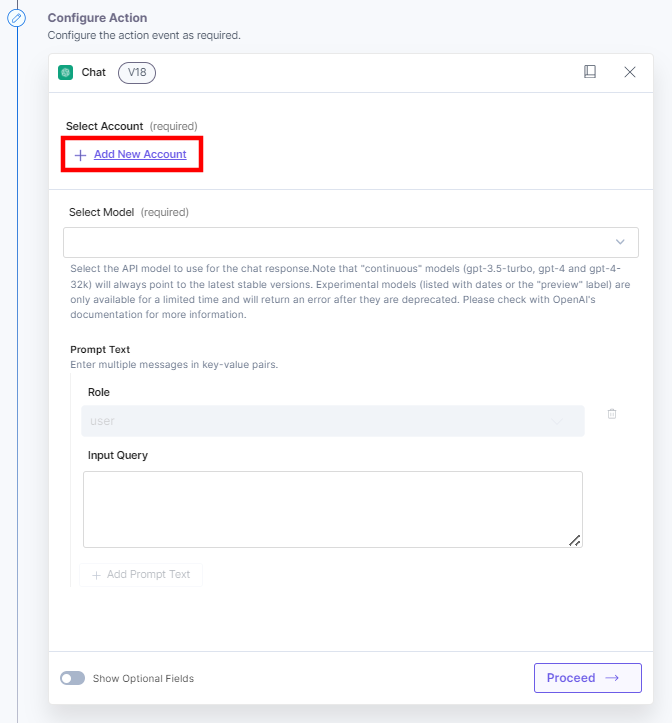
- On the Configure Action page, click the + Add New Account button to add your ChatGPT account.
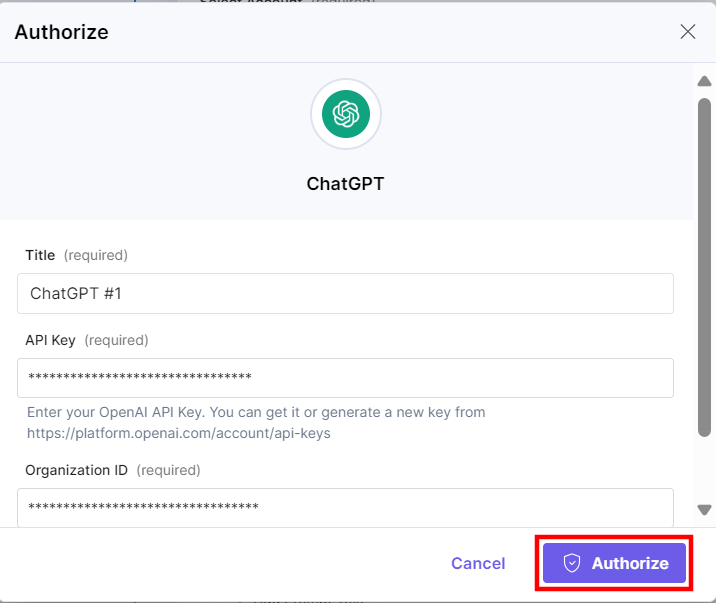
- In the Authorize modal, enter a Title. Enter the API Key and Organization ID retrieved in the Generate API Key and get Organization ID from the OpenAI Platform step from your OpenAI platform account. Click the Authorize button.
Once done, you can go ahead and set up your ChatGPT account.
Set up the ChatGPT Connector
Perform the following steps to set up the ChatGPT action connector:
- From the left navigation panel, click Configure Action Step.
- Then, click Action Step to configure third-party services.
- Within Configure Action Step, click the ChatGPT connector.

Note: You can sort and search the connector(s) based on the filter.
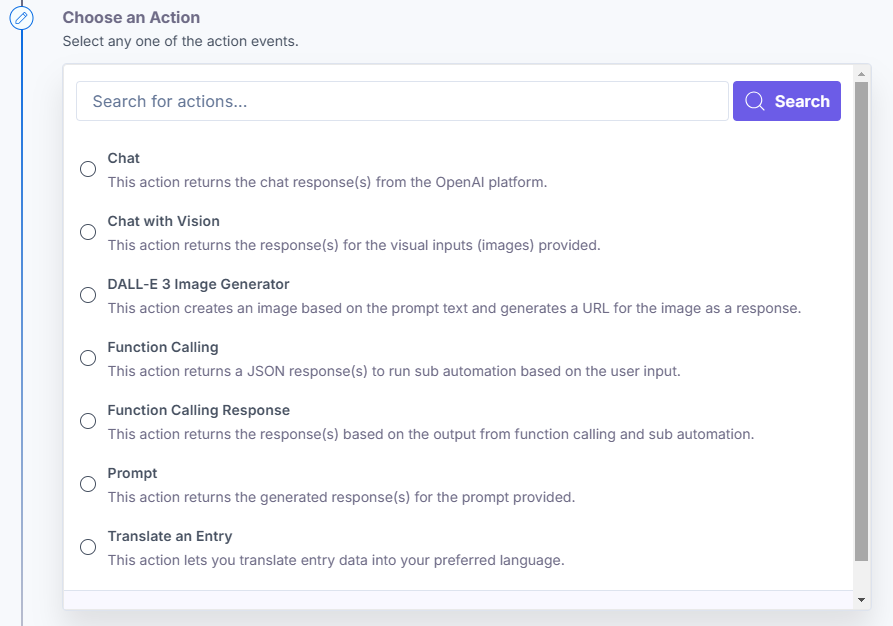
- Under Choose an Action, you will see five actions: Chat, Chat with Vision, DALL-E 3 Image Generator, Function Calling, Function Calling Response, Prompt, and Translate an Entry.
Let’s look at each of them in detail.
Action 1: Select the Chat action
The Chat action returns the chat response(s) from the OpenAI platform. To use the Chat action, follow the steps below:
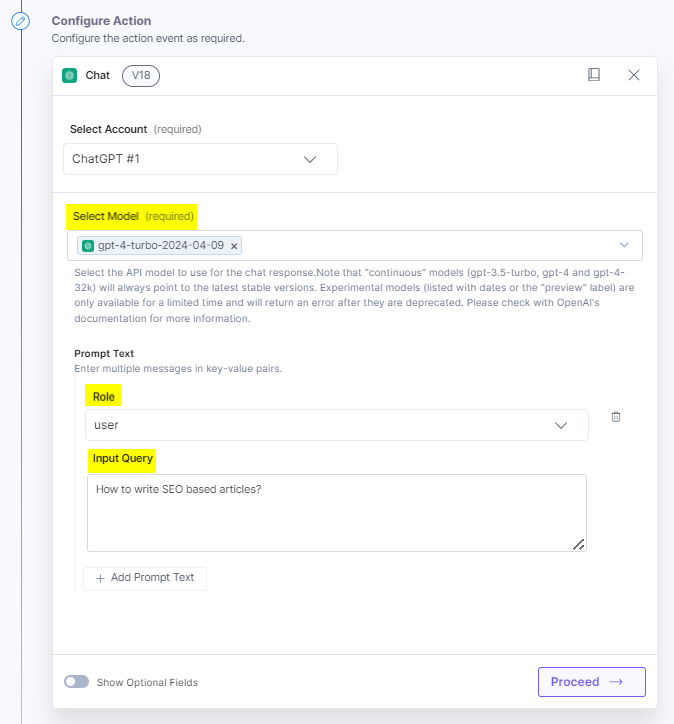
- Under Choose an Action tab, select the Chat action.
- On the Chat Configure Action page, enter the details given below:
- Click + Add New Account button to connect your ChatGPT account as shown in the Connect your ChatGPT Account to Automate step.
- Select the API Model from the drop-down list to generate content for the chat responses.
Note: Different models are available to different users based on the account the user holds such as paid accounts. You must check the account access before selecting the model.
Additional Resource: For more information about the API Models, please refer to ChatGPT API Models.
- Provide the Prompt Text to generate the chat response(s).
- Select the Role from the drop-down options to send to the API model request. By default, the role is set to user.
Additional Resource: There are three types of roles provided by the OpenAI platform. The system role sets the response context, the assistant role provides the response content, and the user role asks the prompt.
- Enter the value in the Input Query field.
- Click the Show Optional Fields toggle button to use these optional fields:
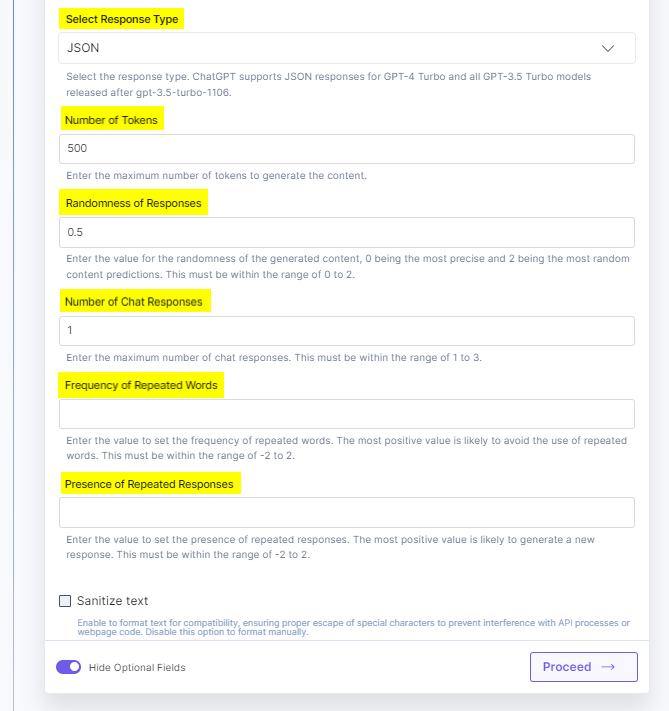
- Select the Response Type as either Text, JSON or Structured Output. For the Response Type as JSON or Structured Output, the output is produced in a valid JSON format. By default, the response in ChatGPT is fetched in Text format.
Note: Ensure you are using the gpt-3.5-turbo-1106 model and above to access and correctly use the Response Type field in the connector.
When selecting Structured Output as the Response Type, you must provide a valid JSON-formatted structured schema to ensure a properly formatted response.
Note:- To utilize Structured Output, all fields or function parameters must be marked as required.
- A schema can include up to 100 object properties in total, with a maximum of 5 levels of nesting.
- Structured Output generates only specified keys and values. To enable this functionality, you must set additionalProperties: false.
Structured Output is supported for GPT-4o-mini models from versions gpt-4o-mini-2024-07-18, gpt-4o-mini-2024-08-06, and later.
Additional Resource: See the JSON Schema documentation for more details.
- Enter the Number of Tokens to generate the content. This must be within the range of 1 to 2048.
- Enter a value for the Randomness of Responses of the generated content. 0 being the most precise and 2 being the most random content predictions. This must be within the range of 0 to 2.
- Enter the Number of Chat Responses you want to be generated in the automation response. This must be within the range of 1 to 3.
- Provide the value to set the Frequency of Repeated Words. The most positive value is likely to avoid the use of repeated words. This must be within the range of -2 to 2.
- Provide the value to set the Presence of Repeated Responses. The most positive value is likely to generate a new response. This must be within the range of -2 to 2.
- You can mark the Sanitize text checkbox to remove special characters or spaces from the chat response. Enabling this checkbox, eliminates any special characters or spaces in the chat response, resulting in a clean and compatible text.
- Select the Response Type as either Text, JSON or Structured Output. For the Response Type as JSON or Structured Output, the output is produced in a valid JSON format. By default, the response in ChatGPT is fetched in Text format.
- Click Proceed.
- Check if the details are correct. If yes, then click Test Action.

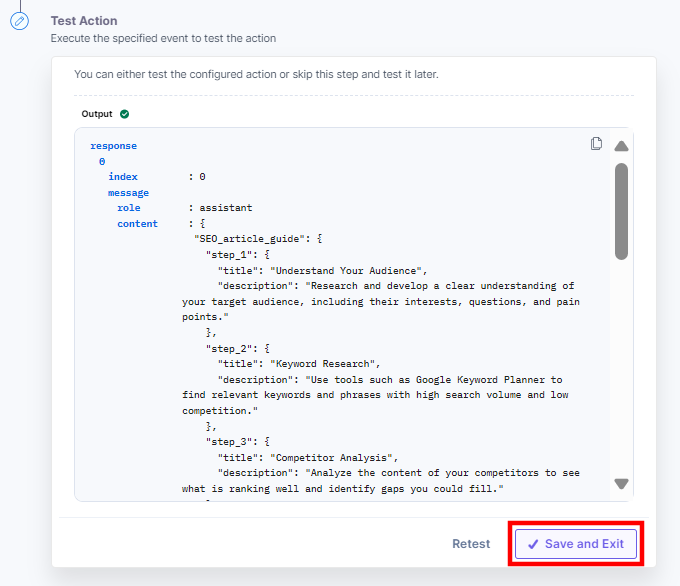
- You will get the response(s). Once set, click Save and Exit.
Action 2: Select the Chat with Vision action
With the Chat with Vision action, you can generate response(s) for images, providing a descriptive response of an image. To use the Chat with Vision action, follow the steps below:
Note: The Chat with Vision action generates a text response based on the URL provided, whereas the DALL-E 3 Image Generator action generates an image URL based on the Prompt text.
- Under Choose an Action tab, select the Chat with Vision action.
- On the Chat with Vision Configure Action page, enter the details given below:
- Click + Add New Account button to connect your ChatGPT account as shown in the Connect your ChatGPT Account to Automate step.
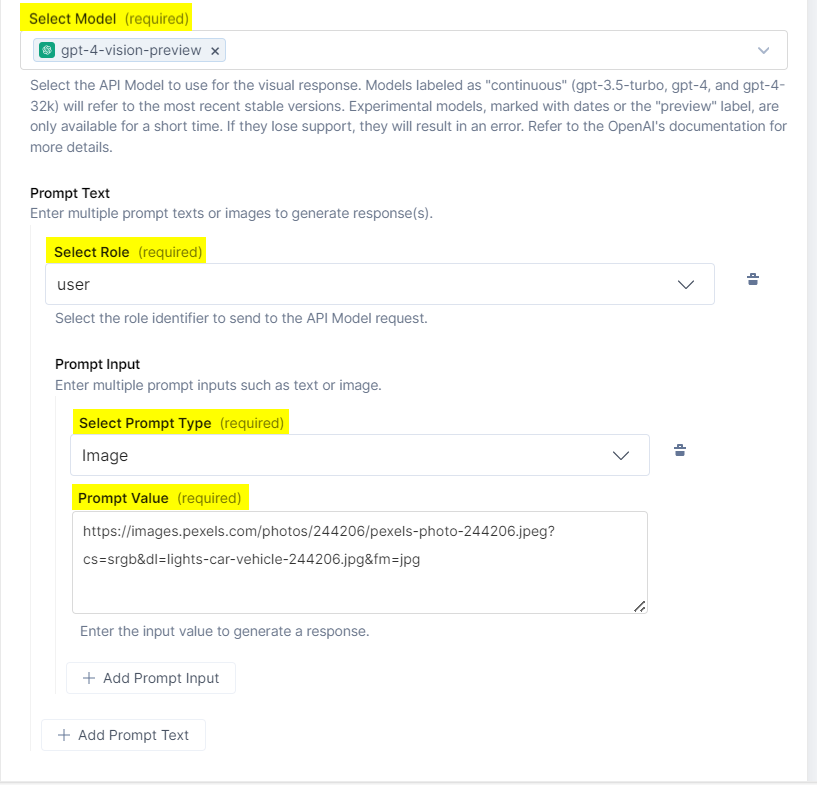
- Select the API Model from the drop-down list for response predictions. You can select, the gpt-4-vision-preview API model. This model will be available as gpt-4-vision after production support.
Additional Resource: For more information about the API Models, please refer to ChatGPT API Models.
- Provide the Prompt Text to generate response(s). Click + Add Prompt Text to enter multiple prompts.
Note: For the Role as system or assistant, you will see the Prompt Text box to enter the text to generate response. If you select the Role as user, you can select the type of prompt content, i.e. Text or Image.
If you select Role as user then follow the below steps:
- Under the Prompt Input section, click + Add Prompt Input button.
- In the Select Prompt Type drop-down, select the type of content, i.e. Text or Image to generate a response.
- Enter the Prompt Value. You can enter a text prompt or a valid image URL to generate a response.
- Click the Show Optional Fields toggle button to use these optional fields:
- Enter the Number of Chat Responses you want to be generated in the automation response. This must be within the range of 1 to 3.
- Enter the Number of Tokens to generate the content. This must be within the range of 1 to 2048.
- Enter a value for the Randomness of Responses of the generated content. 0 being the most precise and 2 being the most random content predictions. This must be within the range of 0 to 2.
- Provide the value to set the Frequency of Repeated Words. The most positive value is likely to avoid the use of repeated words. This must be within the range of -2 to 2.
- Provide the value to set the Presence of Repeated Responses. The most positive value is likely to generate a new response. This must be within the range of -2 to 2.
- You can mark the Sanitize text checkbox to remove special characters or spaces from the chat response. Enabling this checkbox, eliminates any special characters or spaces in the chat response, resulting in a clean and compatible text.
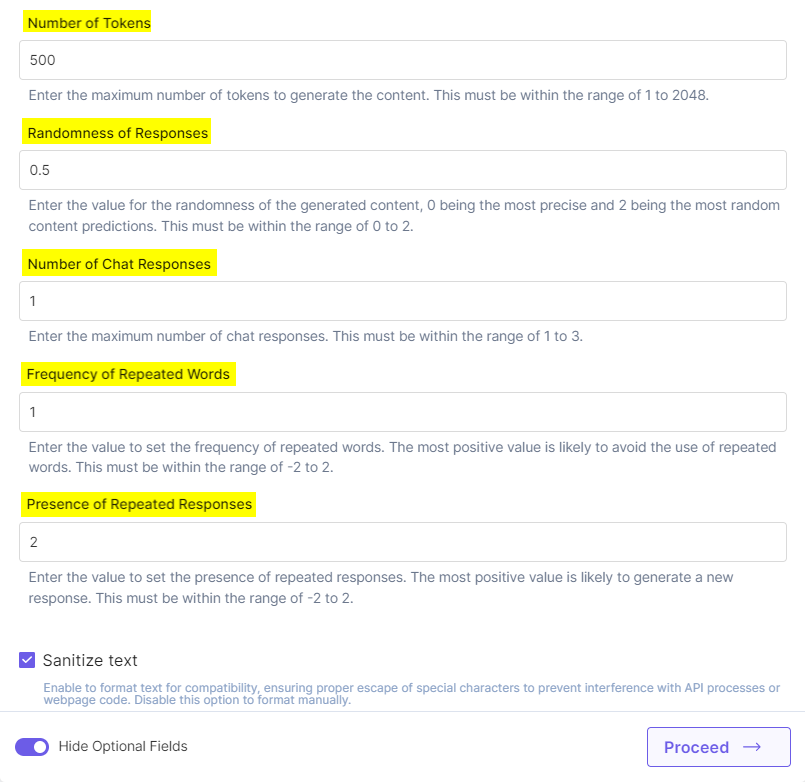
- Click Proceed.
- Check if the details are correct. If yes, then click Test Action.

- You will get the response(s). Once set, click Save and Exit.
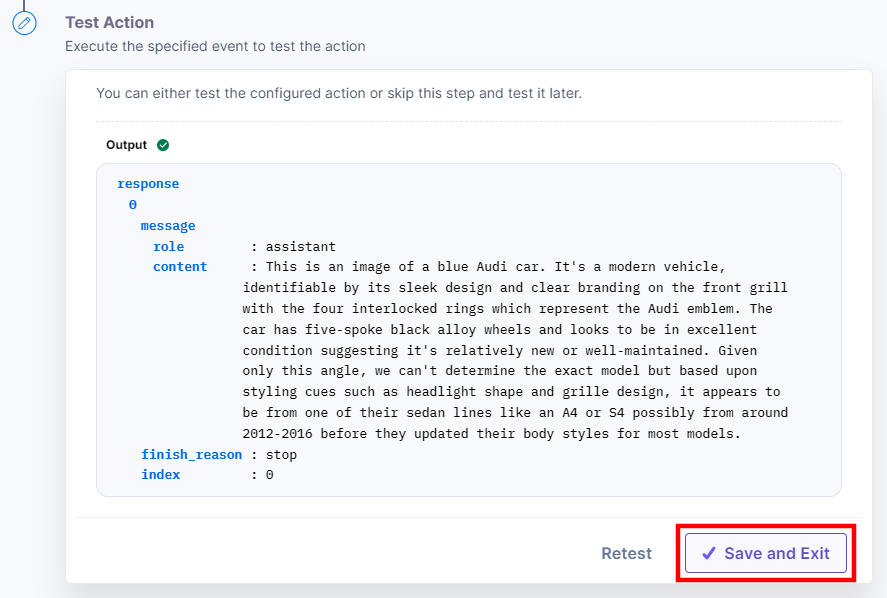
Action 3: Select the DALL-E 3 Image Generator action
The DALL-E 3 Image Generator action allows you to generate an image based on the text prompt and returns a URL for the generated image as a response from the OpenAI platform. To use the DALL-E3 Image Generator action, follow the steps below:
- Under Choose an Action tab, select the DALL-E 3 Image Generator action.
- On the DALL-E 3 Image Generator Configure Action page, enter the details given below:
- Click + Add New Account button to connect your ChatGPT account as shown in the Connect your ChatGPT Account to Automate step.
- Provide the Prompt Text for generating an image.
- In the Select Image Size drop-down, choose the resolution for the image generation. This generates an image in the selected size.
- In the Select Style drop-down, choose the style for the image generation. By default, the image is generated in Vivid style.
- In the Select Quality drop-down, choose the quality for the image generation. By default, the image is generated in Standard quality.
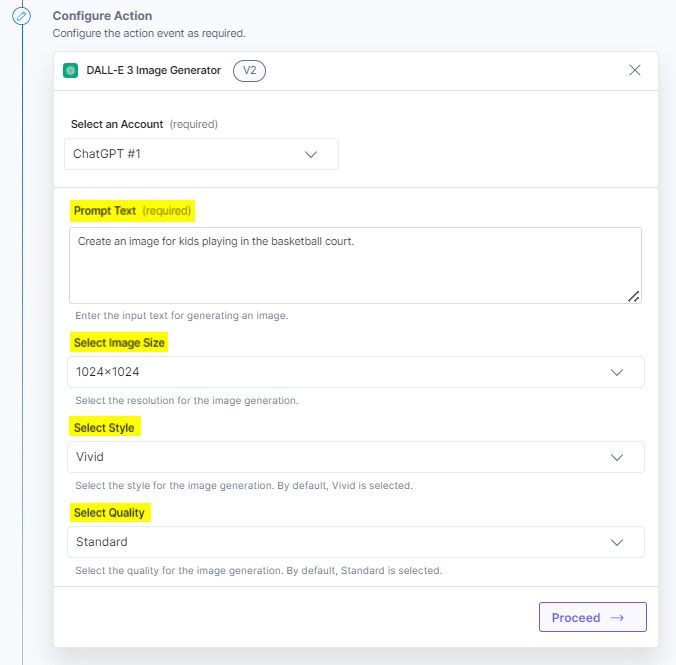
- Click + Add New Account button to connect your ChatGPT account as shown in the Connect your ChatGPT Account to Automate step.
- Click Proceed.
- Check if the details are correct. If yes, then click Test Action.

- You will get the response(s). Once set, click Save and Exit.
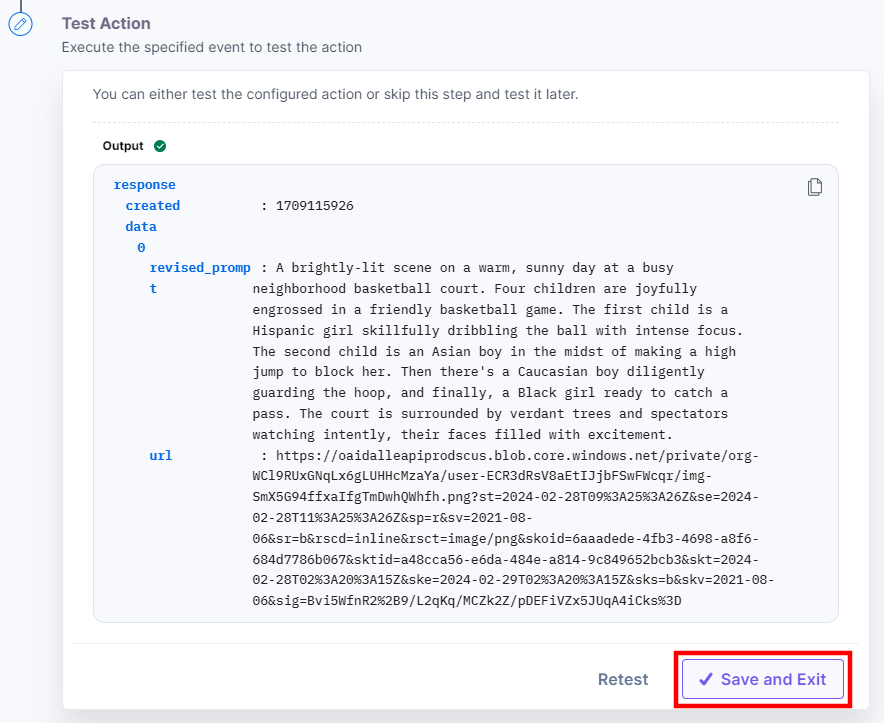
You have the option to utilize the URL of the generated image within your Contentstack entries. Additionally, you can automate the process of adding the image to your entries.
Action 4: Select the Function Calling action
The Function Calling action allows you to generate the responses based on a configured Sub Automation. Within the Function Calling action, you have the flexibility to include various sub-automations, which ChatGPT will analyze to generate and return responses accordingly. To use the Function Calling action, follow the steps below:
- Under Choose an Action tab, select the Function Calling action.
- On the Function Calling Configure Action page, enter the details given below:
- Click + Add New Account button to connect your ChatGPT account as shown in the Connect your ChatGPT Account to Automate step.
- Select the API Model from the drop-down list for response predictions.
Additional Resource: For more information about the API Models, please refer to ChatGPT API Models.
- Provide the Prompt Text to generate response(s). Click + Add Prompt Text to add multiple prompts.
Note: For the Role as system or assistant, you see the Prompt Text box to enter the text to generate response. If you select the Role as user, you can select the type of prompt content, i.e. Text or Image.
- Under the Prompt Input section, click + Add Prompt Text button.
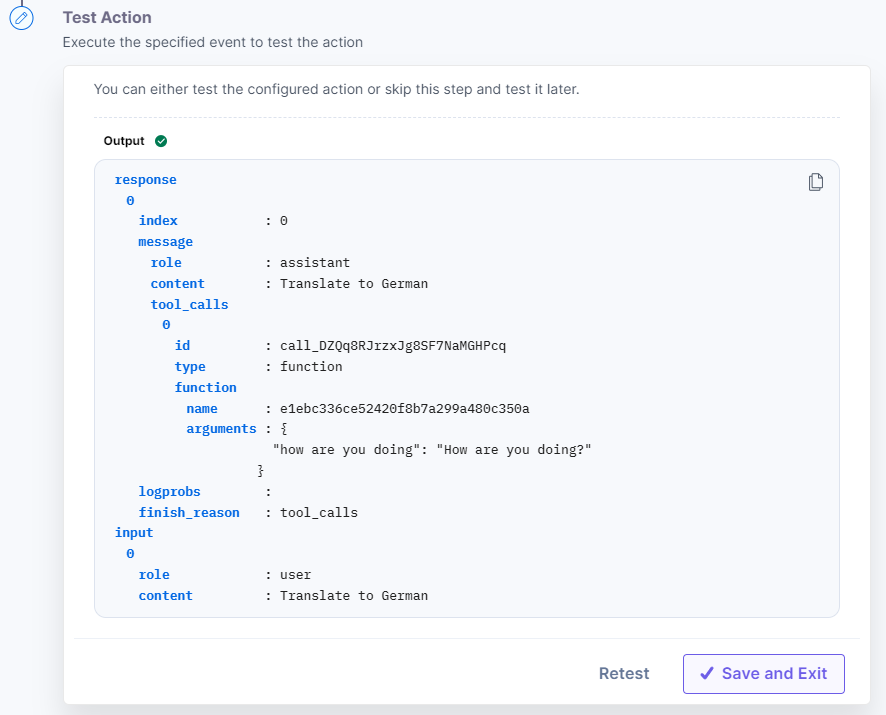
- Select the Role and enter the Input Query. You can enter an input query i.e., Translate to German language.
- Click + Add Sub Automation to add multiple sub automations.

- Click the Show Optional Fields toggle button to use these optional fields:
- Enter the Number of Tokens to generate the content. This must be within the range of 1 to 2048.
- Enter a value for the Randomness of Responses of the generated content. 0 being the most precise and 2 being the most random content predictions. This must be within the range of 0 to 2.
- You can mark the Sanitize text checkbox to remove special characters or spaces from the chat response. Enabling this checkbox, eliminates any special characters or spaces in the chat response, resulting in a clean and compatible text.
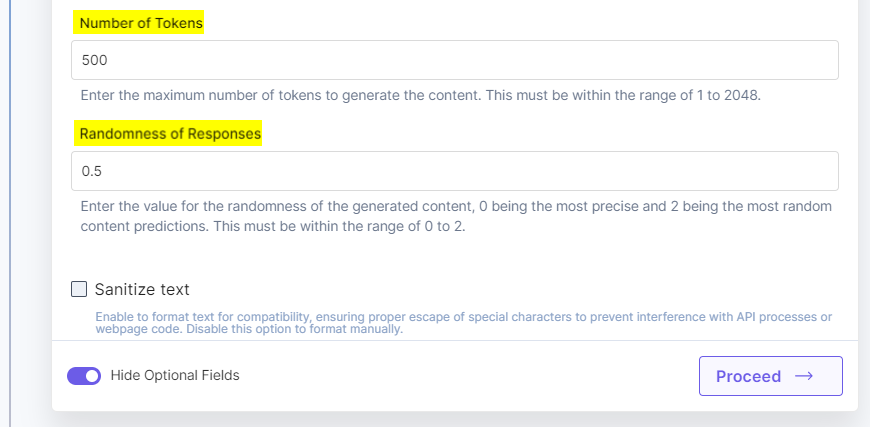
- Click Proceed.
- Check if the details are correct. If yes, then click Test Action.

- You will get the response(s). Once set, click Save and Exit.
Action 5: Select the Function Calling Response action
With the Function Calling Response action, you can format the output from the Function Calling action and the Sub Automation. To use the Function Calling Response action, follow the steps below:
- Under Choose an Action tab, select the Function Calling Response action.
- On the Function Calling Response Configure Action page, enter the details given below:
- Click + Add New Account button to connect your ChatGPT account as shown in the Connect your ChatGPT Account to Automate step.
- Select the API Model from the drop-down list for response predictions.
Additional Resource: For more information about the API Models, please refer to ChatGPT API Models.
- In the Function Calling Response field, select the output from the previous Function Calling action step.
- In the Sub Automation Response field, select the output from the sub automation.

- Click + Add New Account button to connect your ChatGPT account as shown in the Connect your ChatGPT Account to Automate step.
- Click the Show Optional Fields toggle button to use these optional fields:
- Enter the Number of Tokens to generate the content. This must be within the range of 1 to 2048.
- Enter a value for the Randomness of Responses of the generated content. 0 being the most precise and 2 being the most random content predictions. This must be within the range of 0 to 2.
- You can mark the Sanitize text checkbox to remove special characters or spaces from the chat response. Enabling this checkbox, eliminates any special characters or spaces in the chat response, resulting in a clean and compatible text.

- Click Proceed.
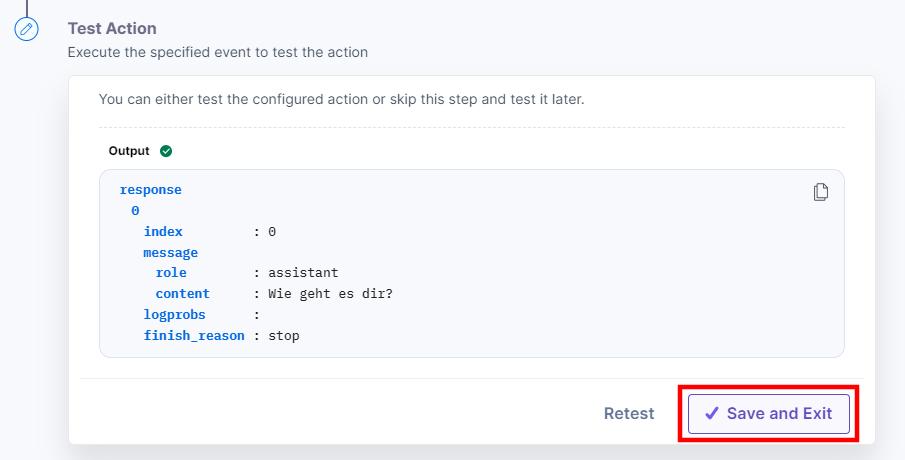
- Check if the details are correct. If yes, then click Test Action.

- You will get the response(s). Once set, click Save and Exit.
Action 6: Select the Prompt action
The Prompt action returns the generated response(s) for the prompt provided via an automation in Automate. To use the Prompt action, follow the steps below:
- Under Choose an Action tab, select the Prompt action.
- On the Prompt Configure Action page, enter the details given below:
- Click + Add New Account button to connect your ChatGPT account as shown in the Connect your ChatGPT Account to Automate step.
- Select the API Model from the drop-down list for response predictions.
Additional Resource: For more information about the API Models, please refer to ChatGPT API Models.
- Provide the Prompt Text to generate response(s).

- Click the Show Optional Fields toggle button to use these optional fields:
- Enter the Number of Prompt Responses you want to be generated in the automation response. This must be within the range of 1 to 3.
- Enter the Number of Tokens to generate the content. This must be within the range of 1 to 2048.
- Enter a value for the Randomness of Responses of the generated content. 0 being the most precise and 2 being the most random content predictions. This must be within the range of 0 to 2.
- Provide the User Identifier name which helps the OpenAI platform to monitor and detect abuse.
- Provide the value to set the Frequency of Repeated Words. The most positive value is likely to avoid the use of repeated words. This must be within the range of -2 to 2.
- Provide the value to set the Presence of Repeated Responses. The most positive value is likely to generate a new response. This must be within the range of -2 to 2.
- You can mark the Sanitize text checkbox to remove special characters or spaces from the chat response. Enabling this checkbox, eliminates any special characters or spaces in the chat response, resulting in a clean and compatible text.

- Click + Add New Account button to connect your ChatGPT account as shown in the Connect your ChatGPT Account to Automate step.
- Click Proceed.
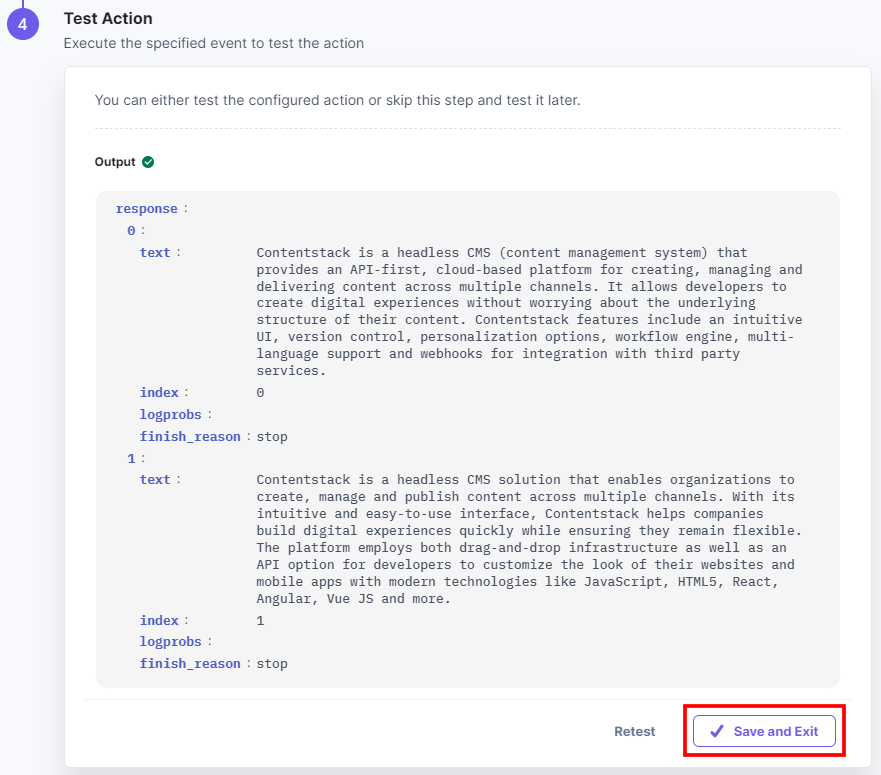
- Check if the details are correct. If yes, then click Test Action.

- You will get the response(s). Once set, click Save and Exit.
- Click + Add New Account button to connect your ChatGPT account as shown in the Connect your ChatGPT Account to Automate step.
Additional Resources: Refer to the ChatGPT Use Cases guide for the two use cases to translate texts via the Function Calling action and generate image URLs via the DALL-E 3 Image Generator action.
Action 7: Select the Translate an Entry action
The Translate an Entry action returns the translated entry data in the response. To use this action, follow the steps below:
- Under Choose an Action tab, select the Translate an Entry action.
- On the Translate an Entry Configure Action page, enter the details given below:
- Click + Add New Account button to connect your ChatGPT account as shown in the Connect your ChatGPT Account to Automate step.
- Select the API Model from the dropdown list for response predictions.
Additional Resource: For more information about the API Models, please refer to ChatGPT API Models.
- In the Entry Data field, enter the entry data to translate.
- In the Content Type Schema field, enter the content type schema for translating the entry data.
You can fetch the Entry Data and Content Type Schema from the previous step using the Get a Single Content Type and Get a Single Entry actions.

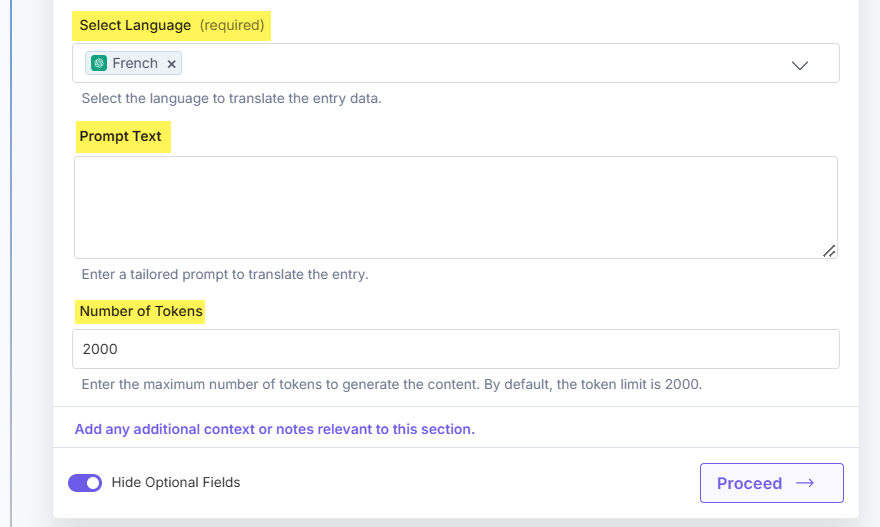
- In the Select Language drop-down, select the language in which you want to translate the entry data.
- Click the Show Optional Fields toggle button to use these optional fields:
- Provide the Prompt Text to generate the response. This offers additional capabilities to customize the translated entry data.
- Enter the Number of Tokens to generate the content. By default, the token limit is 2000.
- Click Proceed.
- Check if the details are correct. If yes, then click Test Action.

- You will get the response(s). Once set, click Save and Exit.

This sets the ChatGPT action connector.


.svg?format=pjpg&auto=webp)
.svg?format=pjpg&auto=webp)
.png?format=pjpg&auto=webp)


.png?format=pjpg&auto=webp)