Azure Blob Storage
The Azure Blob Storage connector lets you create or upload a blob into your Azure Blob Storage account via Contentstack. In the Azure Blob Storage account, you can create multiple containers and create or upload unstructured data (blob), such as images, files, etc.
Prerequisite
To use the Azure Blob Storage connector, you first need to generate a Storage Account Name, create a container, and then generate a SAS Token in your Azure Blob Storage account. To do this, follow the steps given below:
- Log into your Azure Blob Storage account.
- Click Storage accounts from the list of Azure services and then click + Create.
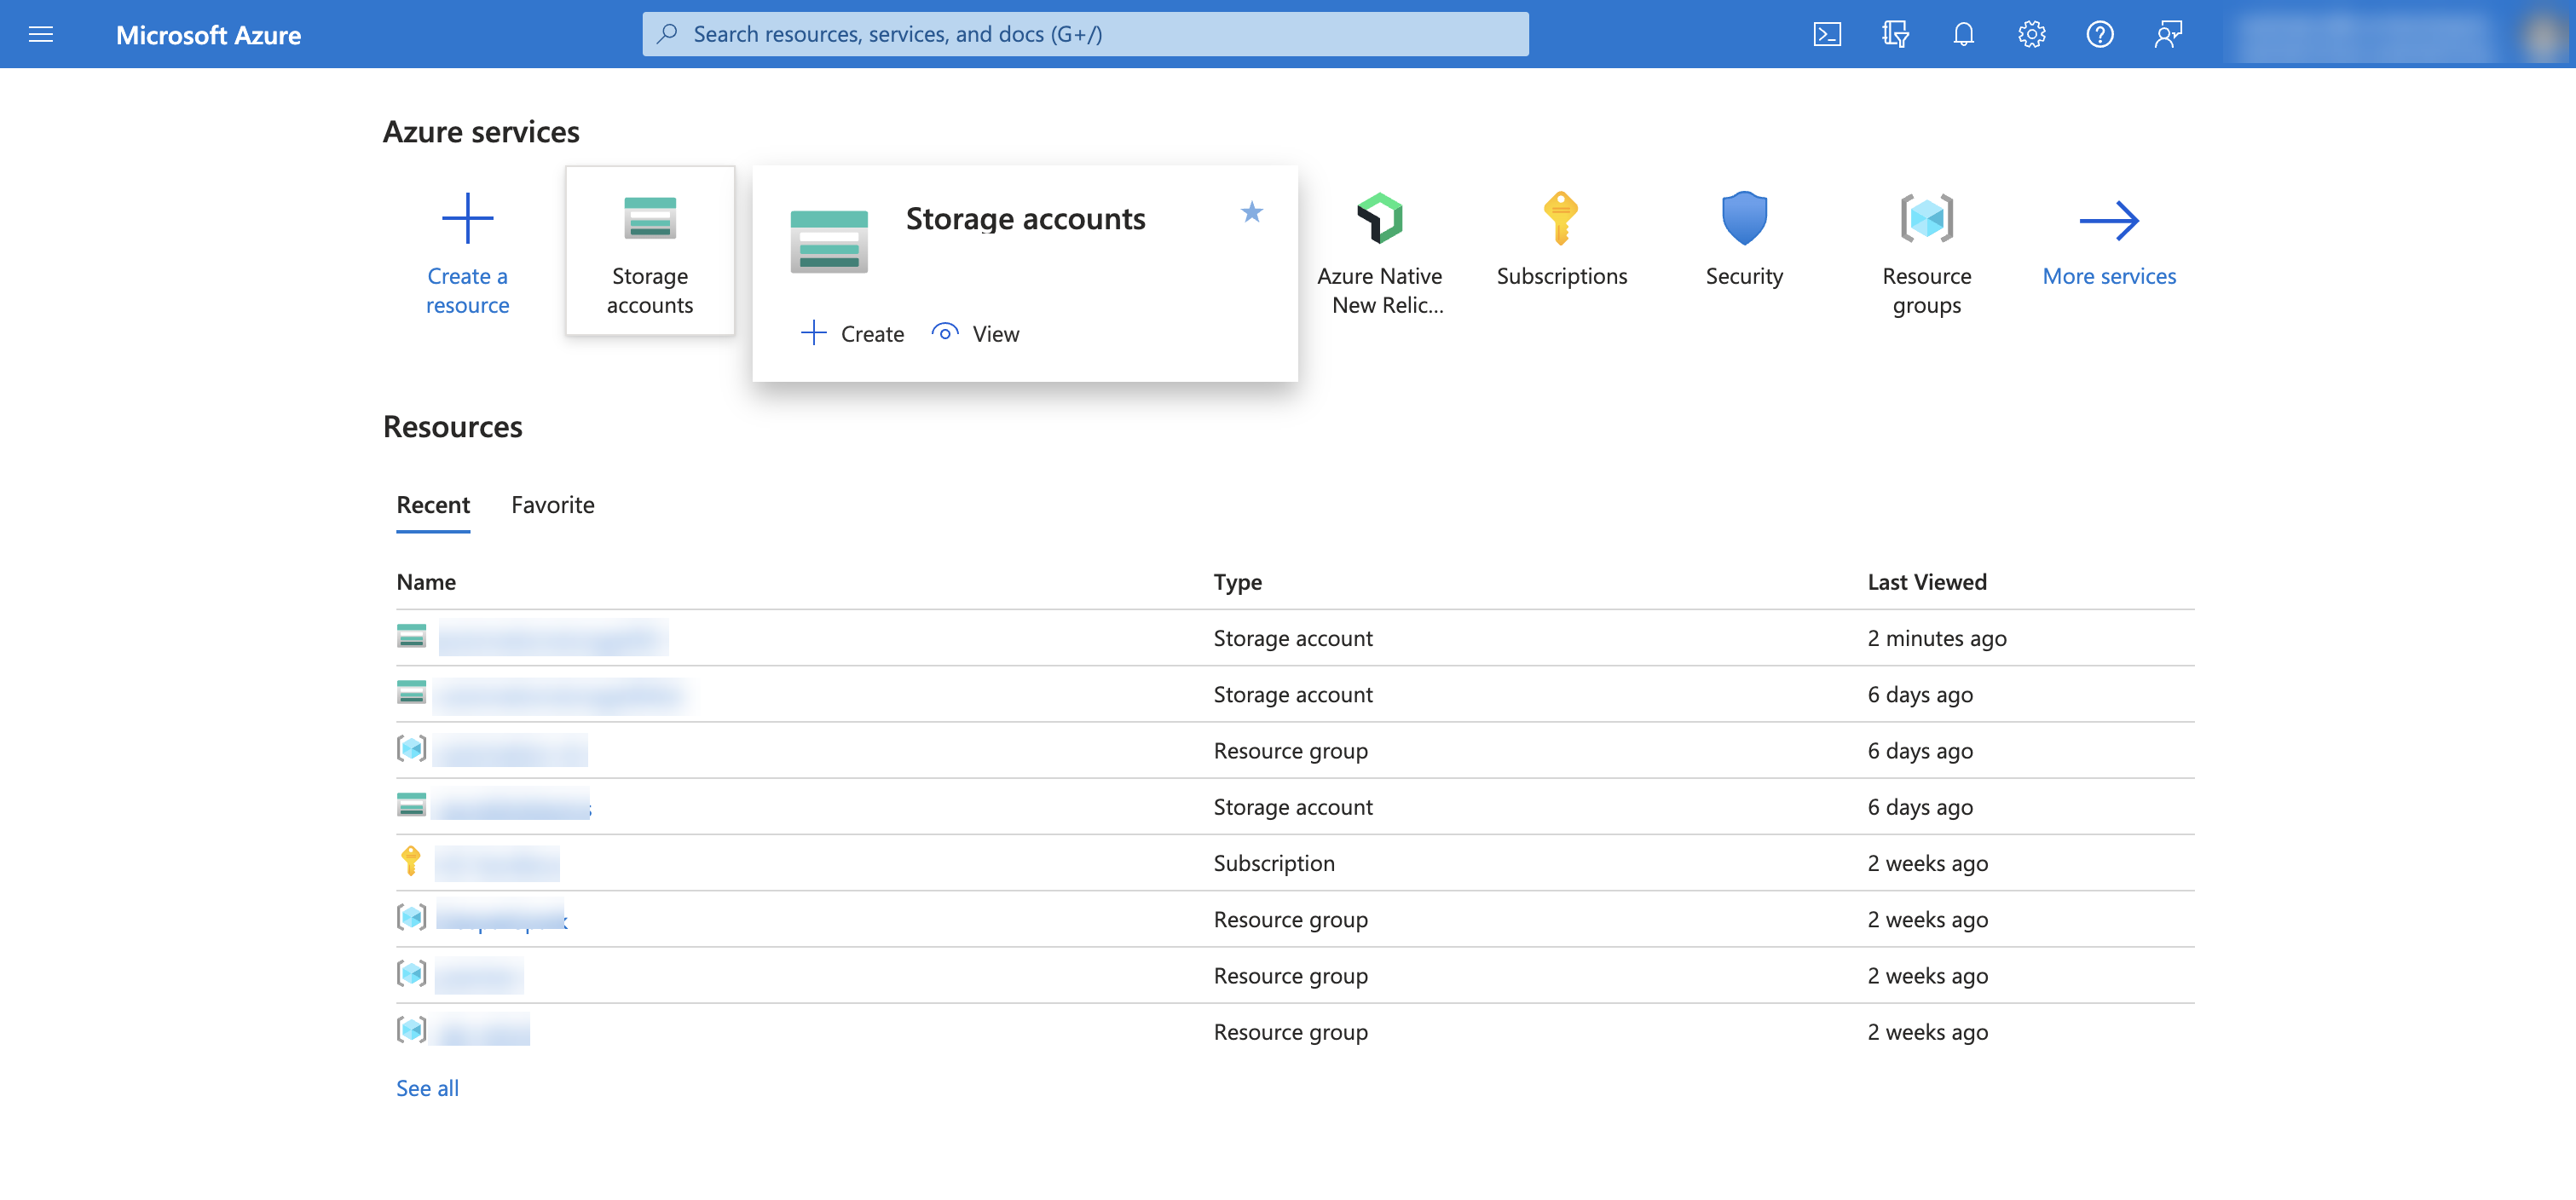
- Enter all the necessary information and click Review to run the validation. This checks if a user has the permissions to create a storage account.
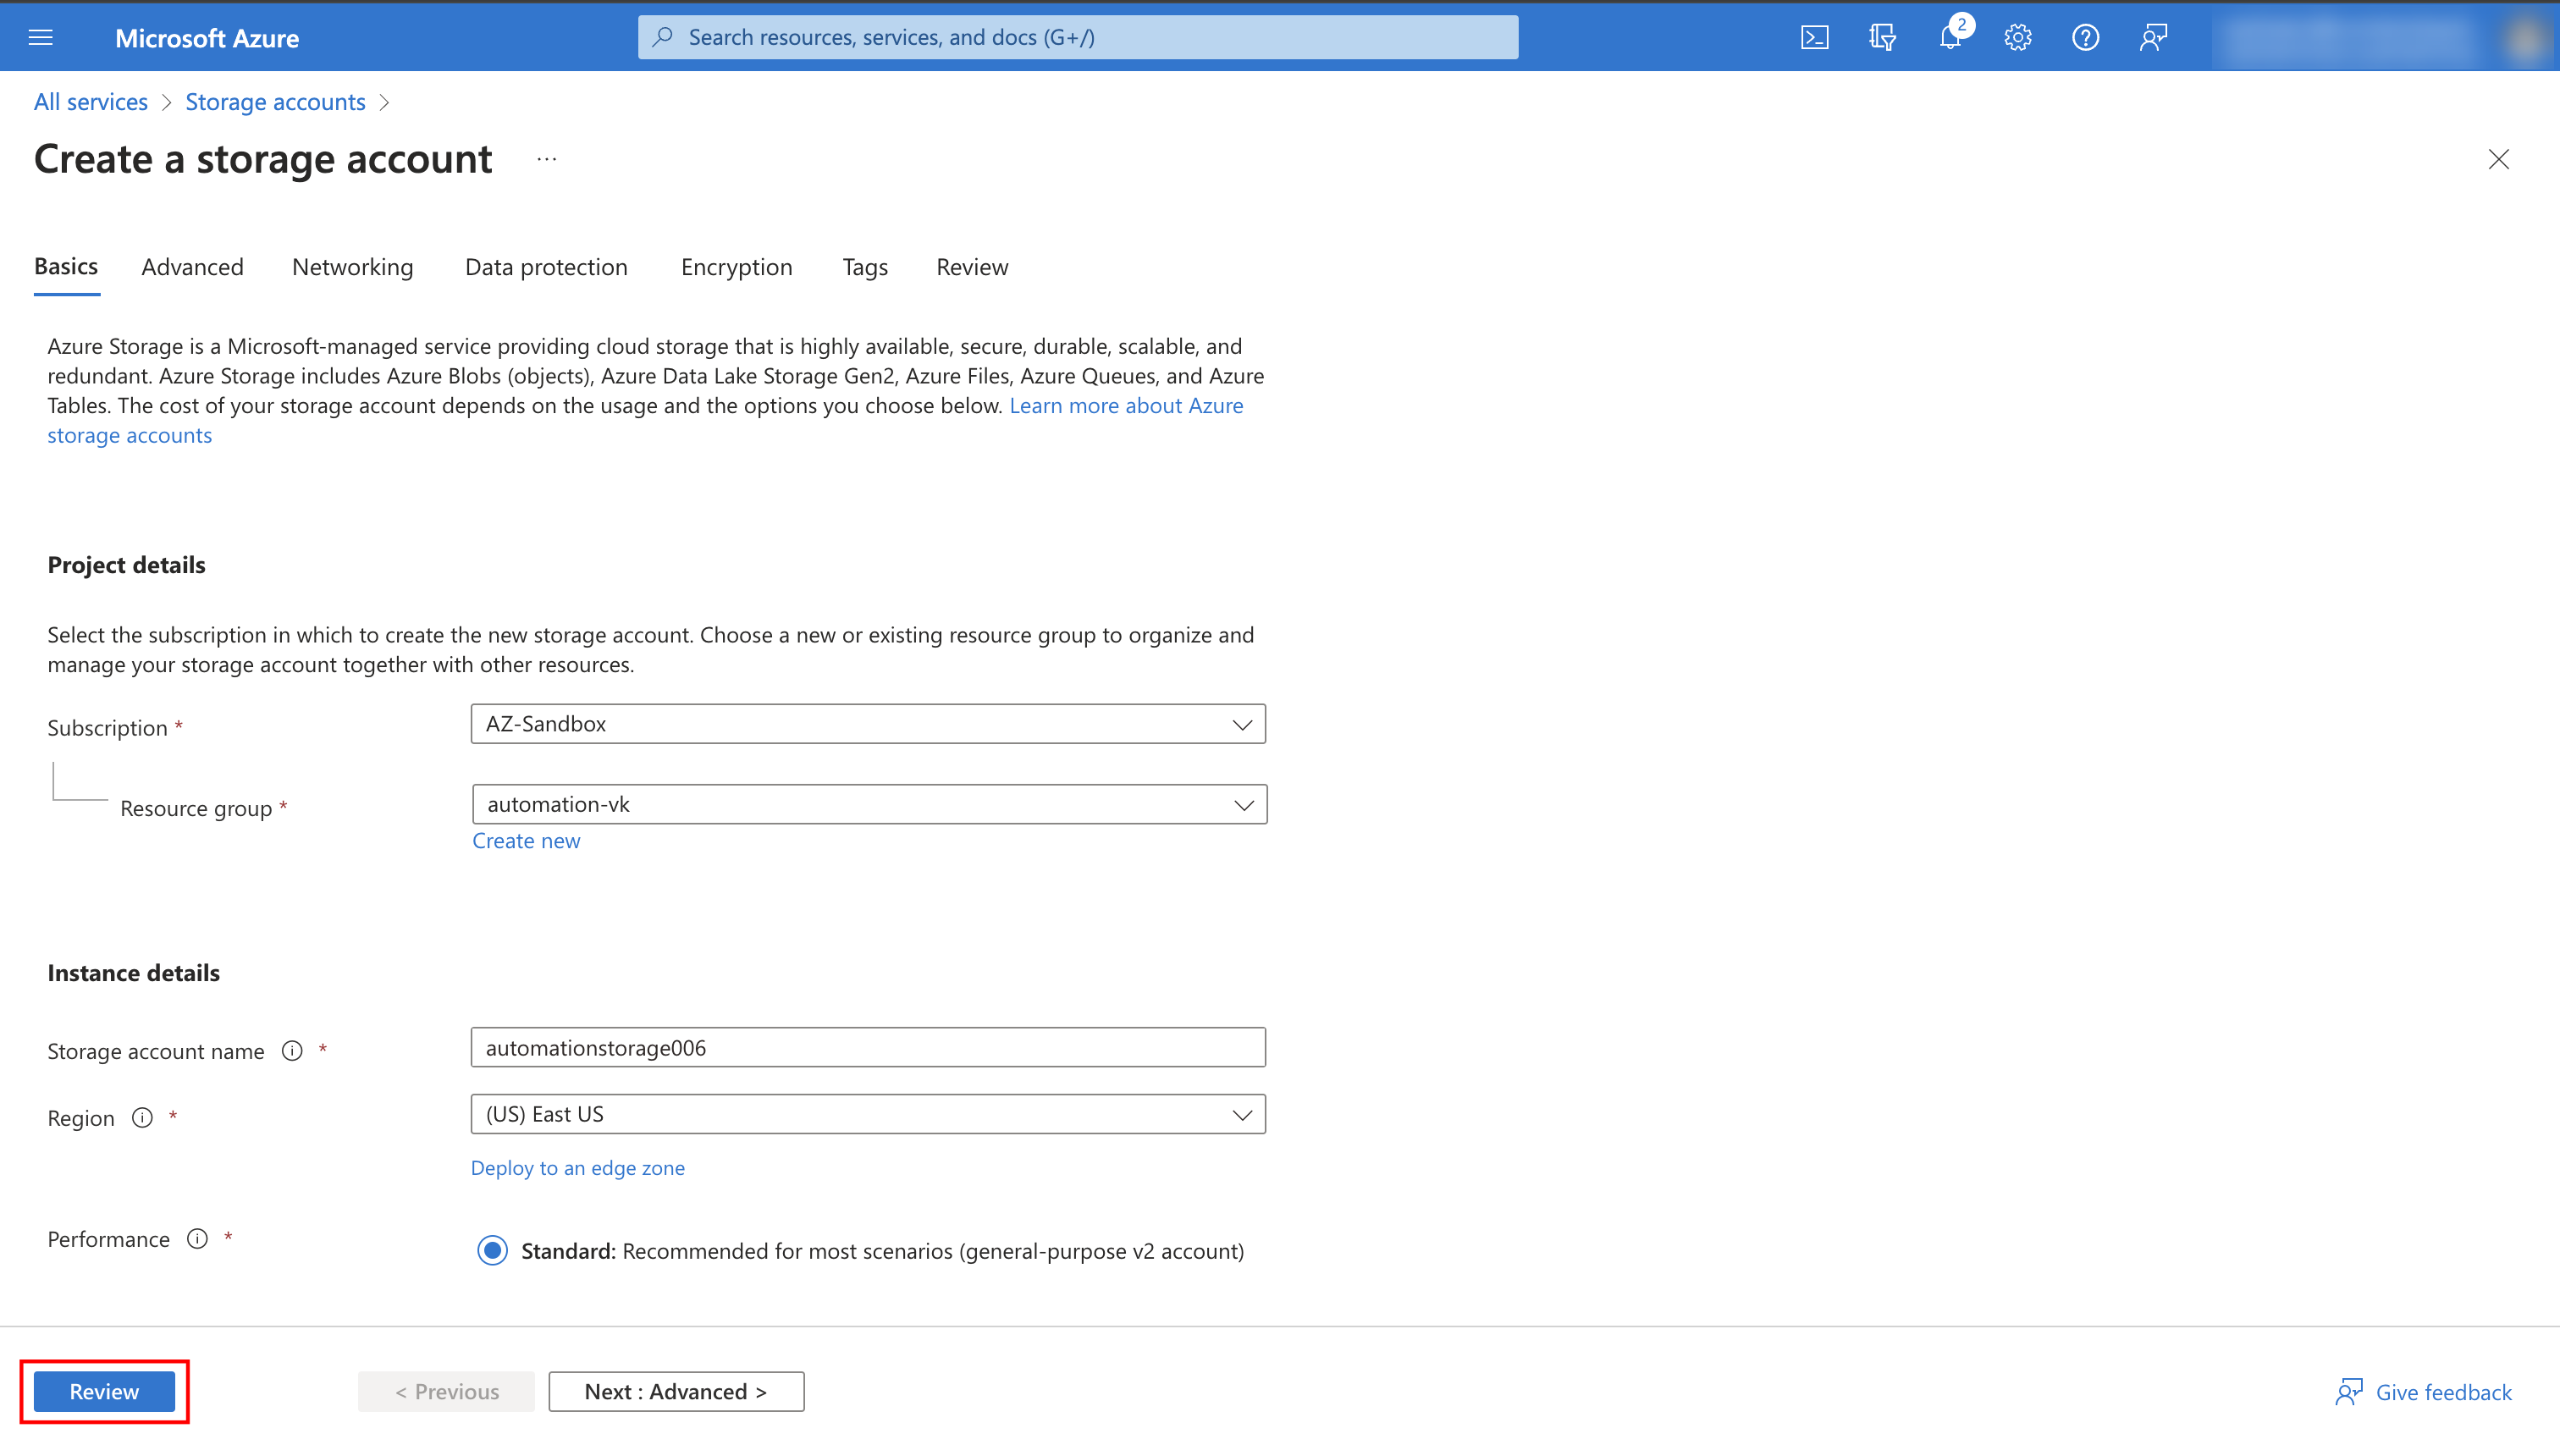
- Once the validation is complete, click Create to initiate the storage account deployment.
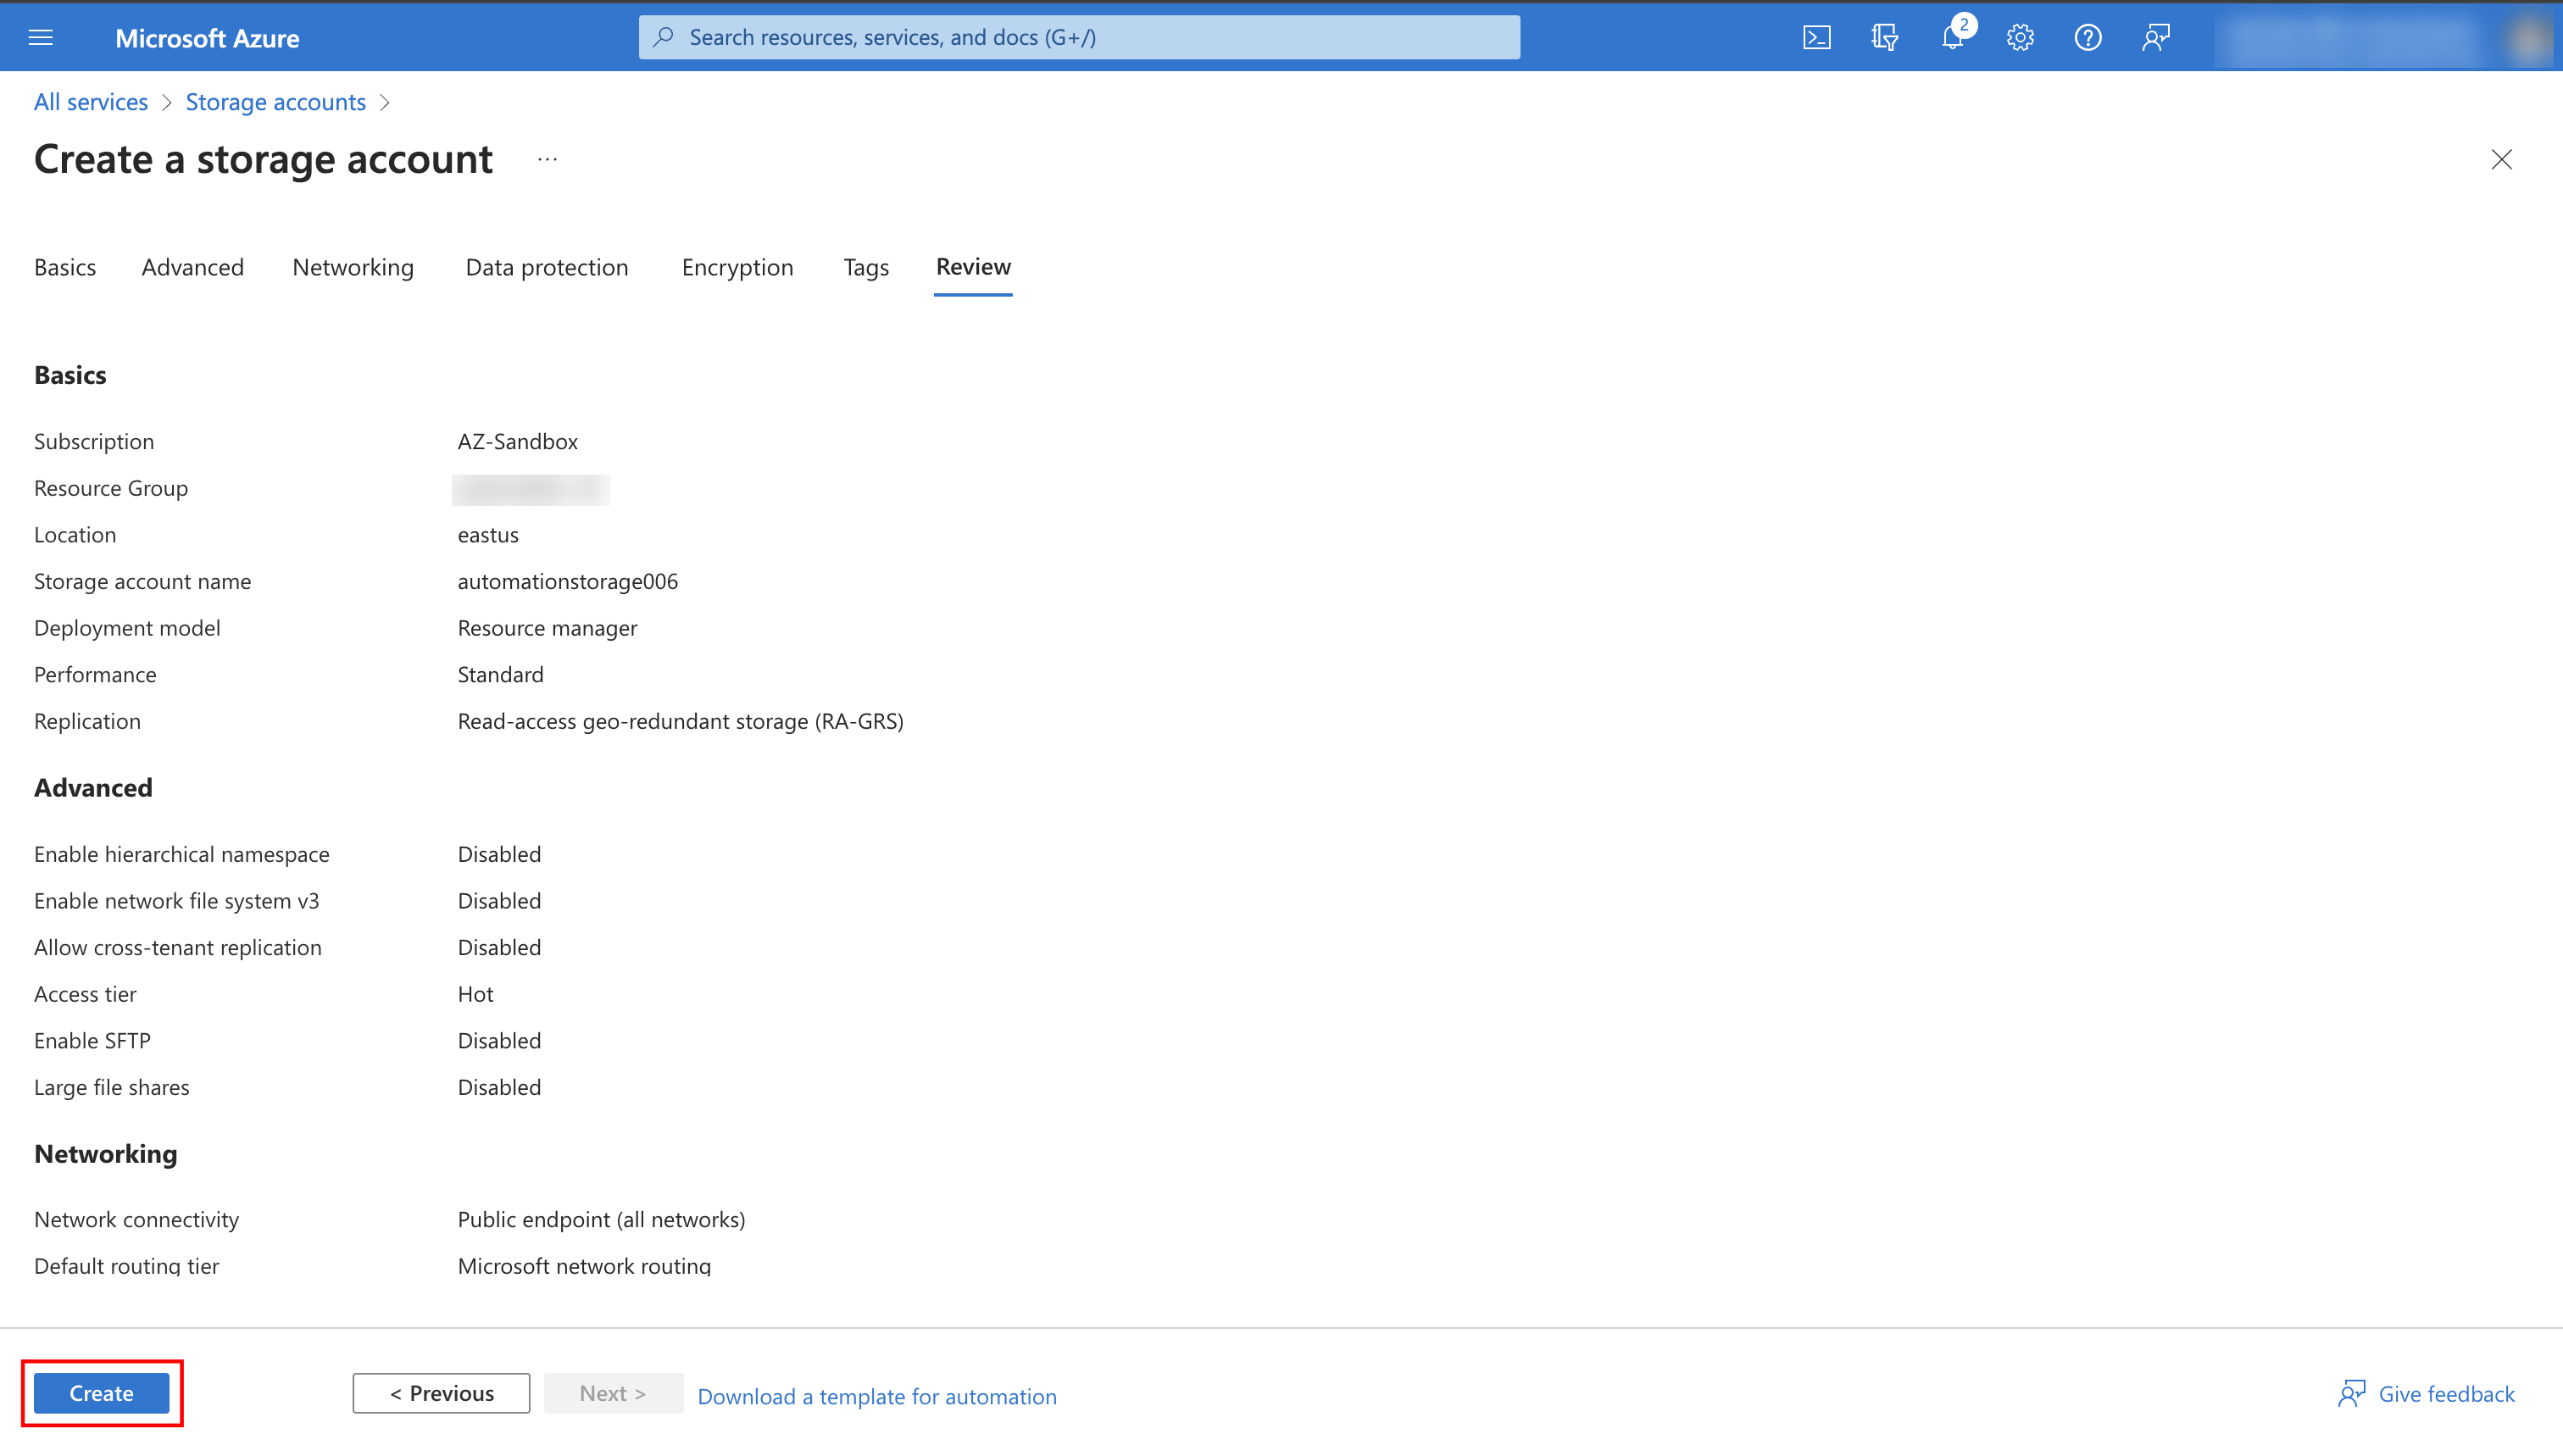
- Once the deployment completes, the storage account gets created. We will now have to create a container inside this storage account.
- So, navigate to this newly created storage account. Under the Data storage section, in the left navigation panel, click Containers.
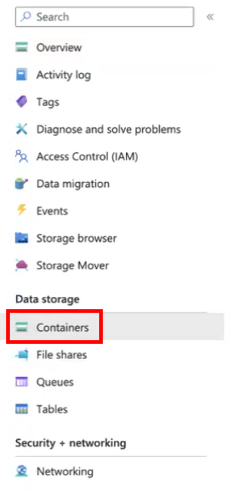
- Then, click + Container. The New container modal opens.
- Enter a suitable name for your container in the Name field. You then have to define the access level of the container.
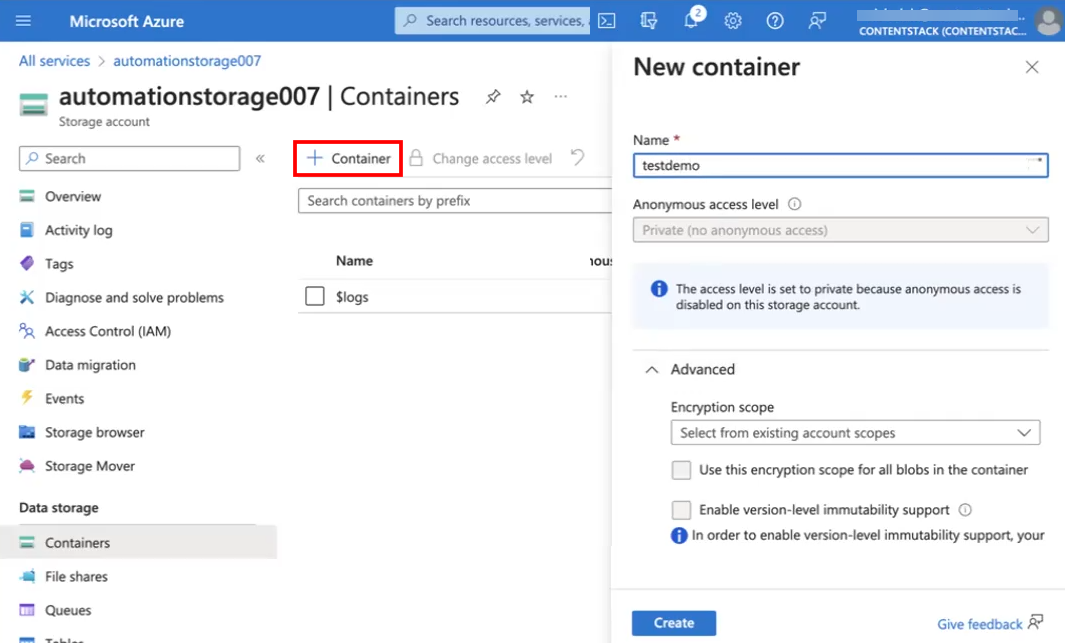
For this, check the Anonymous access level drop-down. If it is disabled, you will have to enable it to change its settings. To do this, follow the steps given below:
- From the left navigation panel, go to the Settings menu and then click Configuration.
- You will be presented with different options. Scroll down to Allow Blob anonymous access, mark the Enabled checkbox, and click Save at the top.
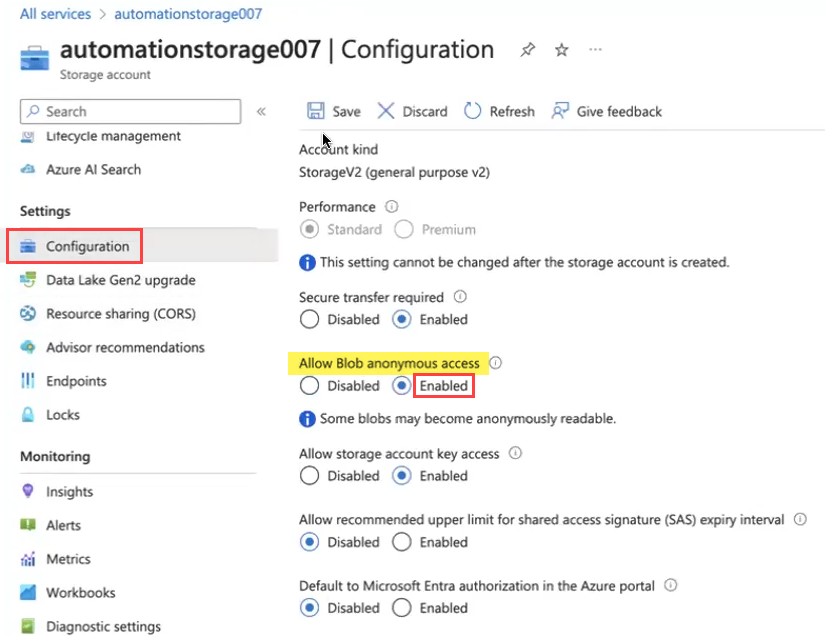
Note: This access is required so that you can store blobs through the Automate connector to your storage account.
- Now go back to your container by navigating to Data Storage. Click Containers and then click the Change access level option.
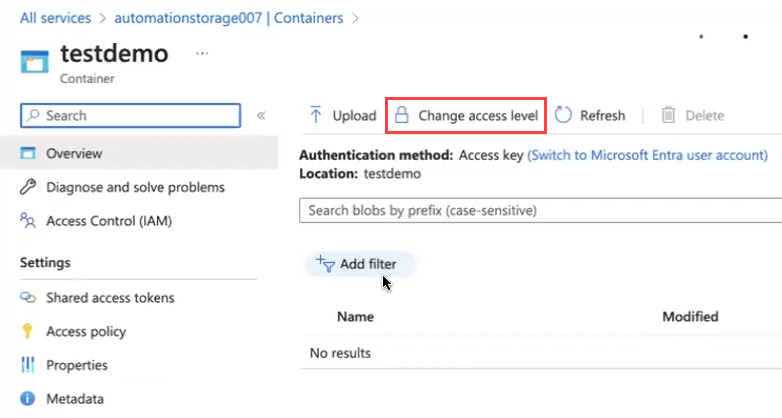
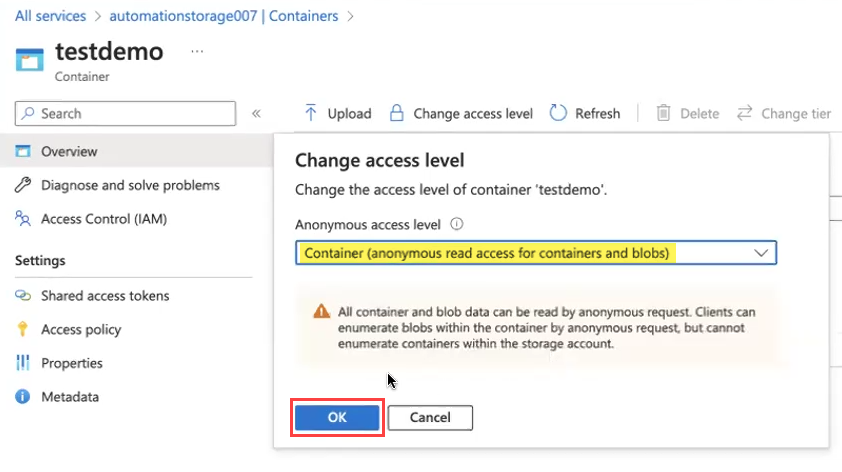
- From the Anonymous access level drop-down, select Container (anonymous read access for container and blobs) and click OK.
- Navigate to the storage account. From the left navigation panel, click Access keys and copy the Storage account name to your clipboard.
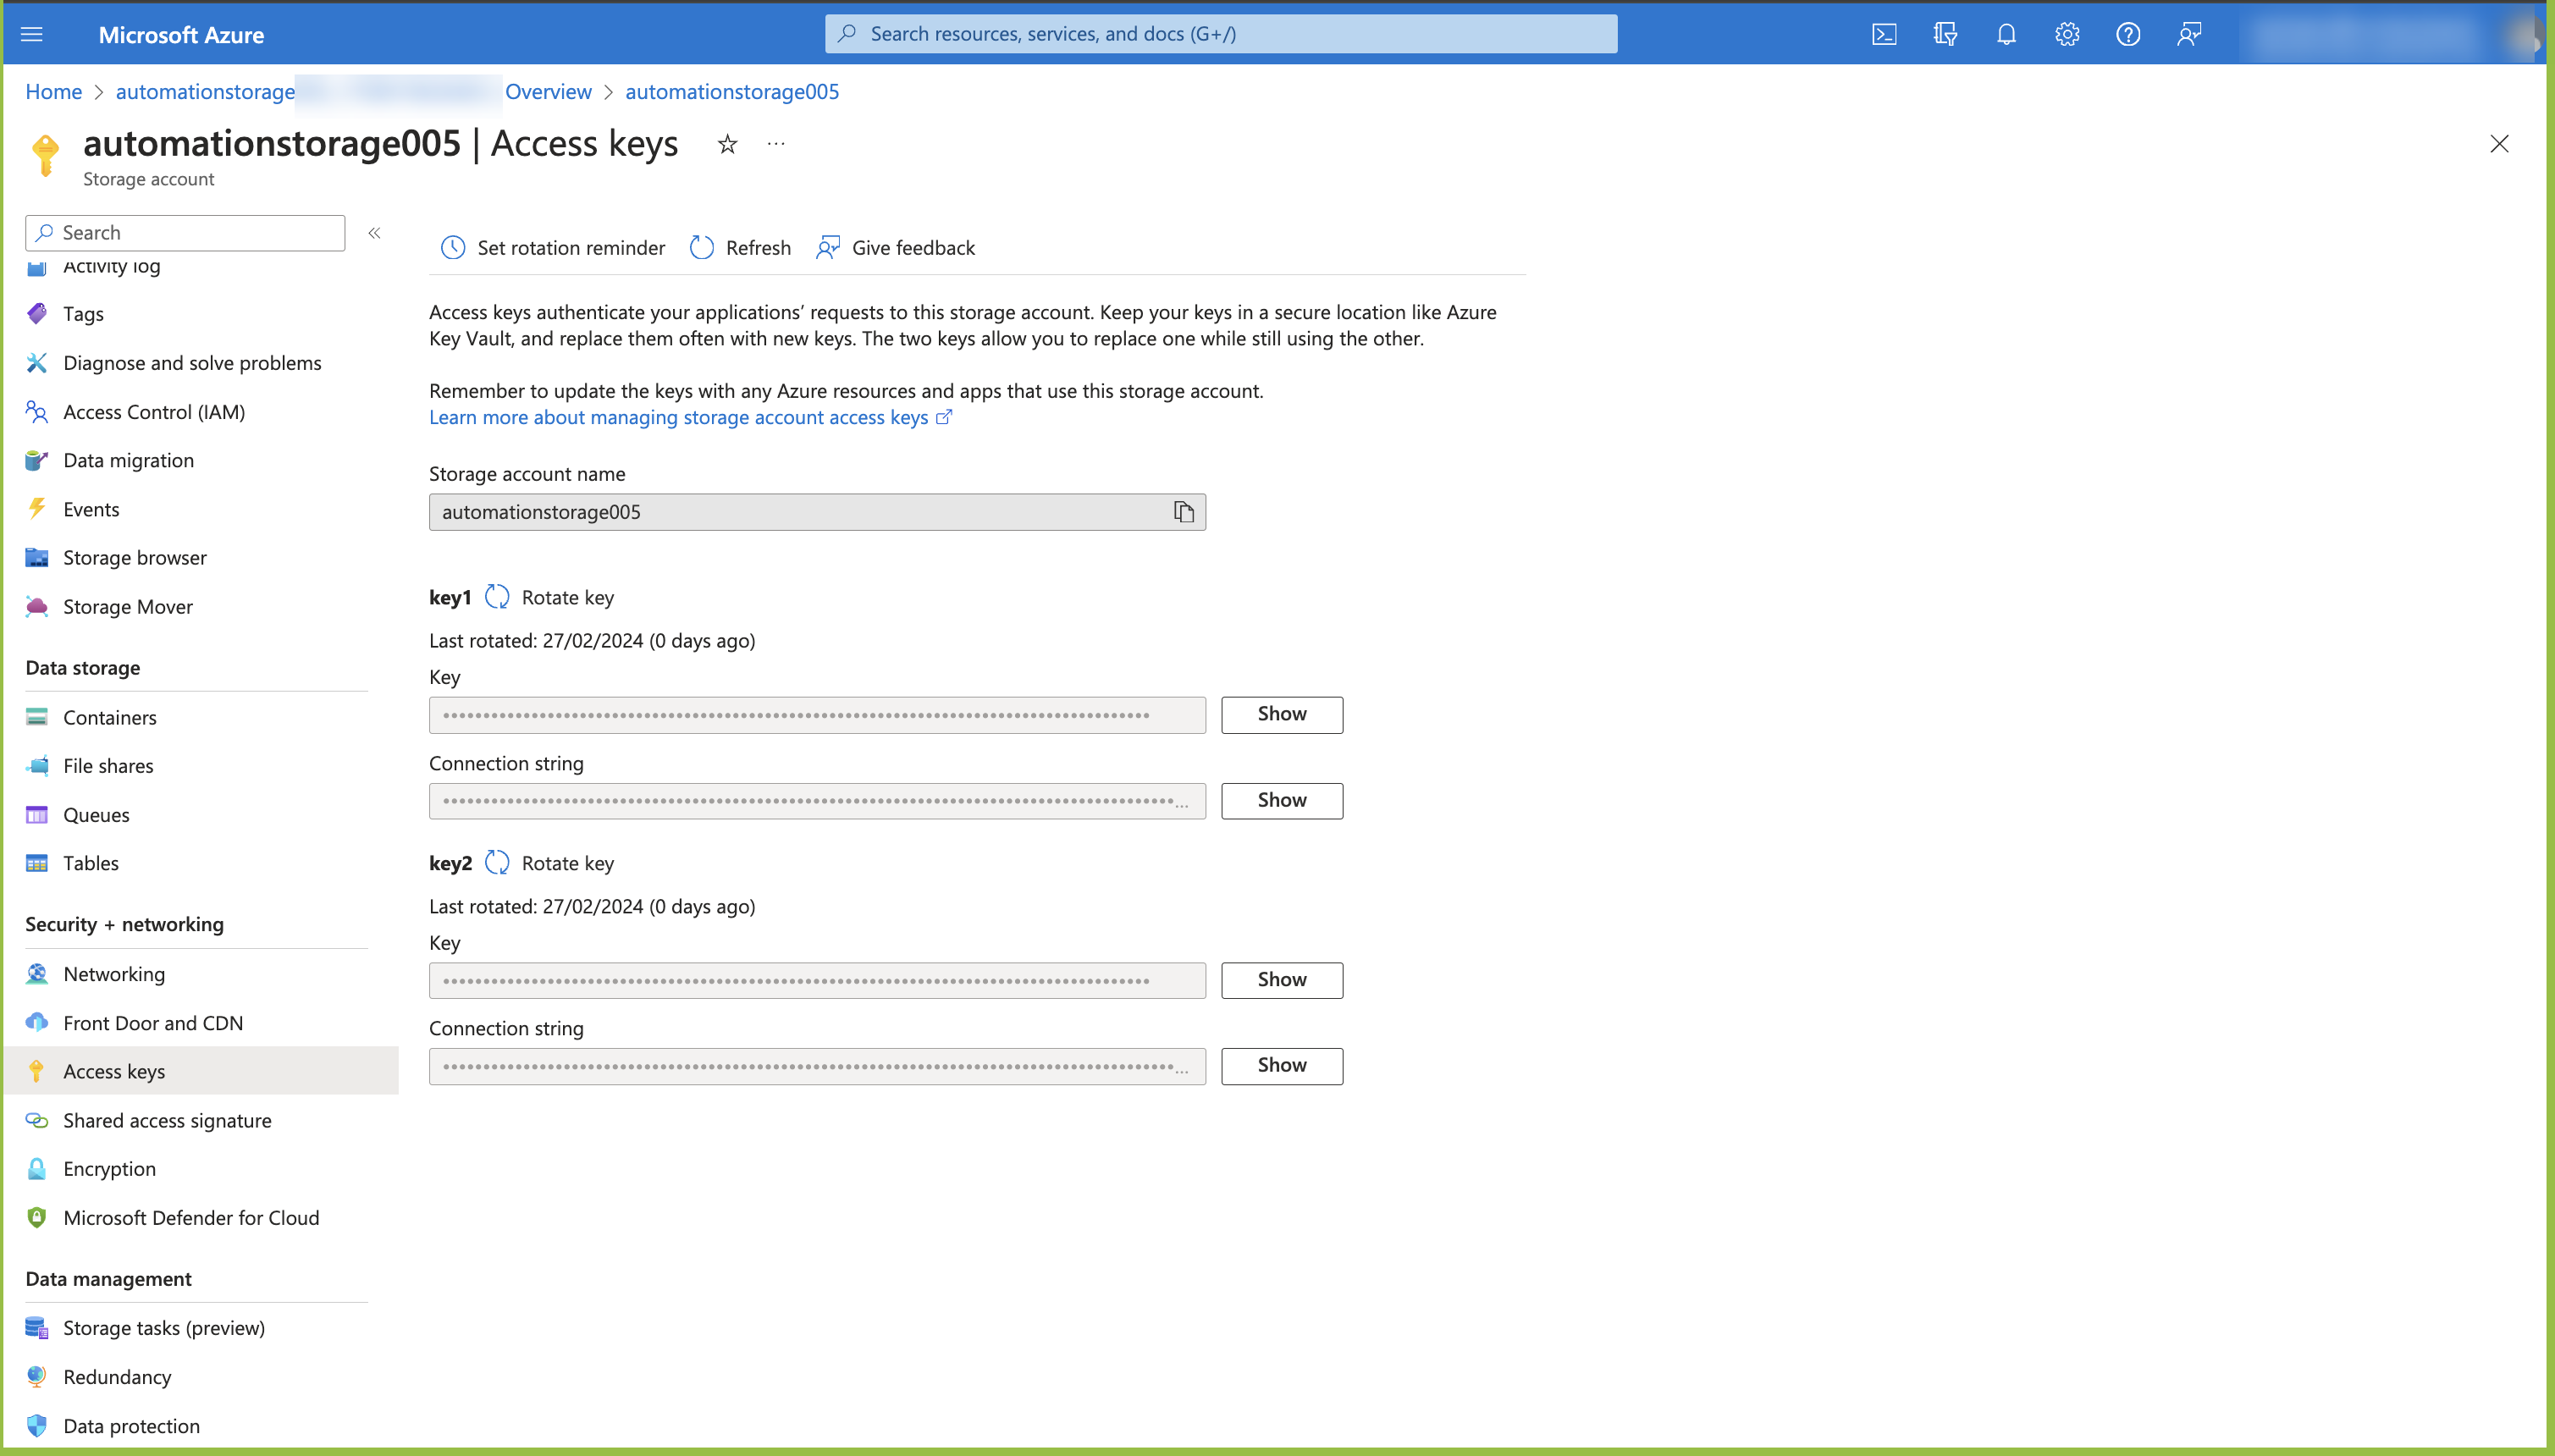
- To generate the SAS Token, follow the steps below:
- From the left navigation panel, navigate to the Security + networking section and click the Shared access signature tab.
- In Allowed services, keep only Blob selected, as our Automate currently supports only blobs.
- In Allowed service types, keep all options checked and in Allowed permissions, select only Read, Write, Delete, List, Add, and Create.
- Also, keep the options under Blob versioning permissions and Allowed blob index permissions selected.
- You can set the start and expiry date and time of the SAS token under the Start and expiry date/time option.
Note: By default, this token expires in a few hours, so you can set its expiry according to your requirement.
- Once you have added these details, click the Generate SAS and connection string button.
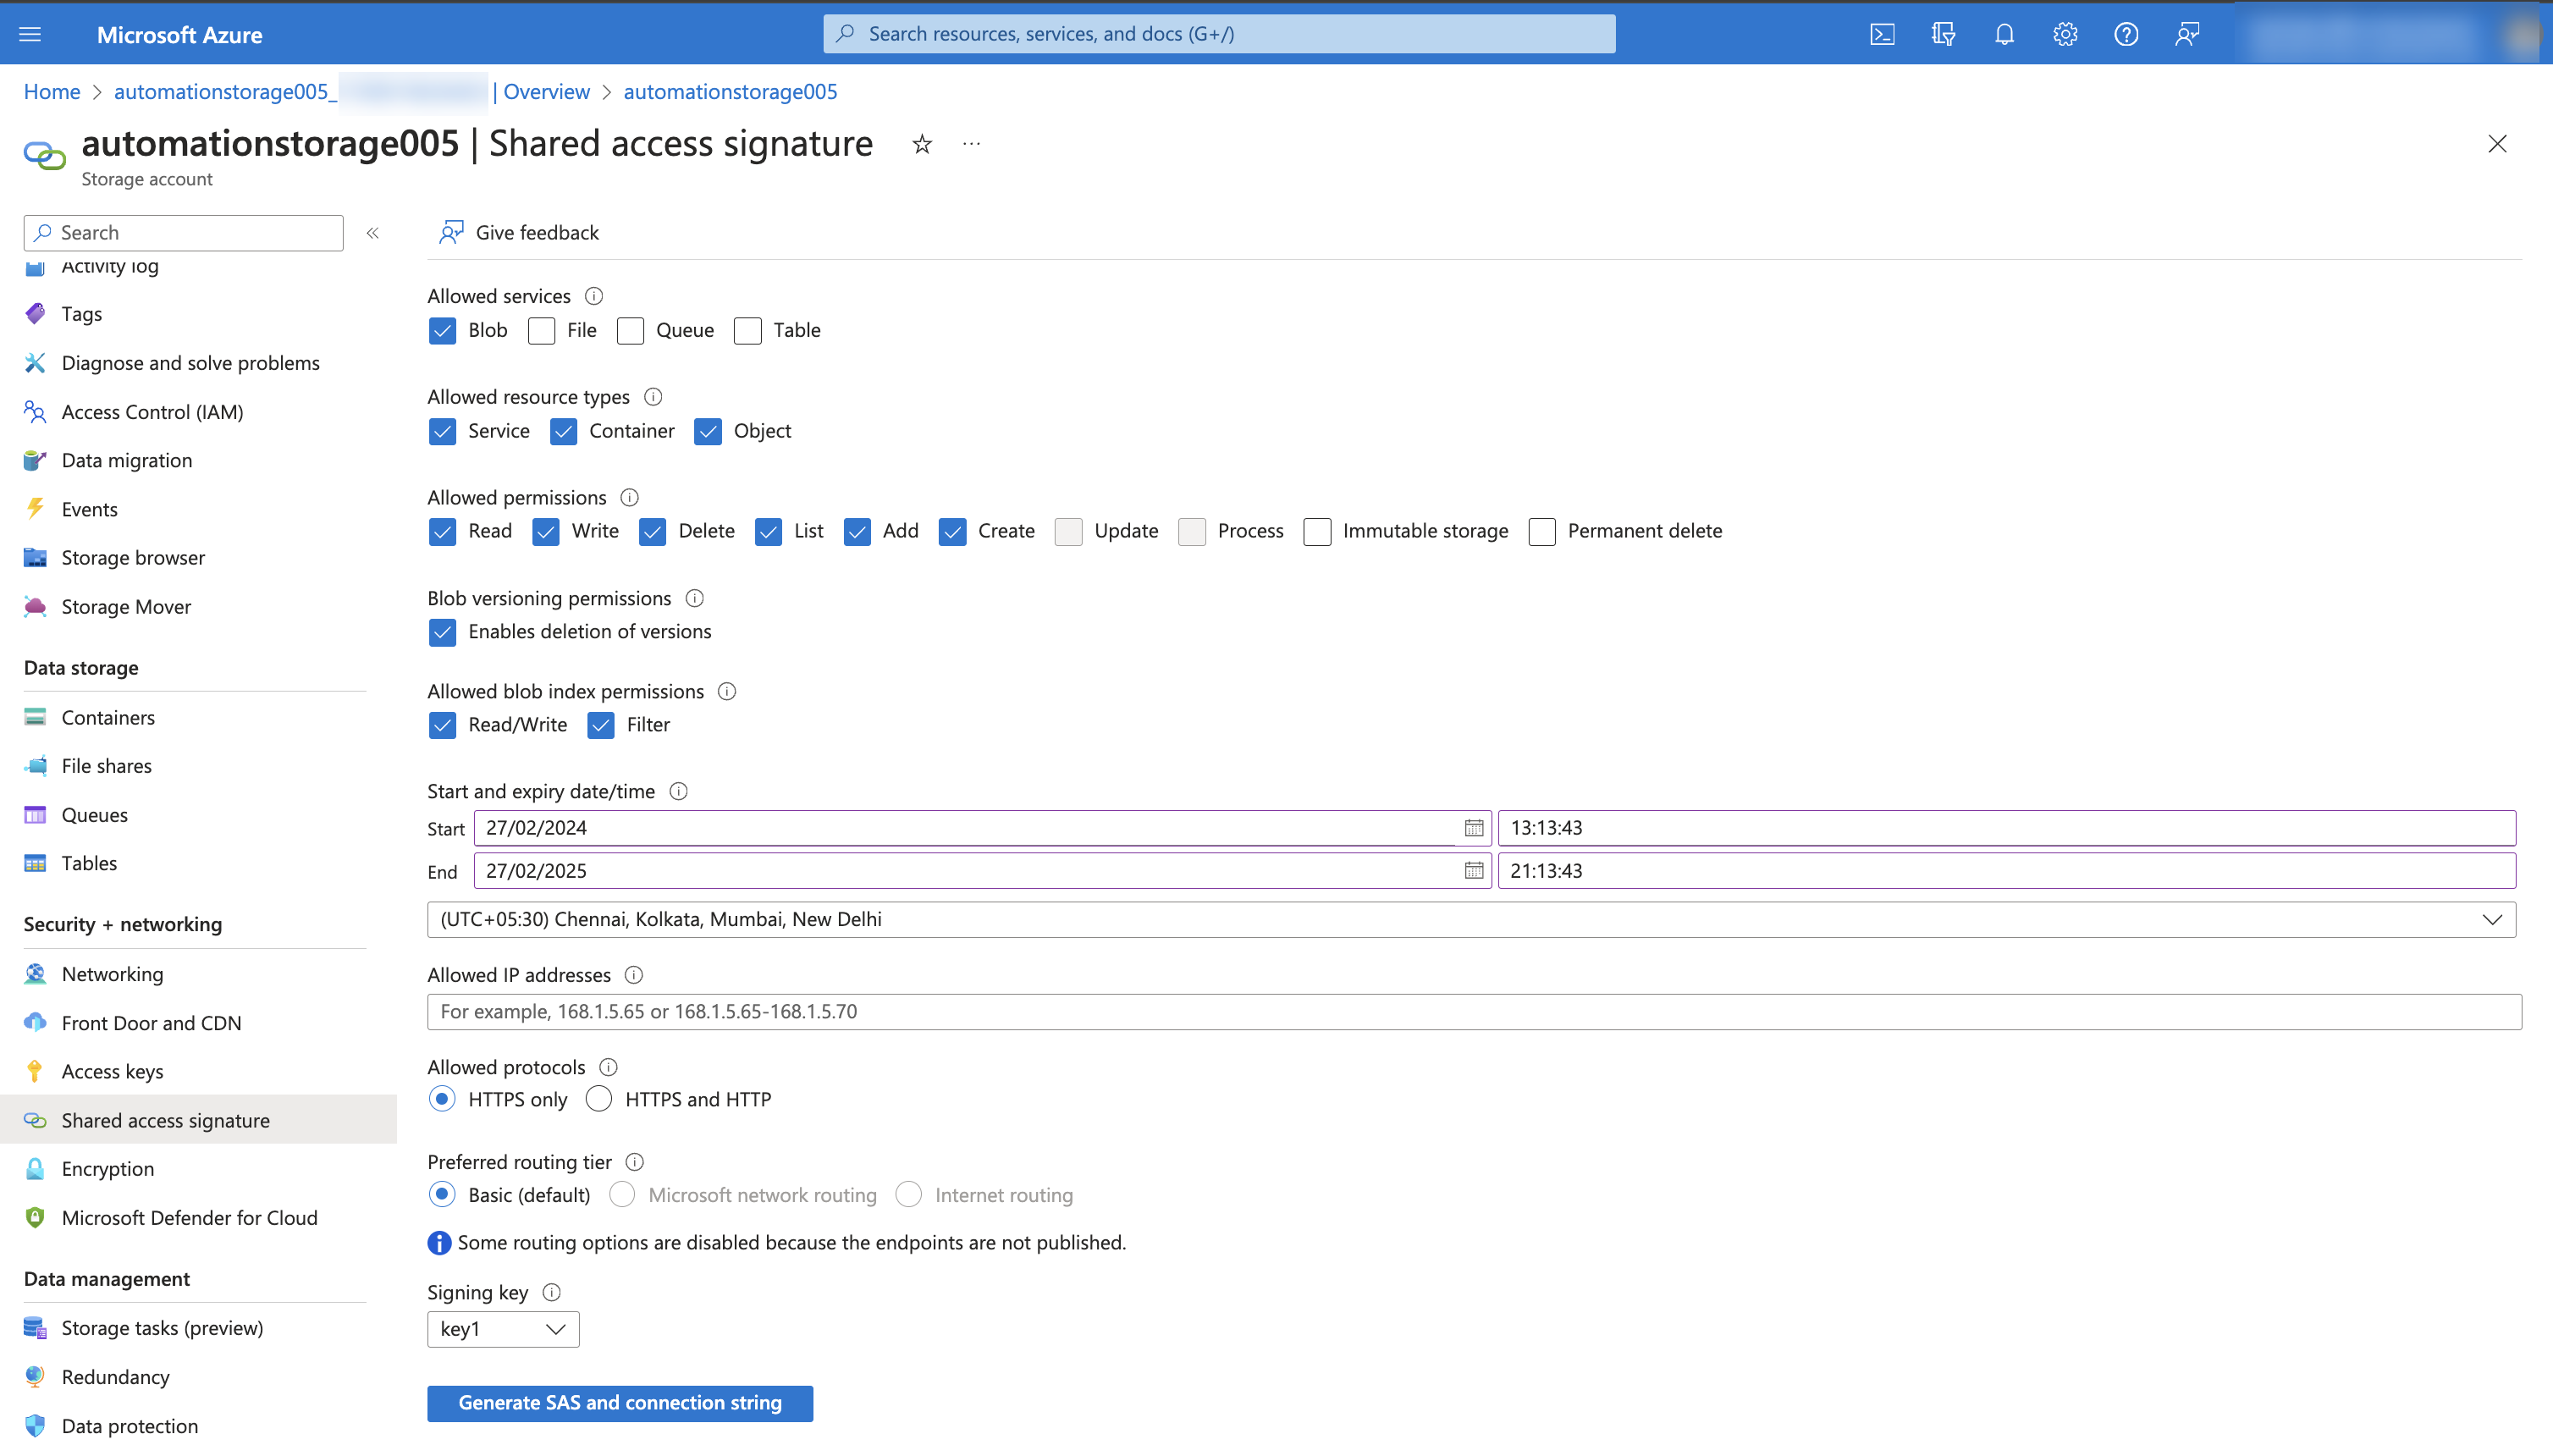
- The Connection string, SAS token, and Blob service SAS URL will get generated. Copy the SAS Token to your clipboard.
Additional Resources: For more information, refer to the Grant limited access to Azure Storage resources using shared access signatures (SAS) documentation.
Set up Azure Blob Storage Connector
Perform the following steps to set up the Azure Blob Storage connector:
- Click Configure Action Step from the left navigation panel.
- Click Action Step to configure third-party services.
- Within the Configure Action Step, click the Azure Blob Storage connector.
Note: You can sort and search the connector(s) based on the filter.
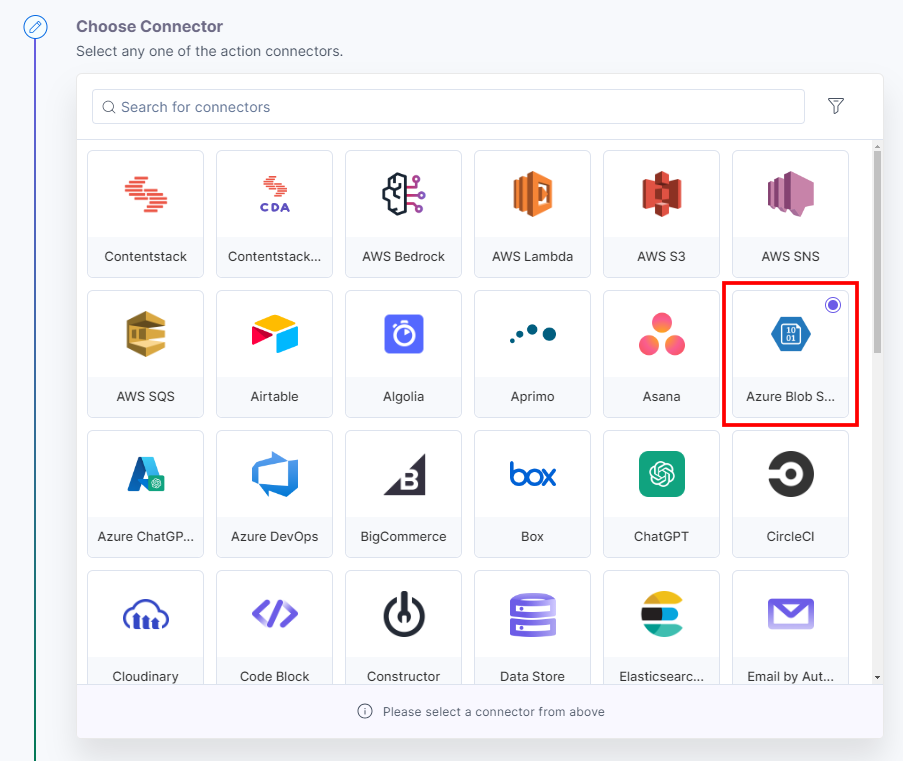
- Under Choose an Action tab, select Create or Upload a Blob action.

- Click the + Add New Account button to add your Azure Blob Storage account.
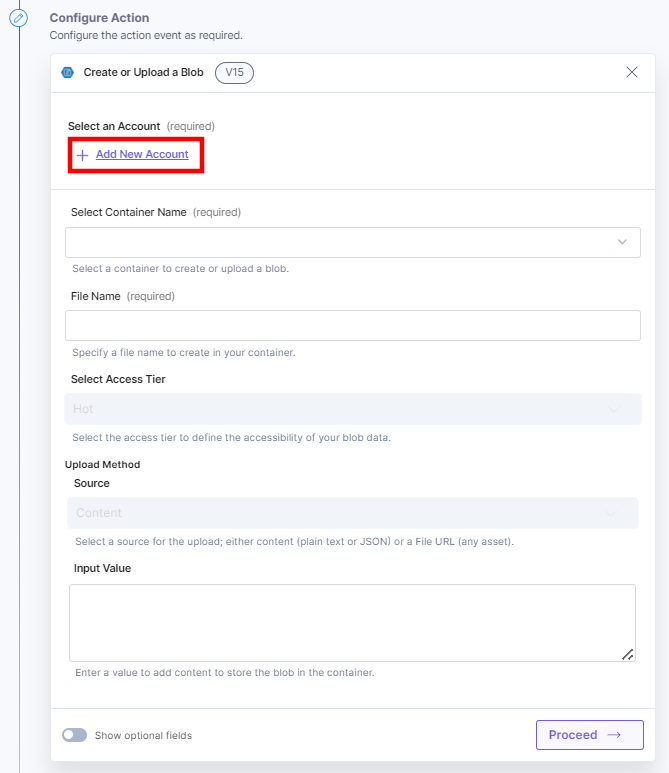
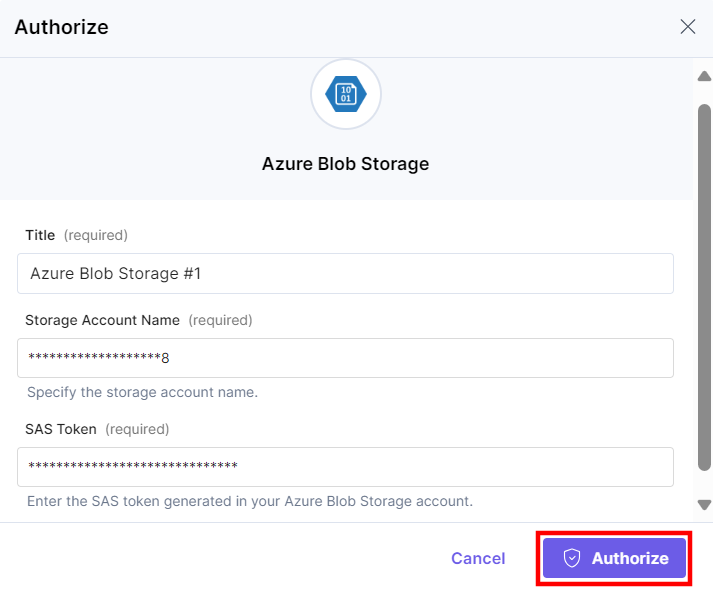
- In the Authorize modal, enter a Title. Enter the Storage Account Name and SAS Token retrieved in the Prerequisite step from your Azure Blob Storage account. Click the Authorize button.
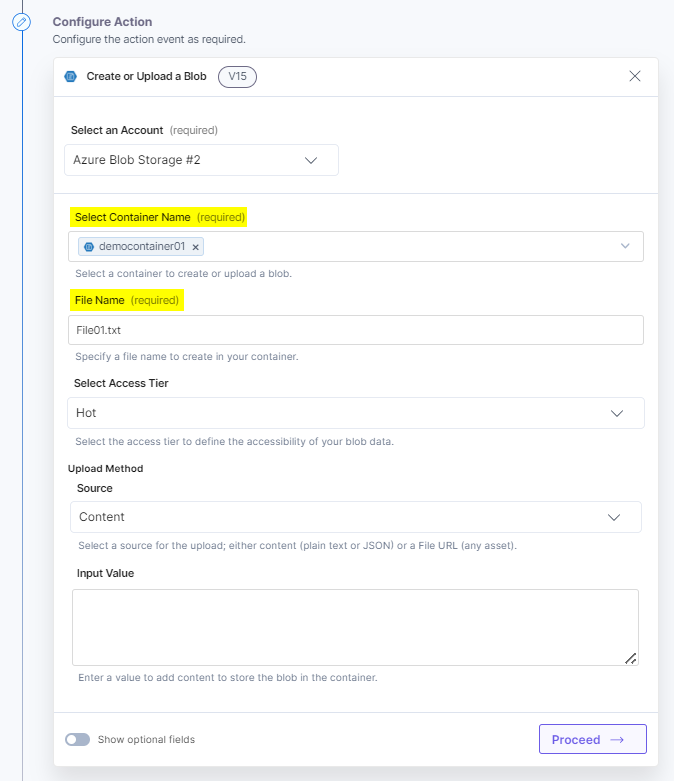
- Select a Container Name from the Lookup list that appears when you click the textbox.
The lookup drop-down loads all the containers that are already defined in your Azure Blob Storage account. - Enter a File Name (for example, File01.txt) to create or upload a blob in your container.
- Select the Access Tier, i.e., Hot, Cold, Cool, and Archive to define the accessibility of your blob data. Let’s take a look at each of them:
- Hot Tier: A tier designed for frequently accessed or modified data online.
- Cool Tier: An online tier tailored for storing rarely accessed or modified data. Data in the Cool tier must be retained for at least 30 days.
- Cold Tier: An online tier designed for infrequently accessed or modified data, yet demands swift retrieval. Data in the Cold tier must be retained for a minimum of 90 days.
- Archive Tier: A storage tier for rarely accessed data with flexible timing needs, usually within hours. Data in the Archive tier must be retained for at least 180 days.
Additional Resources: For more information, refer to the Access tiers for blob data documentation.
- In the Source drop-down, select a Source for the upload (Content or File URL) and provide the Input Value or Input URL for each source.
Note: For the Source type Content and File URL, you must create files with an extension, such as .txt or .jpeg. If the appropriate extensions are not provided, the file will be encoded into a format different from its original one. Consequently, this will result in storing a wrongly encoded file in the storage container.
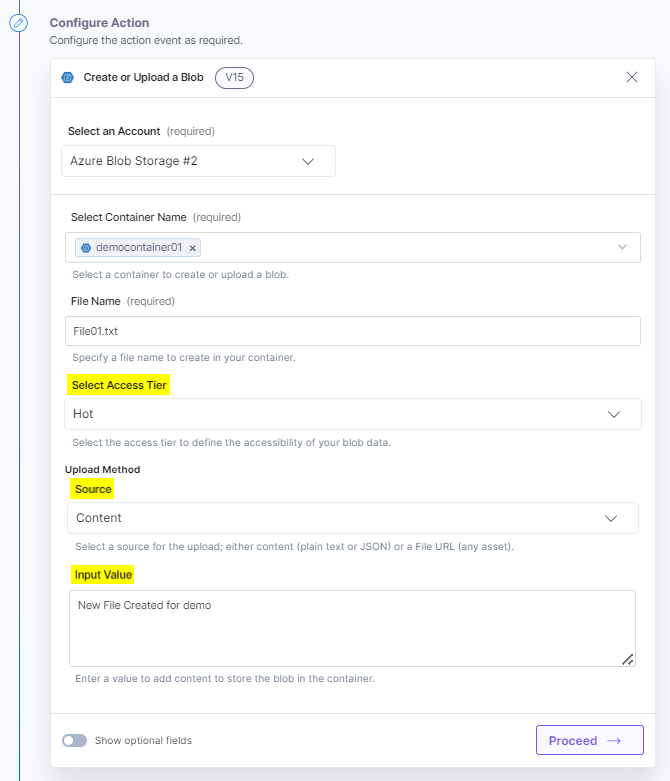
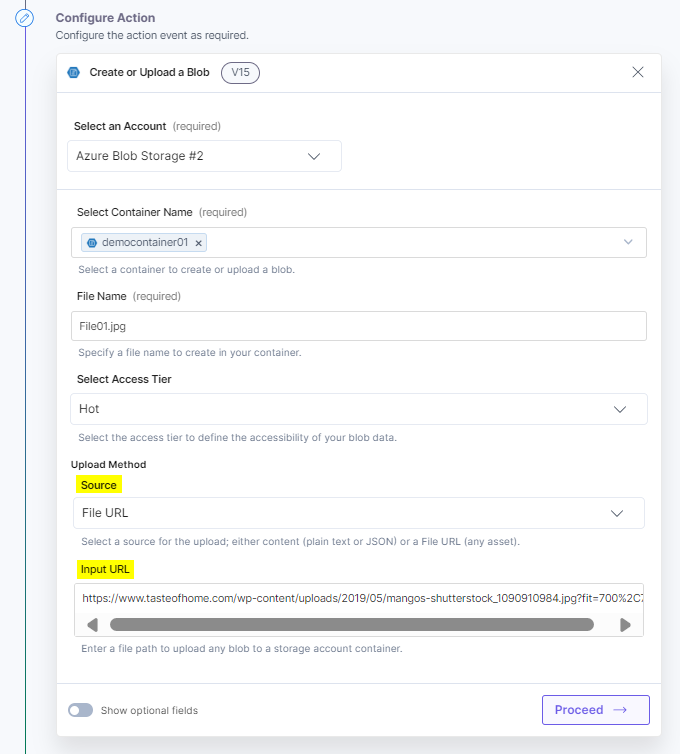
- Click the Show optional fields toggle button to enter the data for the Blob Tags and Metadata optional fields.
Blob tags and metadata offer extra details about a blob. Tags help in blob categorization or organization, while metadata offers specific information like creation date, author, or other attributes.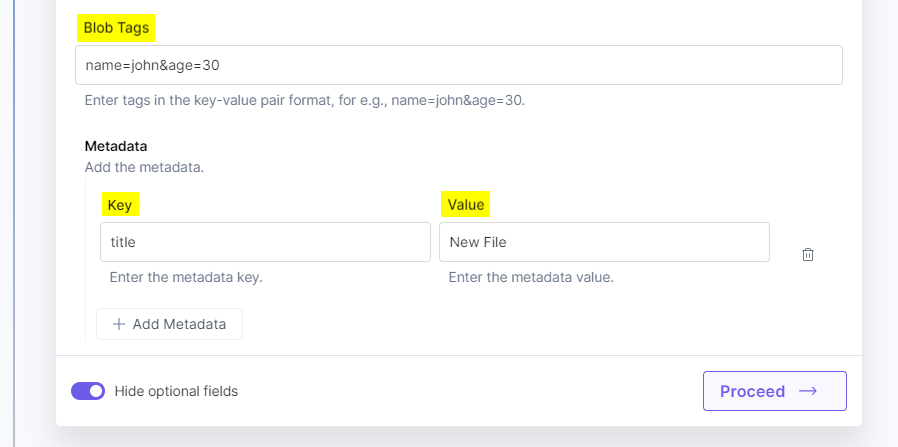
- Click Proceed.
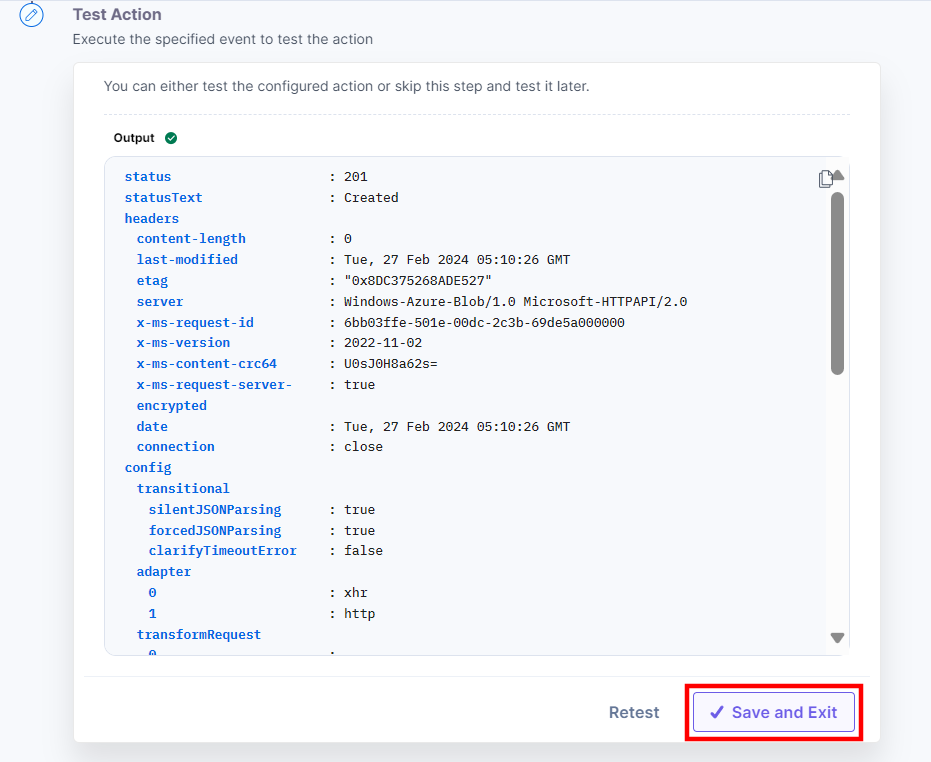
- Check if the details are correct. If yes, click Test Action.

- Once set, click Save and Exit.
- To check all the files created or uploaded in the container, log into your Azure Blob Storage account.

This sets the Azure Blob Storage connector.


.svg?format=pjpg&auto=webp)
.svg?format=pjpg&auto=webp)
.png?format=pjpg&auto=webp)


.png?format=pjpg&auto=webp)